There’s something profoundly grounding about a breakfast that smells like sizzling bacon and starchy potatoes, isn’t there? It’s the kind of honest cooking that carries you through a long day, whether you’re heading out to the fields or just bracing for a busy workday. Back home in Texas, our breakfasts were sturdy—meant to anchor the morning. That tradition of simple, satisfying food is exactly what I tried to capture in this Gluten-Free Hash Brown Breakfast Skillet. Forget fussiness; this is a savory, one-pan meal designed with real life in mind.
When you’re looking for a genuinely filling start that won’t leave you reaching for something heavy later, skillet meals are the answer. Since moving away from gluten, I’ve realized that the best meals—the ones that stick around—are those rooted in natural, whole ingredients. This skillet uses humble potatoes and eggs, turning them into something special without any complicated steps or binders. As a food historian, I always look for that delicious common thread in our everyday meals, and this hash brown skillet is definitely a staple that endures.
We are delivering a truly satisfying experience here. You’ll get crispy edges on your potatoes, runny or set yolks depending on what you love, and zero clean-up drama besides that one great cast iron pan. If you love classic comfort food made with care, I think you’ll find this recipe works perfectly, just as it has for countless families before us. You can find more of my favorite morning recipes over at our breakfast archives.
Why This Gluten-Free Hash Brown Breakfast Skillet Endures
It’s funny how the simplest meals stick with us the longest. This isn’t some fancy brunch dish; it’s pure, hearty fuel built on tradition. The fact that it fits neatly into a whole host of dietary needs without sacrificing flavor is why I keep making it. It’s proven itself to be a reliable favorite.
Here’s what makes the Gluten-Free Hash Brown Breakfast Skillet such a keeper, even decades after variations of this dish have served families:
- It’s genuinely quick—we’re talking under 45 minutes total, which is a win on any busy morning.
- Cleanup is a dream! Everything happens right in that one skillet, meaning less scrubbing later.
- It hits that perfect savory, comforting spot we all crave when the day starts early.
- It’s inherently satisfying; the crusty potatoes and rich eggs keep you full for hours.
When you need a robust, no-fuss, gluten-free morning anchor, this skillet is what you reach for.
Essential Components for Your Gluten-Free Hash Brown Breakfast Skillet
You know, the beauty of a traditional skillet meal is that you don’t need a mile-long ingredient list. It’s about maximizing what you have. For this specific Gluten-Free Hash Brown Breakfast Skillet, everything is chosen intentionally to maximize flavor and texture. I’ve organized the list just as I break it down in my head when I’m pulling things out of the pantry.
Potatoes and Base Ingredients
The potatoes are the star, so spend a little time here. You’ll want exactly two medium potatoes. I usually grab Russet because they have that classic starchy fluffiness inside when cooked, but Yukon Golds work beautifully if you prefer a slightly creamier texture. Don’t forget, you can always swap these out for sweet potatoes if you’re feeling a little different later on, but for the classic experience, stick to those two options.
Meat and Dairy for the Gluten-Free Hash Brown Breakfast Skillet
We’re starting this whole flavor profile with bacon—you need three good strips, rendered perfectly. That grease is cooking liquid gold! For cheese, I rely on smoked gouda, maybe 1/3 cup shredded. The smokiness really elevates the potatoes, but if you’re dealing with dairy sensitivities, no worries; just skip it for the moment, and we can look at dairy-free swaps later on, especially if you’re thinking about versatile breakfast options.
Vegetables and Seasoning
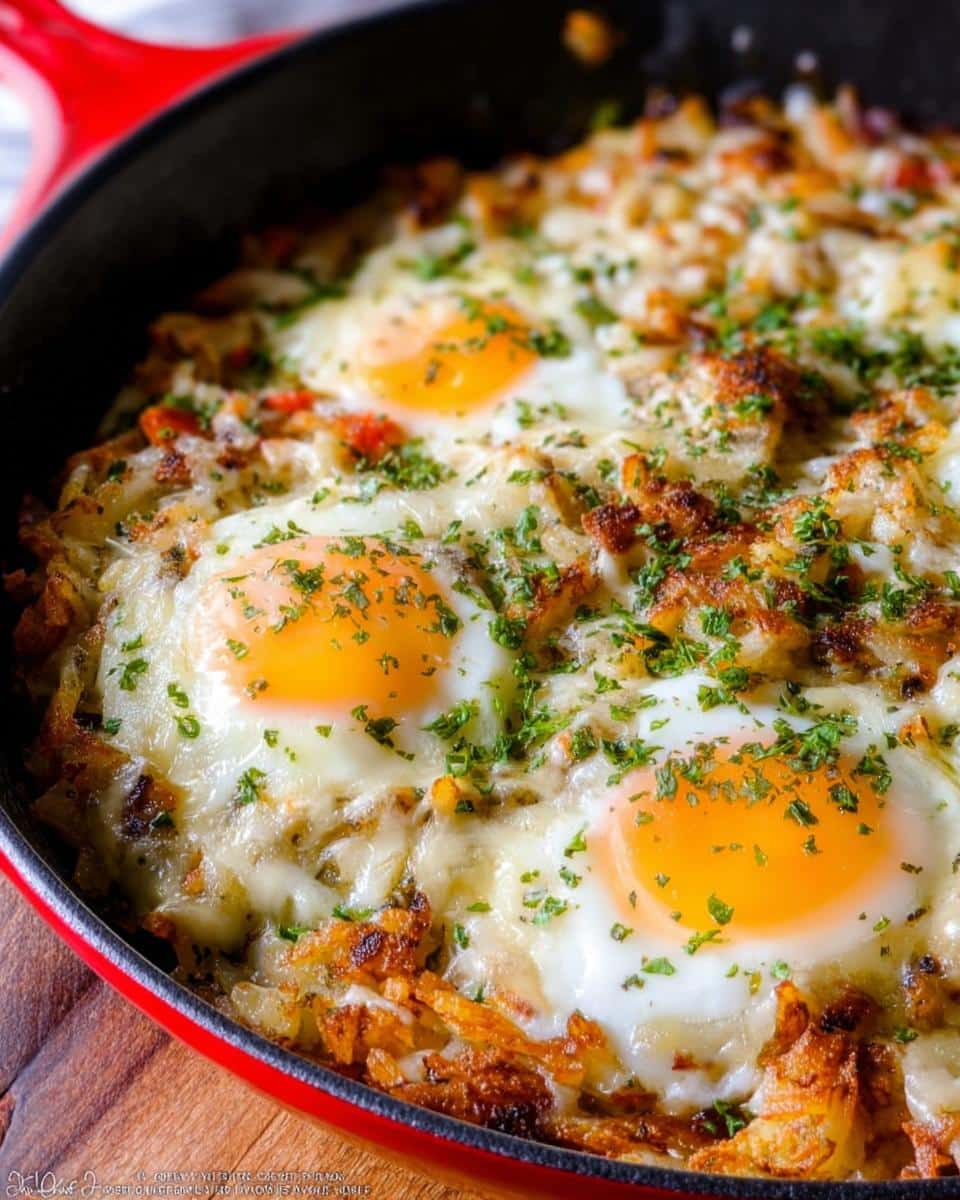
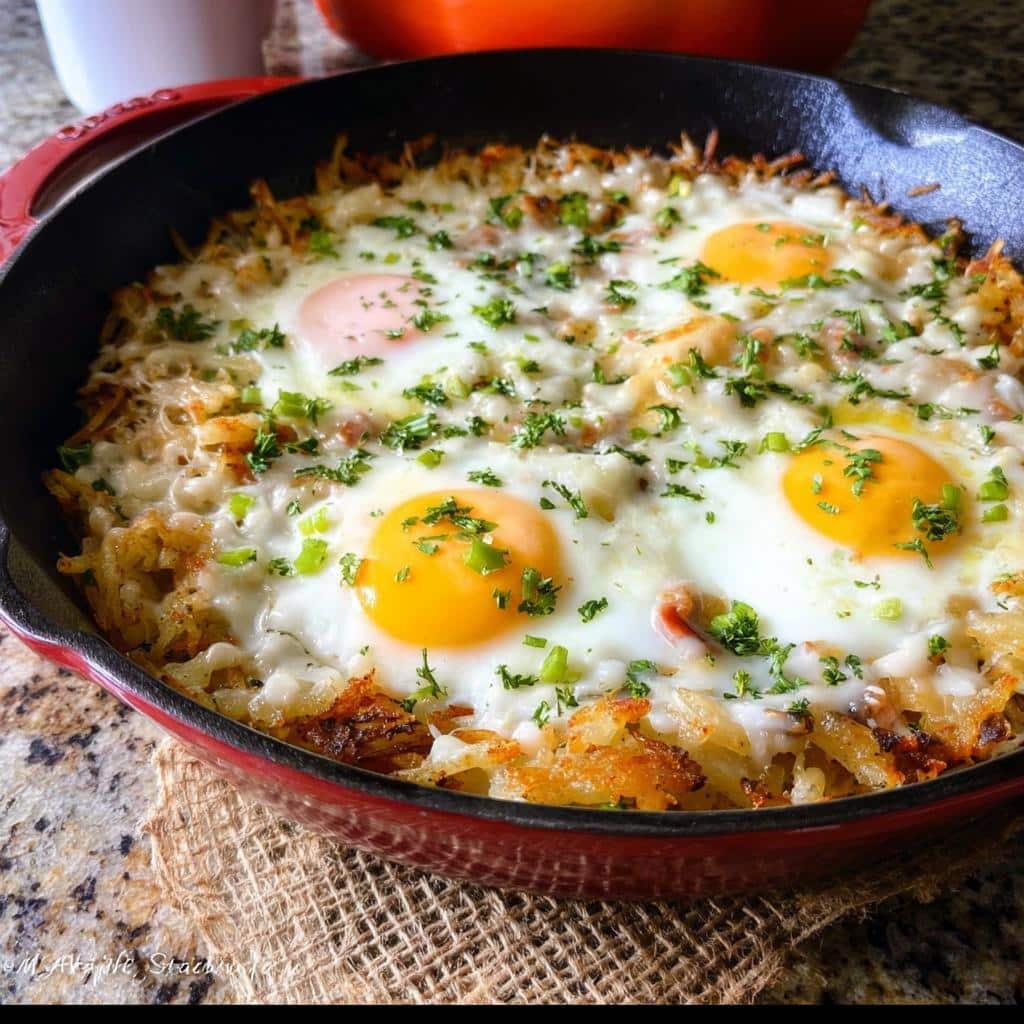
We toss in texture and color with one large bell pepper. I usually grab half red and half green, just to make it look sharp in the pan. Seasoning is straightforward: we’re keeping it classic with 1/4 teaspoon of salt and 1/4 teaspoon of ground black pepper. And of course, we finish the top with four large eggs nestled right in there. If you have some fresh or dried parsley lying around, a sprinkle over the top at the end brightens everything up nicely!
Equipment Needed for the Gluten-Free Hash Brown Breakfast Skillet
You can’t build a house without the right hammer, and you can’t make crispy hash browns without the right pan. Thankfully, the tool list for this Gluten-Free Hash Brown Breakfast Skillet is pretty darn short, which is exactly how I like it. We are focusing on function here, not gadget collecting!
The first thing you’ll absolutely need, unless you’re feeling ambitious enough for hand-whittling your potatoes, is a reliable box grater. This is crucial for getting those uniform potato shreds needed for that perfect crisp texture. Don’t use the super-fine holes either—we want substance, not puree.
Next up is the main player: your 10 to 12-inch skillet. Size really matters here, trust me. If your pan is too small, you end up piling the potatoes too high. When they pile up, the steam gets trapped underneath, and instead of getting that beautiful, golden-brown crust we are aiming for, you end up stewing them. A wider surface area lets the heat do its job uniformly, giving every shredded piece a chance to kiss the hot grease and get crispy. Cast iron is my preference because it holds heat so well, but any heavy-bottomed skillet that can go from stovetop right into the oven will work like a charm.
Step-by-Step Instructions for a Perfect Gluten-Free Hash Brown Breakfast Skillet
Now we get down to the real action! To make sure these hash browns crisp up instead of steaming into mush, preparation is everything. Remember, most of the success in this Gluten-Free Hash Brown Breakfast Skillet comes before it even sees the heat. Don’t rush these first few steps; they are non-negotiable for that golden crust!
Preparing the Potatoes for Maximum Crispness
First things first: shred those potatoes. You’re using the box grater for this, remember? Once they are shredded, wash them under cold water—this gets rid of some of the surface starch, which helps prevent sticking later on. Now comes the crucial part, the step everyone tries to skip: drying them out!
Place those wet shreds onto several layers of paper towels. You need to press down hard—I mean *really* press—to push out all that water. Keep replacing the towels until they aren’t immediately soaking through. If you’re feeling extra diligent, you can actually microwave the shredded potatoes in a bowl lined with a couple of fresh paper towels for about two minutes on high. That super-heats the moisture, making it easier to squeeze out. Whatever you do, make sure they are as bone-dry as possible before they meet the bacon grease.
Bacon Rendering and Setting Up the Skillet Base
We use what we’ve got, and that grease from the bacon is going to flavor everything. Take your 10–12 inch skillet, and lay those three strips of bacon right into the *cold* pan. Turn the heat onto low. This slow introduction to heat renders the fat perfectly, making the bacon crisp without burning the meat itself. Once they are almost crispy—I like mine snappy but not totally brittle—pull them out onto a paper towel-lined plate. Chop them up once they’re cool enough to handle.
Now, turn your attention to the oven! Preheat it to 400°F (204°C). This needs to be hot and ready before the eggs hit the pan later.
Cooking the Hash Browns in the Skillet
Get that stove heat up to medium. You should see the bacon grease shimmering slightly when it’s ready. Dump your dried, shredded potatoes right into the pan. Mix them around quickly with your spatula so they aren’t clumped up, and then—this is key for that crust!—stop stirring. Let them sit undisturbed for about 3 minutes so they can set a solid layer on the bottom of the skillet. Add your chopped bell pepper, salt, and pepper. Stir just once or twice, then flatten that hash potato mixture back down with the back of your spoon. Let that layer cook, undisturbed, for another 3 minutes. Stir it again, making sure things are browning nicely, and cook for 2 more minutes until you see those beautiful golden-brown edges popping up everywhere. Finally, toss in your chopped bacon and mix it all together for a final two minutes.
Finishing the Gluten-Free Hash Brown Breakfast Skillet with Eggs
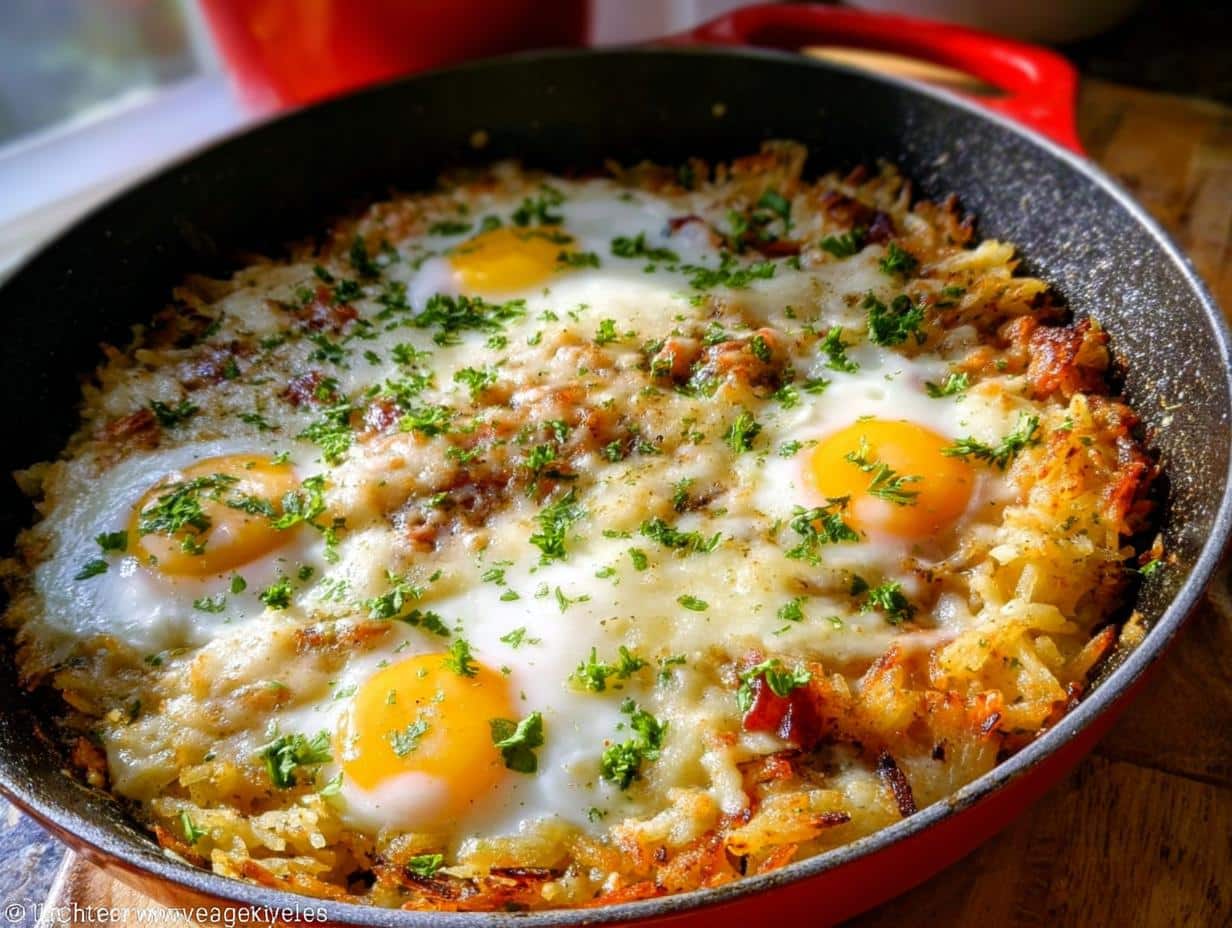
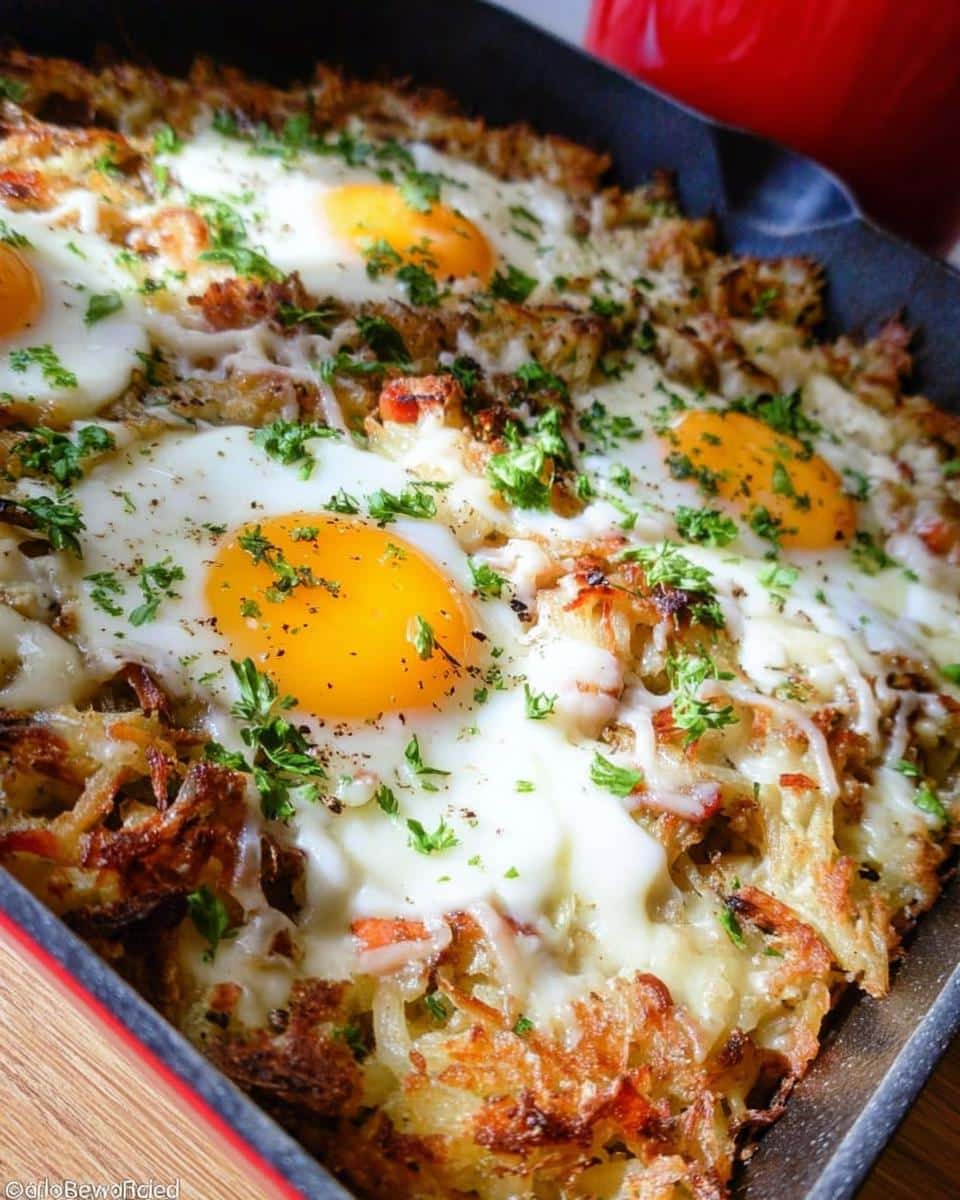
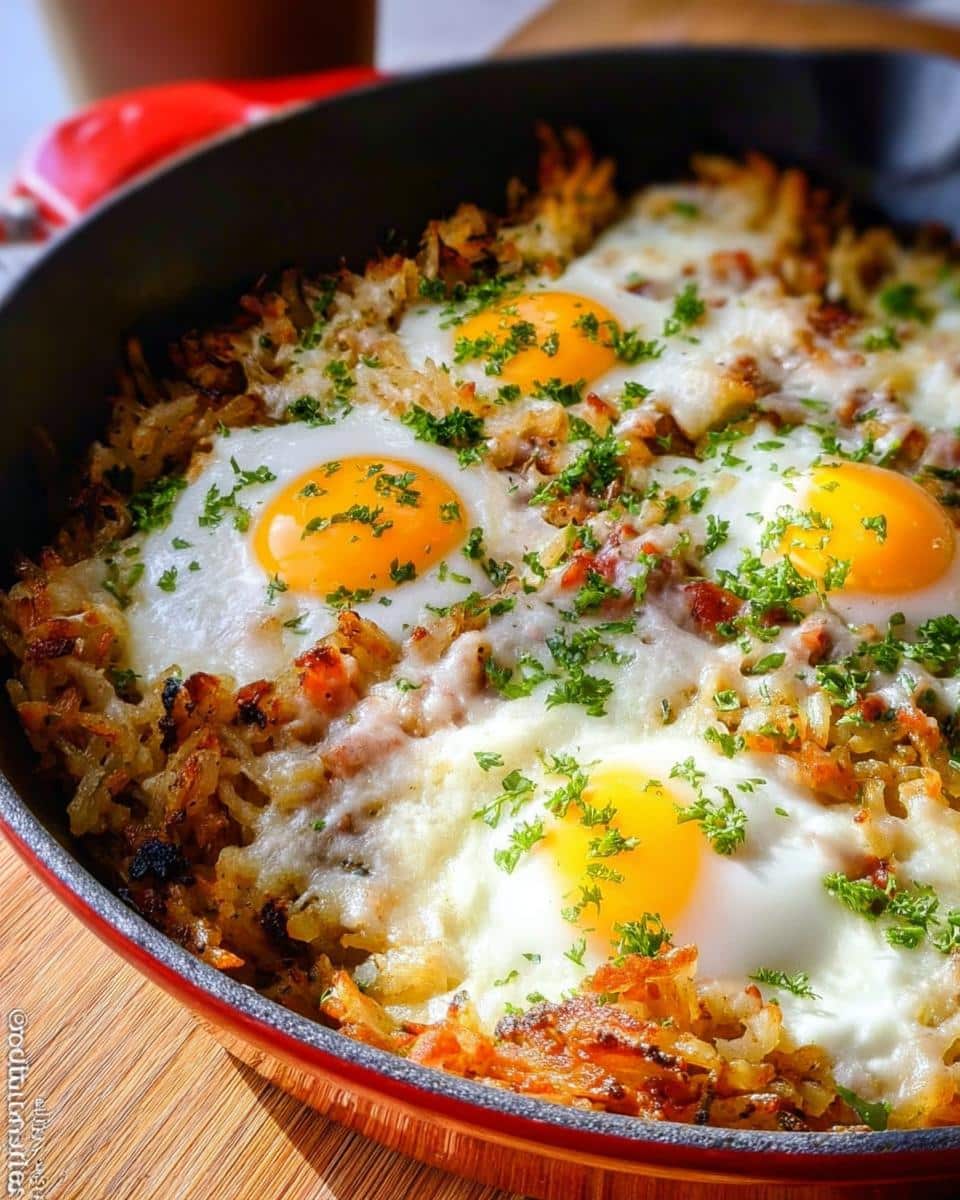
Once the base of the Gluten-Free Hash Brown Breakfast Skillet looks perfectly browned, take the skillet off the direct heat. Use the back of a spoon or your spatula to gently press down on the hash, creating four shallow wells or indentations—these are tailor-made for our eggs. Gently crack one egg into each little nest you’ve made. Top everything, eggs and potatoes alike, with that shredded smoked gouda cheese.
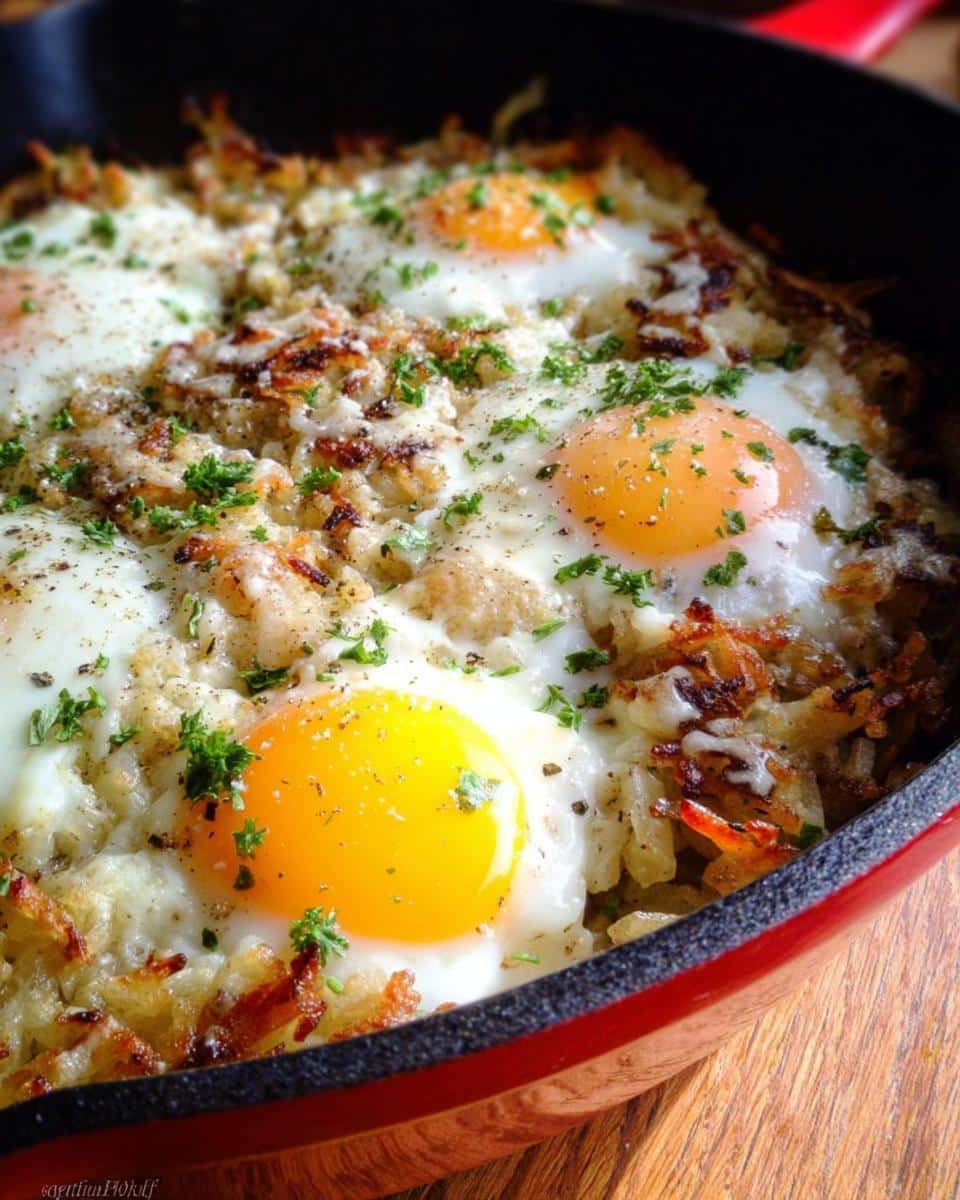
Carefully transfer the entire skillet into that preheated 400°F oven. You’ll bake this for about 8 to 10 minutes. We’re looking for the egg whites to be completely set, but the yolks should still be exactly how you like them—runny or firm! When it comes out, sprinkle on your fresh parsley if you’re using it, give the whole thing a final fresh grind of pepper, and serve it straight from the pan! Seriously, eat it right out of the skillet for the best experience.
Tips for Success When Making Your Gluten-Free Hash Brown Breakfast Skillet
I know I sound like a broken record, but I have to stress this one more time before we talk about leftovers: those potatoes MUST be dry. If you skip the paper towel pressing or the quick microwave zap, you’re just inviting steam into your pan. This is the single biggest difference between a crispy hash and a soggy mess, and it’s essential when we are aiming for satisfying Gluten Free Meals like this one.
Another thing I learned the hard way is about heat management when browning. You want that initial 3-minute no-touch cook for the hash browns to really set a crust. If you can’t resist stirring every 30 seconds, you’re just tossing the potatoes around before they have time to bond with the hot pan surface. Be patient in that first stage—it guarantees that earthy, browned flavor that makes hash browns so good.
When you’re making indentations for the eggs, be deliberate but gentle. You want the egg white to sit *in* the hash, not on top of a huge fluffy mound. If the indentations are too shallow, the whites will run right over the side and cook into a thin, weird layer around the edge of the skillet. Deep enough to cradle the egg prevents that.
Finally, watch those eggs in the oven like a hawk. Ten minutes can turn a barely-set egg into a fully cooked one, and the yolk texture changes dramatically. Set your timer for 8 minutes, check them, and then give them another minute or two if you need firmer yolks. They need to match that rustic, savory vibe of the rest of the skillet!
Ingredient Notes and Substitutions for This Glutenfree Recipe
Since this wonderful Glutenfree Recipe starts with naturally gluten-free staples like potatoes and eggs, we rarely have to worry about sneaky flours or binders sneaking in. That’s a huge relief for anyone cooking in a mixed household! However, substitutions still come up, mostly around the dairy department, or just because of what we happen to have on hand.
Let’s talk about those potatoes first, just to reiterate. If you are using Russets, you get that slightly drier, fluffier center that browns up beautifully. Yukon Golds are a bit moister and creamier when cooked—honestly, you can’t go wrong either way, but the texture profile shifts just a smidge. If you happen to grab sweet potatoes instead, it changes the whole flavor profile, turning it sweeter, but it still cooks up great in the pan.
Now for the cheese, because sometimes we need to make this a clean sweep. That smoked gouda adds such a nice layer of smoky depth, but if you need to skip it, the hash browns are still fantastic with just the bacon grease and seasonings. If you’re looking to lean towards something like easy lunch ideas later in the day or have a dairy issue, you can easily swap that gouda for a sharp dairy-free cheddar substitute. Just make sure the dairy-free version melts well, or you might need to add it right at the very end when the skillet comes out of the oven, letting the residual heat melt it slowly.
And one more quick thought on seasoning: if you don’t have bacon, don’t panic! You can use a few tablespoons of olive oil or even turkey bacon, though you lose that beautiful rendered fat for cooking the hash browns. If you use oil, you’ll have to rely on the butter added later for richer flavor, but it works just fine for making terrific Gluten Free Lunch Ideas!
Storage and Reheating Instructions for Leftover Gluten-Free Hash Brown Breakfast Skillet
I know that making a whole skillet of this wonderful Gluten-Free Hash Brown Breakfast Skillet sometimes results in leftovers, and that’s a good thing! Surviving on savory hash browns the next day is a treat. The key to storing them successfully is making sure you deal with the eggs separately if possible, or at least managing expectations for texture.
If you have leftovers, don’t worry a bit about them sticking around for a day or two. You want to cool the entire skillet down quickly after you finish eating. Once it’s completely cool, scoop out whatever remains into an airtight container. I usually try to scrape off the egg portions and pack those separately from the hash browned potatoes, but honestly, if you just put the whole thing in, it’s fine for a couple of days in the refrigerator. This makes tomorrow morning’s clean-up even easier!
Oven Reheating for Maximum Crispness
If you want to recapture that original glory, the oven is your best friend. Ditch the microwave here; the microwave just steams those glorious crispy edges right back into sogginess. Instead, spread the cooled hash browns out over a baking sheet lined with parchment paper. If you have eggs mixed in, you can reheat the whole thing together, but know the eggs will get rubbery.
Pop that tray into a 350°F oven for about 10 to 12 minutes. The goal here is to dry out any moisture that crept in during refrigeration and bring that crispness back to life. If you reheat the hash mixture separately, you can add a teaspoon of oil or butter to the pan first, and crisp it up on the stovetop instead.
Quick Stovetop Method
If you’re in a rush and just need a portion, the stovetop works faster than waiting for the oven to preheat. Use a small non-stick pan—not the big skillet—and add just a whisper of oil or butter. Heat it over medium heat until it shimmers, then add your portion of hash. Press it down gently with a spatula to encourage contact with the pan, just like we did when we first cooked it. Cook it for maybe 4 or 5 minutes per side until it’s hot all the way through and you hear that familiar sizzle again. These leftovers make fantastic additions to salads or even quick gluten free snacks!
Frequently Asked Questions About This Easy Gluten Free Dinner Option
It’s always smart to have questions before you start cooking, especially when you’re relying on one pan to do all the heavy lifting. I get asked the same things about this skillet all the time, so let’s clear up any lingering doubts so your morning goes smoothly. Even though this is primarily a breakfast dish, it’s so robust, it can certainly stretch into delicious Gluten Free Dinner Ideas later in the week!
Can I make this Gluten-Free Hash Brown Breakfast Skillet ahead of time?
You absolutely can prep components ahead of time, which is a lifesaver on busy mornings! You should shred those potatoes and squeeze them bone-dry up to 24 hours in advance; keep them sealed tightly in the fridge. Cooking that bacon ahead is also fine; just store the bacon pieces and save the grease (or discard it if you prefer using oil in the morning). Where you can’t cheat is the assembly. You need that hot skillet, the freshly browned hash, and the eggs freshly nestled in for the best result. Don’t try to bake the eggs ahead of time, or they turn awfully spongy!
Are there ways to make this recipe closer to Carb Free Recipes?
That is a great question if you’re working on balancing macros! Since the potatoes are the main carb source here, the easiest way to pivot towards Carb Free Recipes is to swap out the potatoes entirely. You can use shredded cauliflower or even shredded rutabaga for a similar texture, though they cook much faster because they have higher water content. If you use cauliflower, you’ll want to skip the microwave step entirely and maybe only cook the shreds on the stovetop for about 6 minutes total before adding your bacon/peppers. It completely changes the flavor, but it satisfies that need for a savory, crusty base!
Can this skillet be adapted for Gluten Free Lunch Ideas?
Oh yes, it’s perfect for lunch, honestly! It’s hearty enough to be a full meal. For Gluten Free Lunch Ideas, the best way to handle leftovers is reheating them gently in a pan with a touch of oil to refresh the crispiness, as I mentioned before. If you’re eating them cold (maybe packed in a lunch box), just crumble the cooled hash and serve it over a bed of fresh spinach with a dash of hot sauce. It works surprisingly well as a cold, savory topping for greens—think of it as a hearty potato salad base!
Share Your Experience with the Gluten-Free Hash Brown Breakfast Skillet
Well, there you have it! We’ve taken humble potatoes and built ourselves a hearty, savory, single-skillet feast that happens to be perfectly gluten-free. It’s comforting, it’s sturdy, and it tastes just like a classic breakfast should—because that’s what history tells us the best meals do: they endure.
I truly hope this Gluten-Free Hash Brown Breakfast Skillet finds its way into your routine when you need a meal that tastes like home. If you give this one a whirl, please come back and let me know how it turned out! Did your potatoes get perfectly crispy? Did you manage to keep those yolks runny? Head down to the comments below and drop a star rating so I know how it worked for you.
Sharing these family-rooted recipes is what I love most about my work. James Porter here—I’m a Food Writer and Culinary Historian at Top Chicken Eats. I spend my days digging into the stories behind simple, comforting food, and this skillet definitely earned its place in the archives. Your feedback helps me keep researching and sharing these timeless meals that nourish us all.
If you’re looking for even more straightforward, historically-conscious cooking, be sure to check out our site policies to see how we keep our recipes reliable, and feel free to poke around for more satisfying ideas!
Gluten-Free Hash Brown Breakfast Skillet
Ingredients
Equipment
Method
- Shred the potatoes using the largest holes of a box grater. Wash and scrub the potatoes. You can peel them or leave the peels on.
- Place the shredded potato in a large bowl lined with paper towels. Top with more paper towels and press down hard to absorb moisture. Squeeze out as much moisture as possible, replacing paper towels as needed.
- Transfer the shredded potatoes to a plate lined with two layers of paper towels. Cook in the microwave on high for 2 minutes. Set the potatoes aside.
- Place a 10 – 12 inch skillet on the stove. Lay the three strips of bacon in the cold pan. Turn the heat on low. Cook the bacon on both sides until it is almost crispy. Remove from heat, reserve the grease, and set the bacon on a paper towel-lined plate. Once slightly cool, chop the bacon.
- Preheat your oven to 400°F (204°C).
- Turn the stove heat up to medium. When the bacon grease begins to simmer, add the shredded potatoes. Mix them quickly with a wooden spoon or silicone spatula. Cook for about 2 minutes, without stirring. Add the chopped pepper, salt, and pepper. Stir once or twice, then flatten the mixture using the back of a spoon or spatula. Cook, without stirring, for 3 minutes. Stir, then cook for 2 more minutes until the potatoes are brown. Stir in the chopped bacon and cook for 2 minutes.
- Remove the skillet from the heat and flatten the hash top. Use the back of a spoon to make 4 shallow indentations in the hash. Crack one egg into each indentation. Top with shredded cheese.
- Transfer the skillet to the oven and bake until the egg whites set, about 8-10 minutes. Season with salt and pepper to taste and top with parsley. Serve immediately.