We all adore the simple comfort of quick banana bread, right? It’s the ultimate way to use up those sad, spotty bananas on the counter. But sometimes, you need that homey flavor profile to dress up for a party! That’s exactly why I developed this show-stopping Banana Layer Cake with Caramel Frosting. It takes everything you love about that moist banana loaf and elevates it into an elegant, three-layer masterpiece perfect for your next big celebration. As someone rooted deeply in soulful Southern cooking principles, I believe even the simplest flavors deserve a sophisticated presentation. You can read more about my cooking philosophy over at the About Me page. Trust me, this cake balances deep banana flavor with unbelievably rich caramel swirl, and it’s surprisingly achievable!
Why This Banana Layer Cake with Caramel Frosting is a Showstopper
When I set out to create this layered creation, I wanted something that said, “Special Occasion!” but still whispered, “I’m your favorite banana bread, just dressed up!” This Banana Layer Cake with Caramel Frosting does that perfectly. It bridges that gap between comfort baking and centerpiece dessert like nothing else I’ve ever made. It’s amazing how good the familiar, warm banana flavor tastes when stacked high!
Here’s the real deal on why this cake belongs on your next dessert table:
- Elegance Meets Comfort: You get all the moist, homey flavor you expect from banana bread but in a stunning, towering layer cake format. It feels both nostalgic and fancy at the same time.
- The Flavor Balance is Spot On: The sweetness of the cake is perfectly cut by the salty-sweet depth of the caramel swirled into that rich mascarpone frosting. It’s heavenly!
- Impressive Presentation: Three layers covered in that creamy frosting, cascading with caramel drips? It looks like it took days, but we both know it’s totally doable. If you’re looking for easy dessert recipes that look complicated, this is it!
Essential Ingredients for Your Banana Layer Cake with Caramel Frosting
Okay, let’s talk supplies! For a cake that tastes this luxurious, you need to pay attention to your starting lineup. Honestly, the success of this Banana Layer Cake with Caramel Frosting hinges on the right ingredients, especially the bananas. You absolutely need those bananas that are brown and mushy—the riper, the better for that deep flavor we want. If you’re ever unsure what to do with them, thinking about all those ripe banana recipes, this cake is the answer!
We keep the ingredients fairly classic, but the quality matters for that layered texture we’re aiming for. Remember, for the frosting, temperature control is key—some things need to be perfectly soft, and others need to be bracingly cold!
Cake Components
For the cake itself, we are mixing dry goods, softened fats, and flavor liquids. Remember, the bananas need to be totally mashed or even liquidised if you want an ultra-smooth crumb:
- 350g All purpose flour
- 330g Sugar
- 1 tbsp Baking powder
- 0.5 tbsp Bicarbonate of soda
- 200g Unsalted butter or margarine softened (Margarine works if you need a swap!)
- 3 Large eggs
- 2 Ripe bananas mashed well or liquidised
- 2 tbsp Milk
- 0.5 tbsp Vanilla paste or extract
- A few drops Banana extract (optional, just for an extra punch!)
Caramel Mascarpone Frosting Ingredients
This frosting is rich, so we use a proper dairy base. The mascarpone should be slightly softened, but pay close attention to the cream; it *must* be COLD for whipping!
- 200g Icing sugar (powdered sugar)
- 450g Full fat mascarpone cheese
- 120ml COLD double cream (heavy cream) – use more if needed!
- 3-4 tbsp Caramel sauce (plus extra for drizzling later)
- 0.5 tbsp Vanilla paste or extract
Decoration Items
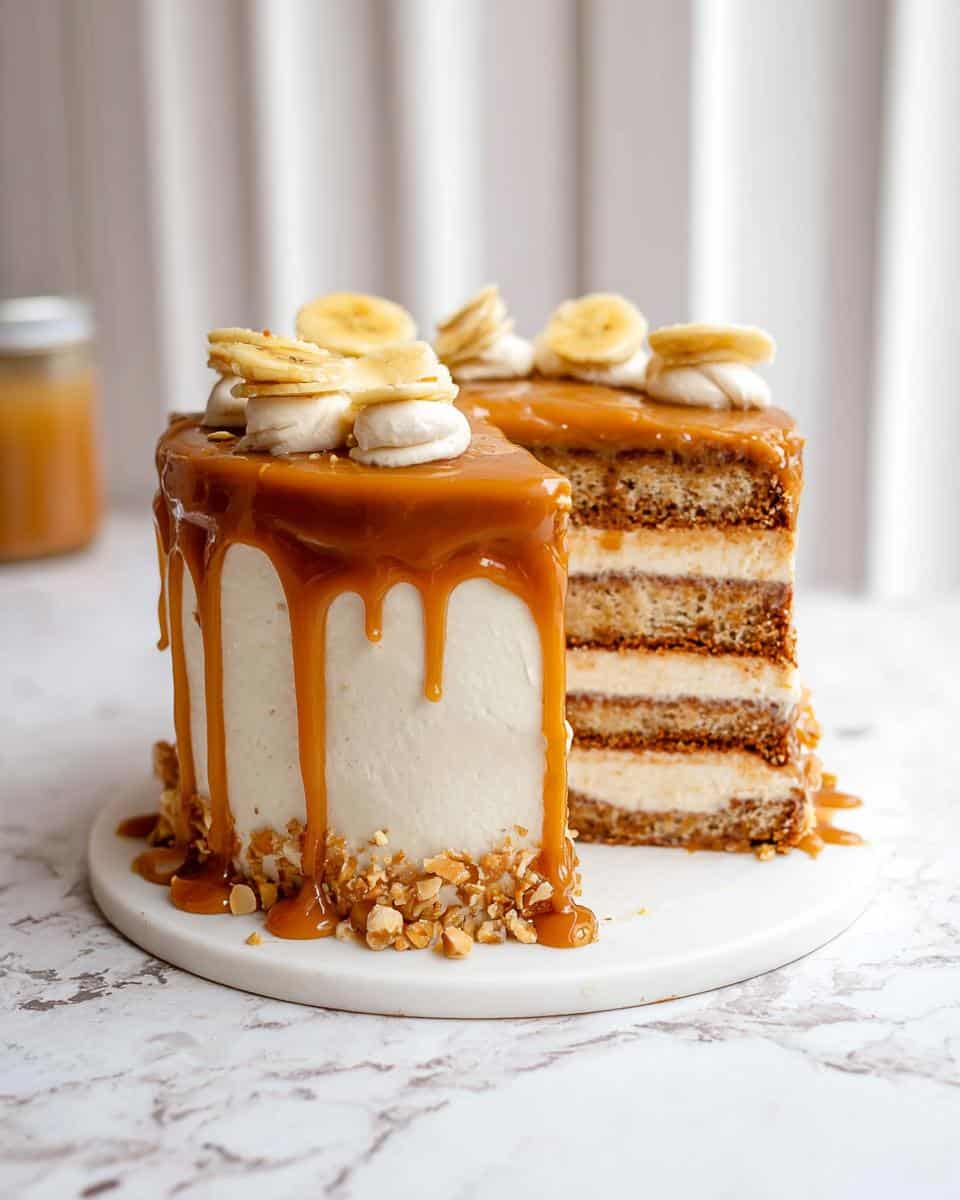
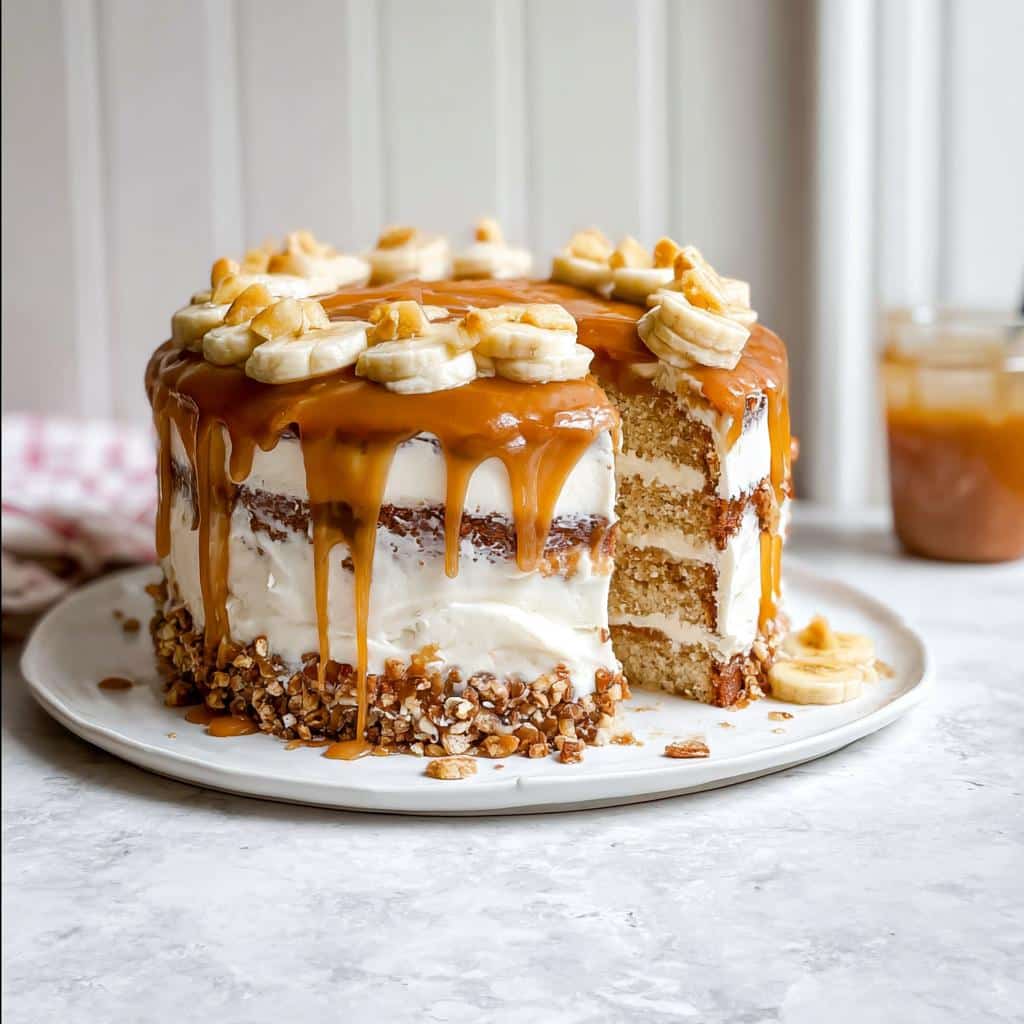
This is where we make it look like a masterpiece! Don’t skip the drizzle; it really sets off the caramel flavor.
- As needed Extra caramel sauce to drizzle
- As needed Caramel fudge pieces
- As needed Banana chips
- As needed Fresh sliced banana
Equipment Needed for the Banana Layer Cake with Caramel Frosting
Before we even think about mixing, we need our tools lined up. Setting up your stations properly is half the battle when you’re making a three-layer cake. It stops that frantic searching midway through creaming the butter, and trust me, we don’t want any scrambling when it comes to making this Banana Layer Cake with Caramel Frosting!
Have these items ready to go. This list ensures you’re completely prepared for the baking and that gloriously messy frosting session:
- Three 20cm (8 in) cake tins. Lining these perfectly is crucial for clean release!
- An electric hand mixer or stand mixer. While you can technically do some steps by hand, for a layer cake this rich, the mixer saves your arm and ensures proper creaming.
- A large mixing bowl—you need room to incorporate all that banana goodness!
- A sturdy spatula. You’ll be using this constantly to scrape down the sides of your bowl when mixing the batter and smoothing the frosting.
- A cooling rack. Essential for letting those layers cool evenly so they don’t steam and get soggy on the bottom.
Step-by-Step Instructions for the Banana Layer Cake with Caramel Frosting
Now for the fun part—putting it all together! Remember what my notes said about using room temperature ingredients for the cake? That helps make this ‘all in one method’ work beautifully, giving you a perfect crumb without a fuss. We need to move efficiently but without rushing the machine, especially when it comes to that luscious frosting. Get your equipment ready, preheat that oven, and let’s start building this incredible Banana Layer Cake with Caramel Frosting! If you’re juggling baking with little ones, remember that this method is great because baking together is always a joy, even if it gets a little messy!
Preparing the Cake Tins and Oven
First things first: get that oven hot! Preheat your oven to 180C (350F). Take your three 20cm (8 in) cake tins. You absolutely must prepare these well—I find these high-moisture cakes love to stick! Spray them lightly with cake release spray or just grease them thoroughly with softened butter, then dust them with flour. Give them a good shake to get rid of the excess flour. Finally, cut circles of baking paper to line the very bottom of each tin. This triple layer of protection means your cake layers come out looking pristine!
Mixing the Banana Layer Cake Batter
In your large mixing bowl, put the flour, sugar, baking powder, and bicarbonate of soda together first. Give those dry things a quick whisk to combine them. Next, add in your softened butter, the eggs, the milk, your mashed bananas—remember, nice and mushy!—and the vanilla. Start your mixer on the absolute lowest speed just until everything starts looking incorporated. Seriously, start low or you’ll have a flour cloud! Once they are just combined, bump that speed up to medium and beat it until you have a smooth, uniform batter. Don’t forget to stop the mixer every minute or so and use your spatula to scrape down the sides and the bottom thoroughly. We want everything mixed evenly!
Baking and Cooling the Layers
Divide that beautiful batter evenly among your three prepared tins and use your spatula to make the tops as level as you can. Pop them into the hot oven. They will need about 25 to 28 minutes to bake. You’ll know they’re done when they spring back nicely when you gently touch the top, or when a skewer inserted right into the center comes out perfectly clean. Let the cakes chill out in their pans for just about 5 to 10 minutes—no longer! Then, carefully tip them out onto your cooling rack and let them cool completely. If you try to frost them warm, the frosting will just melt into a puddle, and trust me, you want that beautiful frosting intact!
Creating the Caramel Mascarpone Frosting
While those layers are cooling, we tackle the star of the show: the frosting! Put the icing sugar, mascarpone cheese, COLD double cream, and vanilla into your mixer bowl. Start beating on a very low speed to slowly incorporate everything. Once it starts holding together, increase the speed to medium. Now, slowly drizzle in your caramel sauce, one spoonful at a time. Keep beating until it holds nice, soft peaks. If you notice it seems a little too stiff for spreading, just add a tiny splash more of that COLD cream, but stop mixing as soon as it’s spreadable. Overmixing mascarpone frosting can make it grainy—we want it silky smooth!
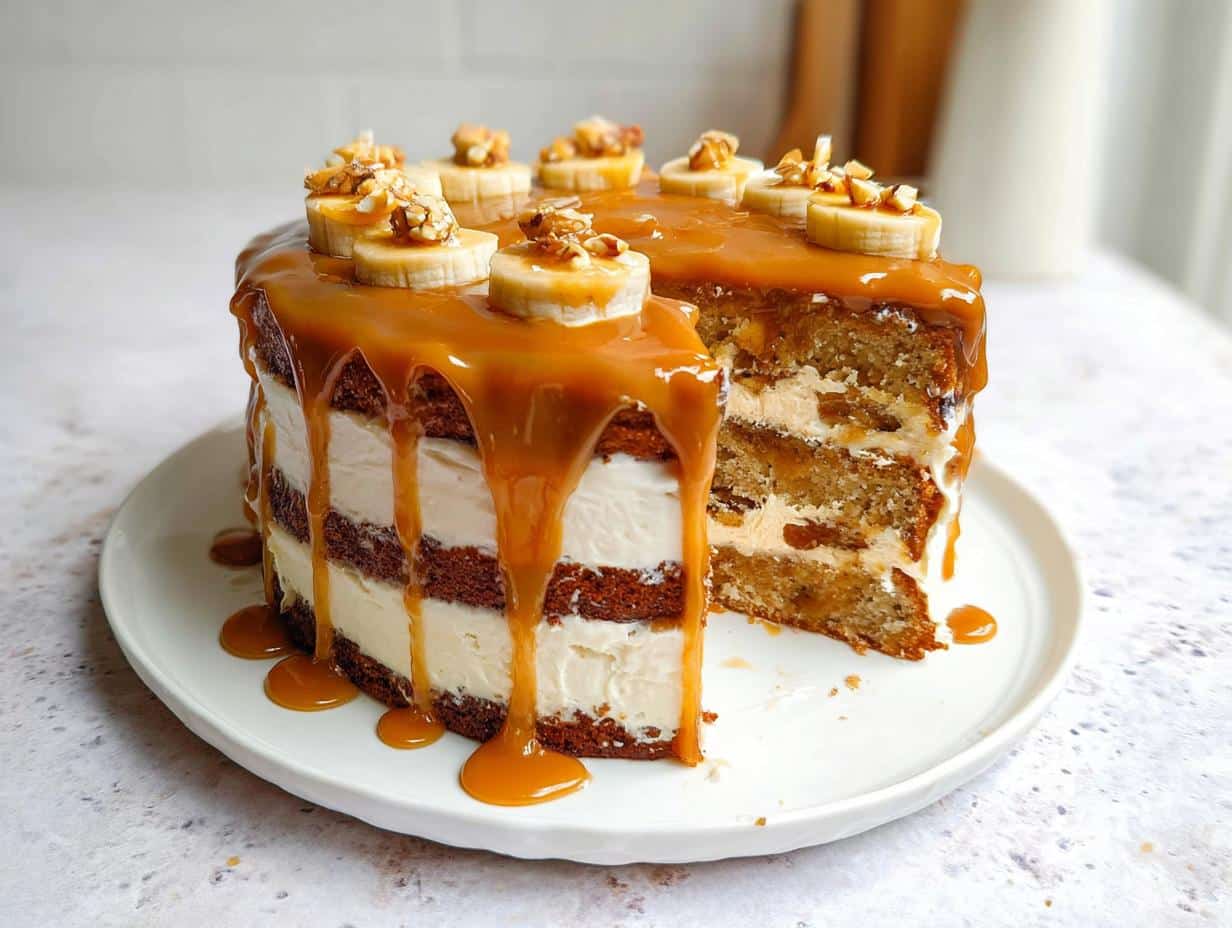
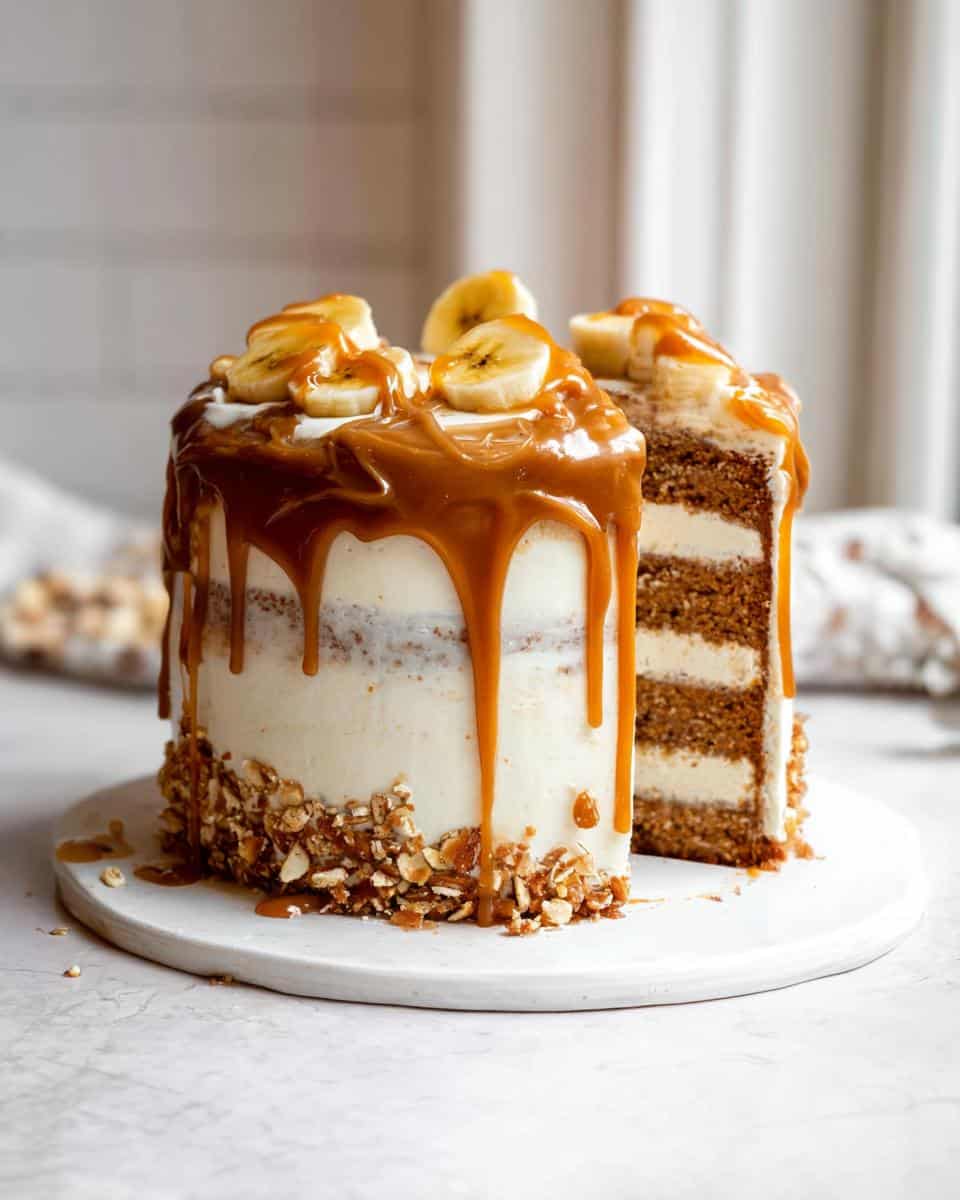
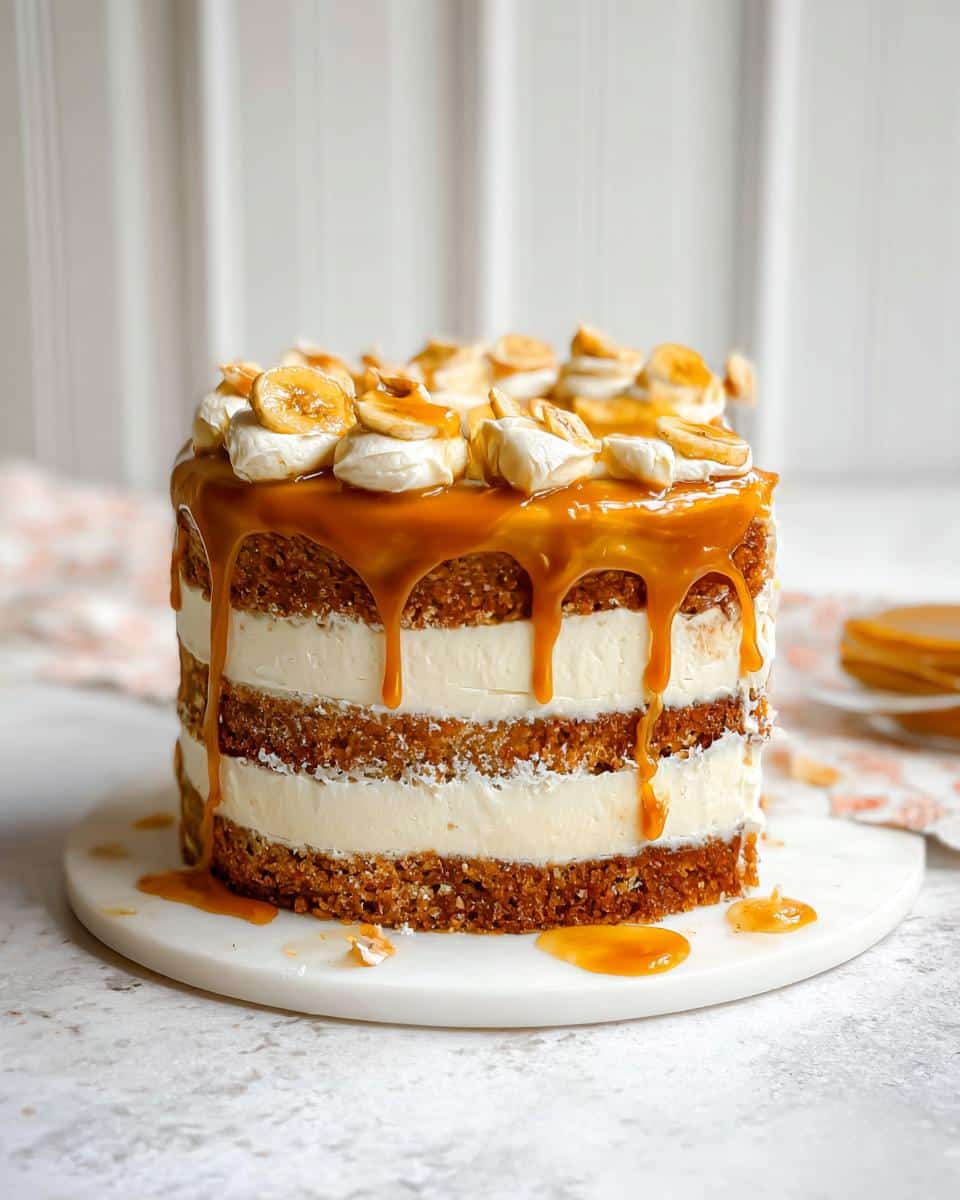
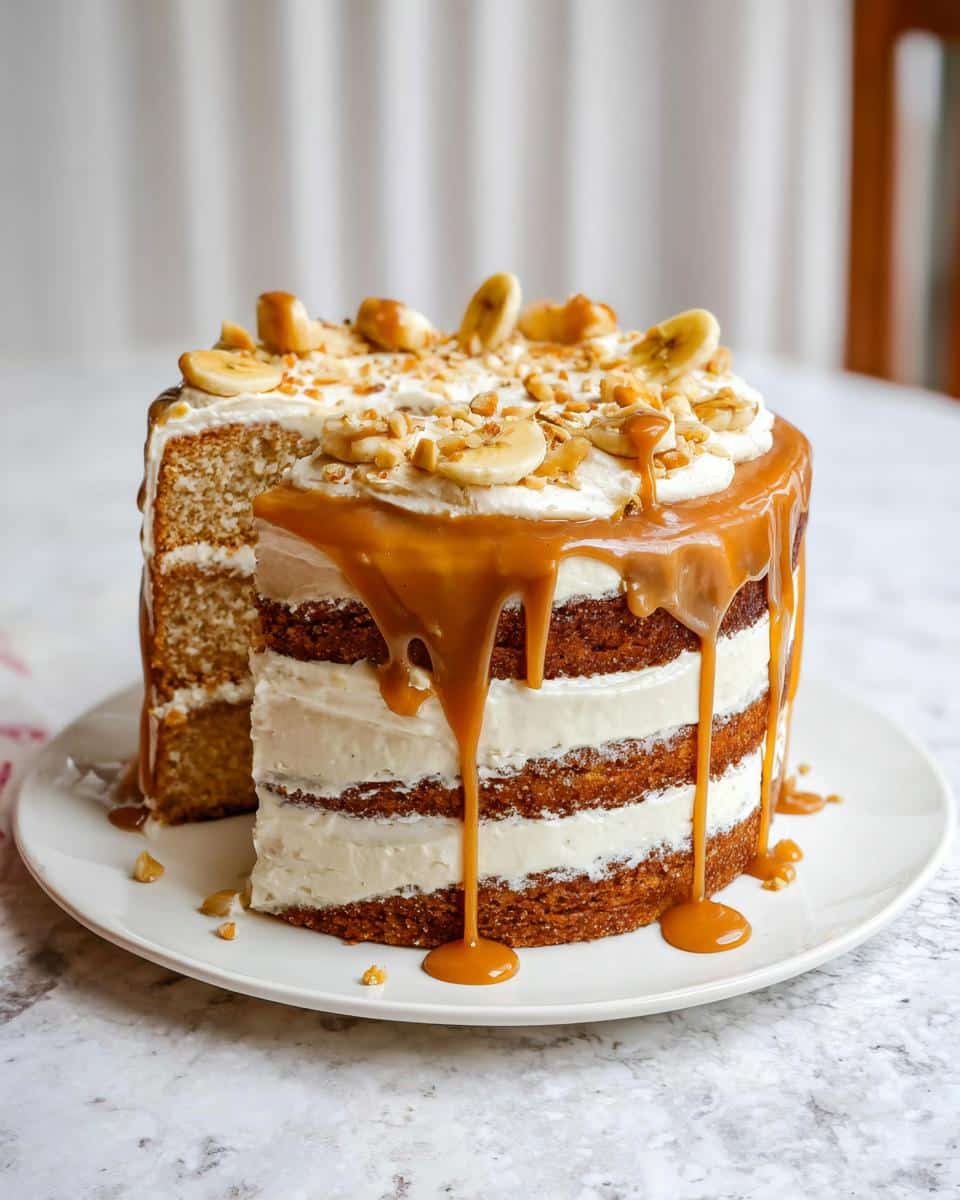
Assembling and Decorating Your Banana Layer Cake with Caramel Frosting
Time to build! Place your first cooled layer down on your serving plate. Spread a generous amount of the caramel mascarpone frosting evenly over the top. Place the second layer on top and repeat the frosting step. Crown it with the third layer. Now, take a small amount of remaining frosting and cover the entire outside of the cake thinly—this is called the crumb coat, and it locks in all those loose crumbs so your final layer is perfect. Chill this for maybe ten minutes if you have time. Once chilled, use the rest of your frosting to cover the cake nicely. For the grand finale, take your extra caramel sauce and drizzle it over the top edge, allowing those gorgeous drips to run down the sides. Scatter your caramel fudge pieces and banana chips over the top, maybe tucking in a few slices of fresh banana for color!
Tips for the Best Banana Layer Cake with Caramel Frosting
Look, if you want this Banana Layer Cake with Caramel Frosting to live up to its name—the *best*—you have to follow a couple of my non-negotiable rules. These aren’t just suggestions; they are the difference between a decent home bake and something that truly shines. I’ve learned these lessons honestly, sometimes failing spectacularly, but now I can pass the good advice along to you! We’re focusing on temperature and freshness here to make sure those layers bake up perfectly.
For starters, let’s talk about those critical temperatures. For the cake batter itself, remember what I said in the instructions: use room temperature ingredients! Softened butter, room temperature eggs—this allows everything to emulsify properly, creating those tiny air pockets necessary for a lighter crumb, even in a rich cake like this. It helps everything combine smoothly when we use that all-in-one method.
However, the frosting is the opposite! When you move to the Caramel Mascarpone Frosting, your double cream needs to be icy cold, straight from the fridge. I find that cold cream whips up into stable peaks much faster and stays firmer when blending with that softer mascarpone and caramel sauce. If your cream is warm, you’ll end up having to add more sugar to thicken it up, and we don’t want that.
Also, and this is a big one for lift: check your leavening agents! Baking powder and bicarbonate of soda do all the heavy lifting for keeping this moist cake light enough to feel like a layer cake, not a brick of banana bread. If your baking powder has been sitting in the cupboard since last year, it’s probably lost its power. Make sure both are fresh if you want a good rise. This quality check is fundamental if you’re aiming for that consistently excellent texture, just like you’d find in a super moist banana bread recipe!
Finally, and you know this is one of my core beliefs: use the best, ripest bananas you can find. If they’re only yellow, they aren’t sweet enough. Black spots are your friend here! If you bake them a little underdone rather than keeping them in the oven waiting for the skewer to come fully clean (moist crumbs are the goal!), you’re retaining that fresh banana moisture that this recipe is famous for. Bake with confidence, but trust your eyes and your nose over the timer sometimes!
Ingredient Substitutions for Your Banana Layer Cake
So, you’re halfway through gathering supplies and realizing you’re out of something crucial? Don’t panic! Baking is flexible, darling, especially when we’re dealing with comfort flavors like banana. While I stand by my original list for the absolute Best Banana Layer Cake with Caramel Frosting, I totally get that substitutions happen. Let’s talk about how to swap things out without completely ruining the structure of this beautiful layered cake.
The biggest challenge in swapping ingredients is maintaining moisture since this cake relies heavily on the natural wetness from the banana. If you’re trying to achieve something like those amazing, healthier versions you see online, remember that swapping the fat changes the game entirely!
Swapping the Butter and Fat
In the cake recipe, I listed softened butter or margarine. Margarine is an easy 1:1 swap if that’s what you have on hand; it works fine, though the flavor might be a tiny bit less rich than real butter. If you’re looking for a completely different texture, you could try swapping the butter for a neutral oil, like canola or vegetable oil.
Now, a word of caution: If you use oil instead of butter, you won’t be able to ‘cream’ the fat with the sugar because oil is already liquid! This means you lose those tiny air pockets creaming creates, resulting in a slightly denser, more traditional ‘moist banana bread’ texture instead of the lighter layer cake crumb. It’ll still be delicious, but it won’t have that airy structure we worked so hard to build.
Dairy Substitutes for the Frosting
The filling here is where temperature and texture are most important. The combination of full-fat mascarpone and COLD heavy cream creates that dreamy, stable frosting. If you can’t find mascarpone, you can absolutely substitute it with full-fat brick-style cream cheese. They are similar in richness!
Just be aware: cream cheese has a distinct tanginess that mascarpone lacks. This makes the final frosting slightly sharper, which actually pairs quite nicely with the caramel, but it will taste different than intended. Use the same weight (450g) and follow the cold cream instruction absolutely strictly. If you use room temperature cream cheese, your frosting is going to instantly become a sloppy mess, and we definitely don’t want to turn that caramel frosting into a runny disaster!
What About the Bananas?
I hope you have ripe bananas, but if you only have slightly firm ones, don’t give up! If you’re short on time, you can microwave your bananas for about 30 seconds to soften them up slightly, which helps them mash better and releases a little more of their internal moisture. This trick helps mimic the texture of those truly spotty ones needed for a great cake, even if it’s not quite as sweet as the Easiest Banana Bread Recipe made with nearly black fruit.
If you are desperate and have *no* bananas, technically, you could use applesauce or yogurt mixed with a little extra banana extract for flavoring, but honestly, if you are skipping the banana entirely, you should probably just make a different cake! Banana is the star here.
Storage and Reheating Instructions for Layered Banana Cake
This Banana Layer Cake with Caramel Frosting is absolutely divine on day one, but I’m going to let you in on a little secret: it tastes even better the next day once those flavors have really settled into the layers. Because we’re using a mascarpone frosting, we do have to be a touch more careful about storage than if we were using a simple buttercream.
Generally speaking, this cake is happy sitting out on the counter, covered, for about two to three days. The sugar content in both the cake and the frosting acts as a wonderful preservative. Just make sure it’s kept somewhere cool and dark where no pets or hungry family members can accidentally swipe a slice before you’re ready!
Now, if your kitchen is anything like mine here in North Carolina during the summer—warm and humid? You need protective custody for this beauty! If the weather is warm, or if you notice the frosting starting to look overly soft or greasy, you absolutely must move your covered cake into the fridge. Refrigeration keeps that creamy texture firm and safe.
If you do chill it, remember that the cold can sometimes mute the flavor slightly and firm up the cake crumb. To bring it back to that perfect, almost-bakery freshness, pull the cake out about 30 to 45 minutes before you plan to serve it. That small bit of warming time lets the butter in the cake and the mascarpone in the frosting soften just enough. It brings back that beautiful, soft texture we aim for.
Just a quick note regarding leftovers: If you happen to have any plain, unfrosted cake layers left over, which is unlikely because this cake disappears fast, you should wrap those tightly in plastic wrap and you can freeze them for a month or two! You can look over my privacy guidelines if you ever wonder how I handle keeping your secrets safe!
Frequently Asked Questions About This Banana Layer Cake with Caramel Frosting
I always get so many questions after people try this recipe because it’s a little more involved than just whipping up a quick loaf! It’s natural to wonder about make-ahead timing and ways to adjust the recipe for different needs. I’m happy to walk you through anything that seems confusing about creating this magnificent Banana Layer Cake with Caramel Frosting.
Can I freeze the Banana Layer Cake with Caramel Frosting?
Yes, you absolutely can freeze parts of it, which is a lifesaver if you need to prep ahead for a party! The layers freeze like a dream. Once your cake layers are cooled completely, wrap each one tightly first in plastic wrap, and then maybe once more in foil. This double wrapping seals in all that banana moisture. You can keep those wrapped layers safely tucked away in the freezer for about two months. Thaw them overnight in the fridge before you plan to frost them. If you freeze the cake already frosted, the mascarpone frosting might weep a little when it thaws, especially right where the caramel drips are, so I strongly recommend freezing the layers plain!
What is the best way to get moist layers, like a Super Moist Banana Bread Recipe?
To achieve a level of moisture that rivals the Super Moist Banana Bread Recipe standard, you need two things: supremely ripe fruit and no overbaking! Resist the urge to pull the cake out just because the top looks done. As I mentioned in the tips section, those brown, spotty bananas release the maximum amount of sweet, moist sugars into the batter. When you test the cake, look for moist crumbs clinging to your skewer, not wet batter, but also don’t wait until the skewer comes out completely dry. Every extra minute in the oven steals moisture, and we want every layer of this cake to be tender!
Can I make this cake as a sheet cake instead of layers?
You sure can! If you don’t want to mess with stacking three layers—totally understandable for a casual weeknight treat—you can pour the entire batter into a greased and floured 9×13 inch rectangular pan. Because the batter is spread out thinner, it will bake faster, probably closer to 25 minutes. You’ll miss the dramatic height, of course, but the flavor of this Banana Layer Cake with Caramel Frosting will be just as incredible when you simply spread the frosting over the top!
Can I make the Caramel Mascarpone Frosting ahead of time?
That’s a great question, especially if frosting assembly feels stressful! You can certainly make the frosting a day ahead of time. Because of the mascarpone and cream, it’s best stored in an airtight container in the refrigerator. However, you MUST take it out about an hour before you want to use it. If it’s too cold, it will be too stiff to spread nicely, and you’ll start pulling crumbs off your perfectly cooled cake layers! If it seems a bit stiff after softening, you can beat it with the mixer on low for just 30 seconds to bring back that spreadable texture. Feel free to reach out through the contact page if you have any issues when you start mixing!
Share Your Banana Layer Cake with Caramel Frosting Creation
That’s it! You’ve baked a masterpiece. I really, truly hope you enjoyed the process of taking simple, beautiful ingredients and turning them into such an elegant centerpiece. When I create recipes like this Banana Layer Cake with Caramel Frosting, I pour my heart into blending soulful home cooking with that touch of professional finesse that makes baking special. If you loved discovering how comforting flavors can be elevated, I’d be honored if you’d share your experience!
Did you find the mascarpone frosting piped up wonderfully? Did you drizzle that caramel exactly how I described? Please, tell me all about it! Leaving a star rating right here on the recipe page helps other bakers feel confident trying it out for their own celebrations.
And please, please tag me on social media when you cut into it! Seeing your creations is genuinely the highlight of my day. It reminds me why I love sharing these recipes—to bring a little bit of that joy and soulful comfort into your kitchen, just like they do in mine back in Asheville.
If you want to check out more of my recipe philosophy or read up on ingredient sourcing, feel free to look through the site disclaimer, but first, let’s eat cake!
Banana Layer Cake with Caramel Frosting
Ingredients
Equipment
Method
- Preheat the oven to 180C (350F). Mist three 20cm (8 in) cake tins with cake release or grease with softened butter and dust with flour, shaking out any excess. Line the bottom of the tins with baking paper.
- Put the flour and sugar in a large bowl. Add the baking powder, bicarbonate of soda and salt and mix together using a balloon whisk.
- Add the softened butter, eggs, milk, mashed bananas and vanilla extract to the dry ingredients.
- Beat on the lowest speed setting until the ingredients start to combine, then increase the speed until you have a smooth batter. Use a spatula to scrape the bottom and sides of the bowl to make sure everything is evenly mixed.
- Divide the batter between the prepared cake tins and level the tops. Bake for 25 to 28 minutes, or until the cake is well risen, springy to the touch, and a skewer inserted in the center comes out clean.
- Cool the cake in the tins for 5 to 10 minutes, then carefully turn out onto a cooling rack to cool completely.
- Make the Caramel Frosting: Put all the frosting ingredients apart from the caramel sauce in a mixing bowl. Start beating together on a low speed setting, then increase to medium, gradually adding the caramel sauce.
- Continue to beat until the frosting holds peaks, adding more cold cream gradually if the frosting is dense. Do not overmix.
- Assemble the Cake: Pipe or spread frosting on the cake layers and sandwich them together. Cover the cake with a thin layer of frosting and smooth the outside.
- Drizzle caramel around the edge of the cake, letting it drip down the sides. Pipe or spread any remaining frosting on top of the cake and drizzle with more caramel. Decorate with caramel fudge pieces or banana chips.