Listen, I know what it’s like staring at those stunning bakery photos online and thinking, “There’s no way I can do that at home.” But trust me, tackling a showstopper like the Chocolate Ganache Drip Cake is way easier than you think! When I started baking in Asheville, I wanted every celebration to feel special, and nothing screams ‘special’ like that perfect, smooth, glossy chocolate cascade. This recipe takes that intimidating look and breaks it down into super simple steps. You don’t need fancy equipment, just a little patience while things cool down. Honestly, seeing that perfect, slightly uneven drip on your own creation? That’s pure joy, y’all. If you’re looking to step up your game for the next birthday, you need this technique in your back pocket. Check out all my secrets, and let’s make something truly impressive!
You can find more of my favorite trending cake designs and recipes right here.
Why This Chocolate Ganache Drip Cake Recipe Works for You
I developed this recipe because I wanted that expensive, bakery-style finish without all the headache. It’s honestly one of the most reliable ways to make a stunning dessert for any celebration.
- It gives you that luxurious, high-end look with surprisingly minimal cleanup.
- The technique is so forgiving; if a drip isn’t perfect, you can easily fix it!
- It makes any of your simple birthday cake designs look like a total showstopper.
- The rich chocolate flavor is just unbeatable.
Essential Equipment for Your Chocolate Ganache Drip Cake
Okay, let’s talk gear. You don’t need a full professional kitchen to pull this off, but a few specific tools make the difference between a messy cake and that gorgeous, sleek finish. Having the right setup means less stressing when we get to the fun part!
Here is what you’ll want handy before you mix up that ganache:
- A fully frosted cake base – this is non-negotiable!
- A heatproof bowl for melting.
- A small saucepan for warming the cream.
- Aluminum foil because we hate cleaning cooked bits!
- A squeeze bottle. Trust me, this is the secret weapon for perfect drips!
- An offset spatula for getting that top layer perfectly flat.
Preparing Your Base Cake for the Chocolate Ganache Drip Cake
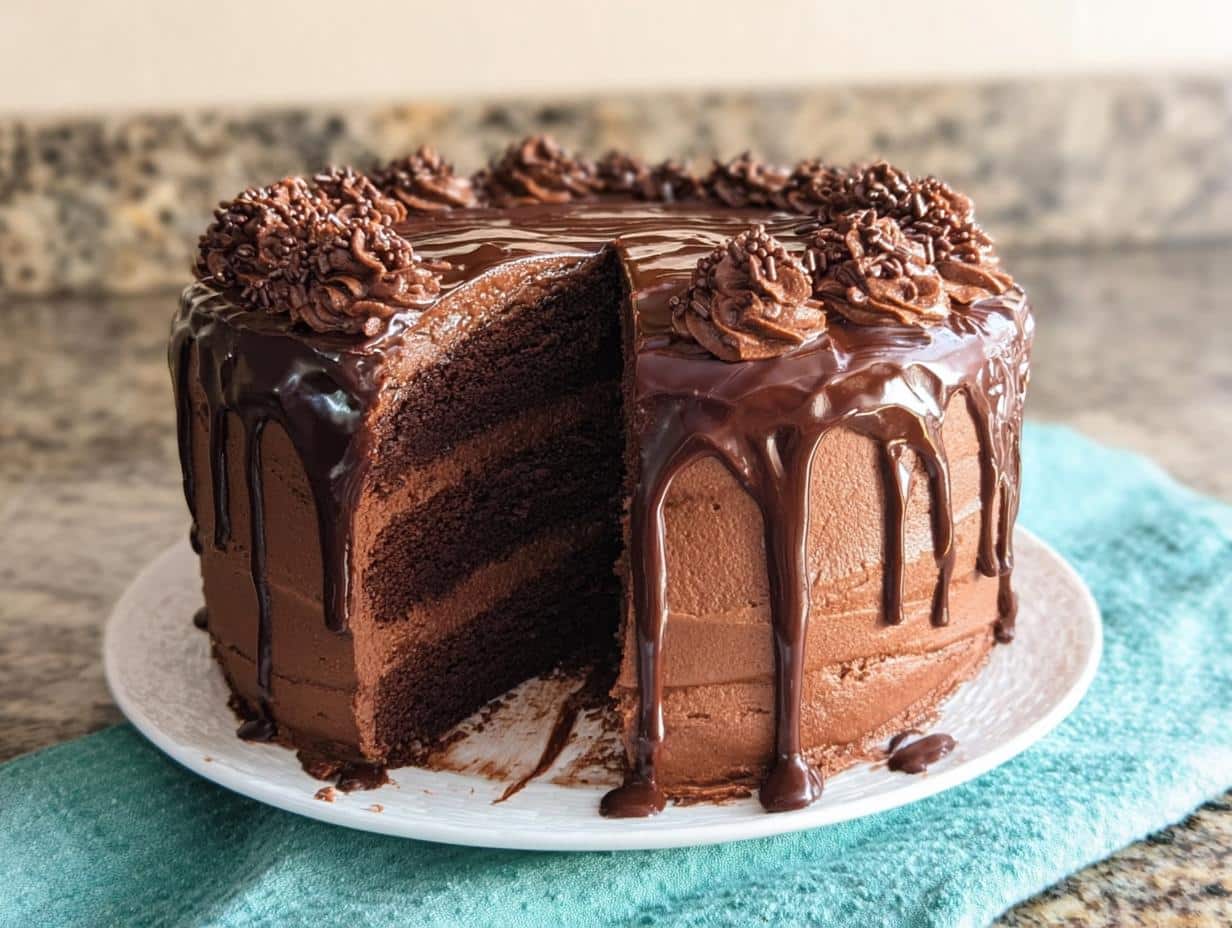
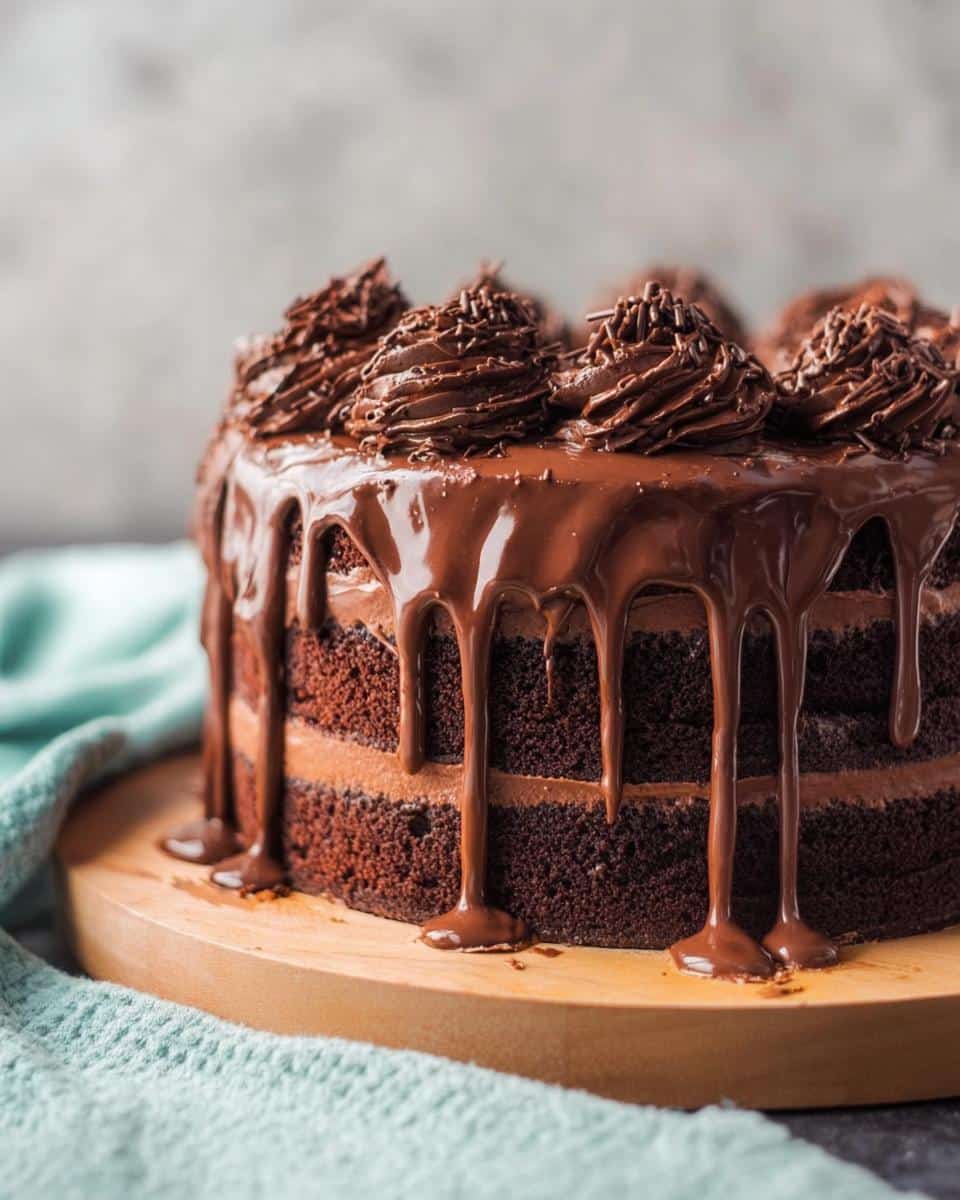
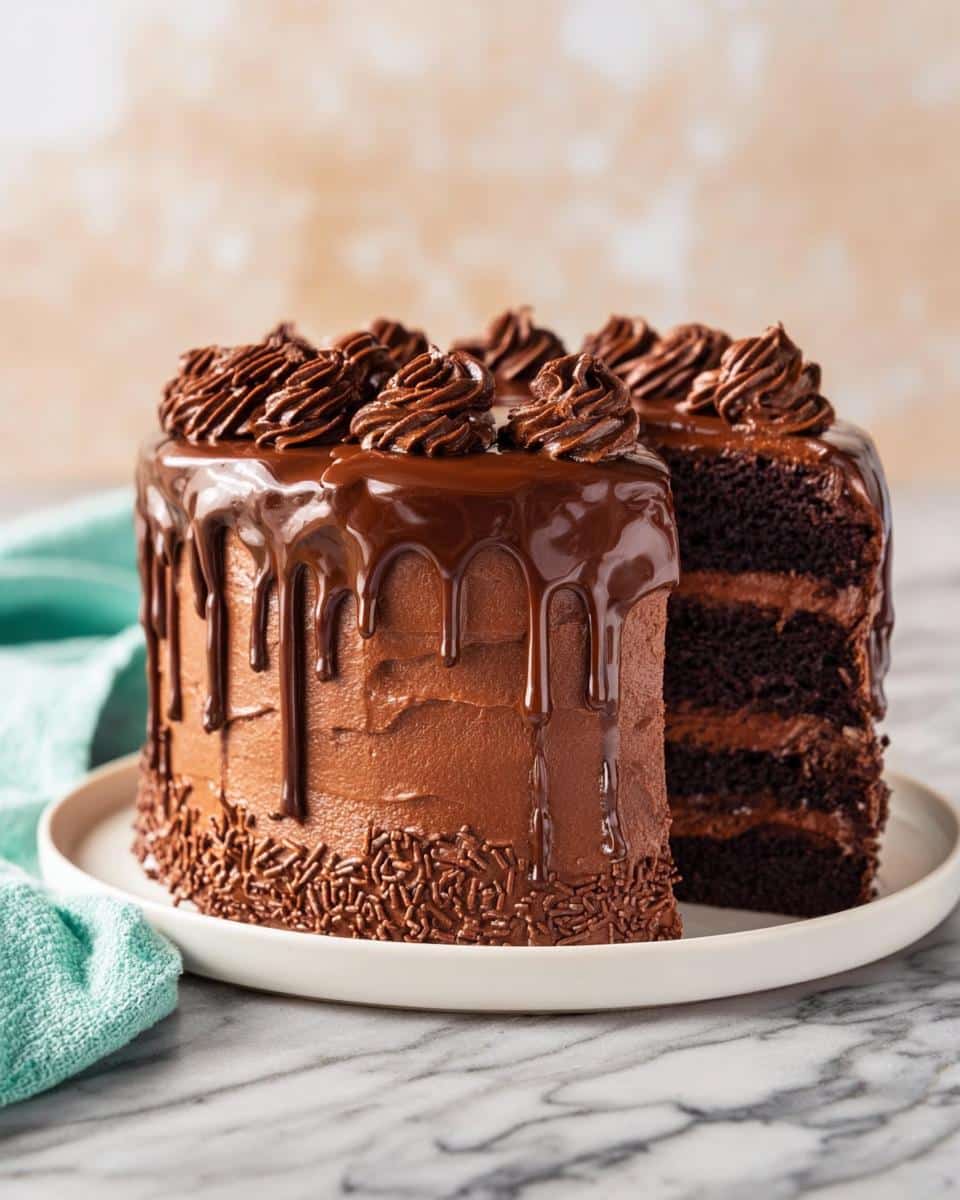
Before we even think about chocolate, we have to get the canvas ready for our masterpiece. Your cake has to be fully iced, and I mean *smooth*. Then, stick that finished cake right into the refrigerator. We need that cold temperature! When the frosting is slightly hardened, the warm ganache hits it and sets immediately, giving you those clean lines for your Chocolate Ganache Drip Cake. Don’t skip the chilling step, or you’ll end up with chocolate soup instead of drips!
Ingredients Needed for the Homemade Chocolate Ganache Drip Cake
This recipe is wonderfully simple, which is why it keeps popping up for all the best celebrations. You truly only need two things to make the actual drizzle, though you need that perfected base cake first, of course! We’re going for rich, bold flavor, so high-quality chocolate matters here. Remember, we’re making a beautiful Chocolate Ganache Drip Cake, so let’s treat those ingredients right.
Here’s what you need for that showstopping pour:
- For the Ganache:
- 4 oz semisweet or dark chocolate bar, coarsely chopped (I prefer bar chocolate, but chips work in a pinch!)
- 1/2 cup heavy cream
If you’re looking for some wonderful holiday twists on chocolate, you can check out my favorite desserts over here! But for the drip, these two ingredients are all you need. Simple magic!
Step-by-Step Instructions to Master the Chocolate Ganache Drip Cake
Ready to watch the magic happen? This is where we turn a simple frosted cake into an elegant showpiece. Don’t worry about perfection right away; the key to mastering the Chocolate Ganache Drip Cake isn’t speed—it’s patience while you are testing the temperature!
Making the Perfect Homemade Chocolate Ganache
First things first, get your chopped chocolate into that pretty heatproof bowl. Now, bring your heavy cream in the saucepan right up until it starts to simmer. It shouldn’t boil, just get nice and hot! Pour that hot cream right over the chocolate, cover it up tight with foil, and walk away! I mean it, go pour yourself a glass of water or something. You need to let it sit, undisturbed, for a full five minutes so the heat can gently work its way through all that rich chocolate. Resist the urge to peek! Once those five minutes are up, start stirring slowly from the center out until you have the silkiest chocolate ganache drip cake mixture you’ve ever seen. That smooth texture is everything!
Testing and Adjusting Ganache Consistency for the Drip Effect
This next part is crucial for your Chocolate Ganache Drip Cake, so please don’t skip the test! After it cools for about 15 minutes—and only slightly warm to the touch—load it into your squeeze bottle. Now, take a spare plate, or toss a piece of cardboard on the counter, and squeeze a tiny bead onto the edge. If it races right off the plate and puddles, it’s way too warm! Pop it back on the counter to cool longer. If it barely moves, honey, it’s too cold! We want slow, deliberate drips. This testing phase is how we make sure your finished chocolate drip cake recipe is perfect.
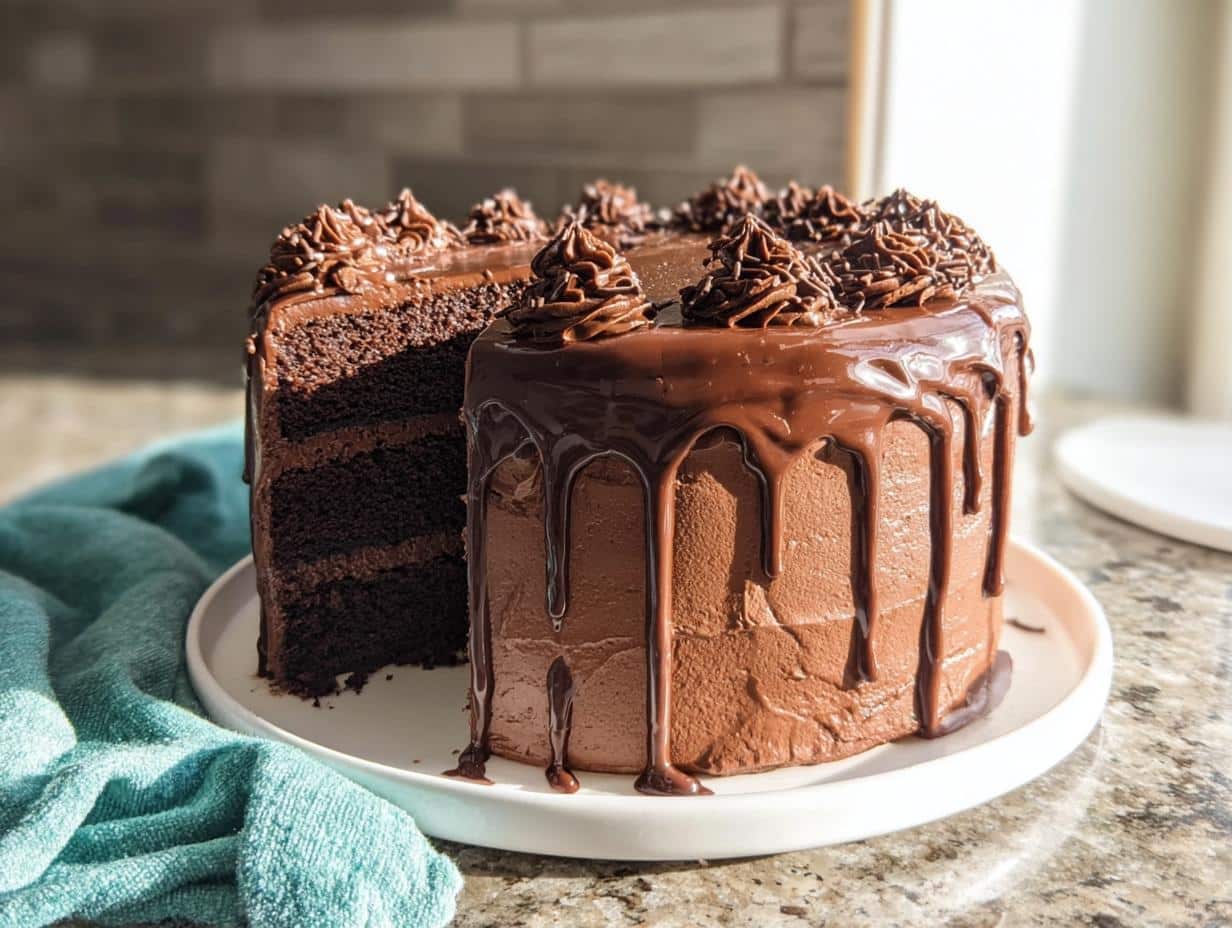
Applying the Drip Technique on Your Chocolate Ganache Drip Cake
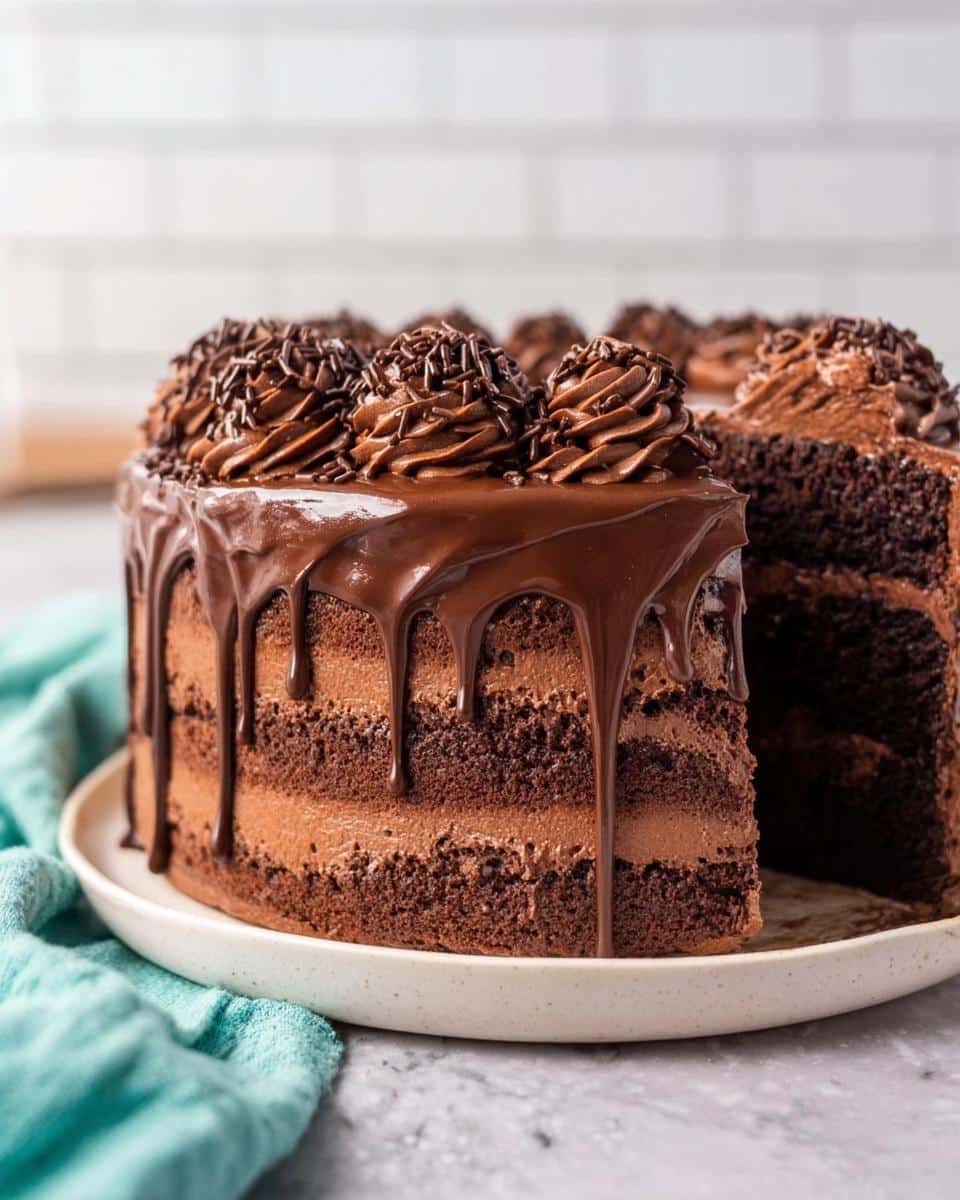
Now that your ganache consistency is spot on, pull that nice, cold cake out of the fridge! Hold your squeeze bottle perfectly vertical right on the very edge of the cake top and give a gentle squeeze until the chocolate flows over. Stop squeezing, move to your next spot, and give a little more squeeze. You can vary the length by pausing longer or squeezing harder. It’s your art! If you pull the bottle away and the drip stops too soon, just squeeze a tiny bit more right at that spot to coax it down. Once you’ve gone all the way around the edges, pour the rest of your beautiful mixture right onto the top surface. Use your offset spatula, nice and quick, to gently spread it right to the edges, making sure you smooth over all the gaps between your drips. Then, back into the cold it goes!
If you’re looking for simple baking projects for the kiddos, this technique is fun to practice on small cupcakes first!
Tips for Success with Your Celebration Chocolate Cake
Alright, let’s talk about making sure this looks like you bought it from a fancy patisserie! One thing I learned the hard way is that if your ganache looks dull when it sets, it usually means your chocolate wasn’t melted quite enough, or you over-stirred it in the beginning. Always stir gently! If you accidentally squeeze a drip that runs way too far all the way to the plate, don’t panic! Just quickly grab a small, clean offset spatula or even the back of a spoon and gently scoop that excess chocolate back up onto the top surface before it hardens. You can smooth that area with an extra dab of ganache later. Also, the colder your cake is, the better the drips hold their shape. If it’s room temperature, those beautiful drips melt right into the frosting!

I always keep my recipe card taped to the pantry door—it reminds me of the simple, soulful baking techniques I learned over the years. You can read more about my philosophy over on my About page!
Creative Birthday Cakes: Styling Your Chocolate Ganache Drip Cake
Now that we have those gorgeous, glossy drips set, it’s time to really make this cake sing! This is where we turn a reliable recipe into one of those truly Pretty Birthday Cakes that everyone stops to photograph. Don’t feel like you have to keep it plain just because the ganache is so dramatic. I love taking a Minimalist Bday Cake design and giving it a little pop!
For contrast, a swirl of light-colored vanilla or cream cheese frosting right on top of the dark, rich chocolate looks stunning. If you want texture, grab some colorful sprinkles—I prefer metallic gold ones—and just dust them lightly over the unset ganache near the top edge. You can also always lean into the natural beauty of fresh toppings. Pile on some raspberries or bright strawberries right in the center; the tartness cuts through the chocolate perfectly. It’s amazing how these accents can transform your Chocolate Ganache Drip Cake into one of the most Trending Cake Designs out there. Remember, baking should be fun, so experiment!
For more ideas on keeping things fresh and exciting, swing by my section on new culinary trends!
Storage and Reheating Instructions for Your Chocolate Ganache Drip Cake
Because this cake has a lovely, rich filling and that beautiful shiny ganache topping, it needs a little cuddle in the fridge. You can store your finished cake right in the refrigerator for up to four days. Just make sure you cover it loosely with a cake dome or aluminum foil so it doesn’t dry out or absorb fridge smells—yuck! Now, the best way to serve it is never straight from the cold. Pull that beauty out about an hour before you plan on slicing it. Letting it sit on the counter slowly brings the cake back to that perfect serving crumb without making the chocolate topping sweat or melt into a mess.
Frequently Asked Questions About the Chocolate Ganache Drip Cake
I always get questions every time I post a photo of this cake because people assume it’s super difficult! But trust me, once you nail the temperature, this becomes one of your go-to Easy Cake Decorating Ideas. It’s surprisingly simple to pull off, even if you’re aiming for one of those very **Cute Simple Cakes**.
Can I use milk chocolate instead of semisweet for this chocolate drip cake recipe?
Oh, honey, you *can*, but I really warn against it if you want those clean, sharp drips! Milk chocolate has a much higher sugar and milk content, meaning the ganache stays softer for longer. If you try it, you’ll need to cool that ganache down seriously—like, maybe another 30 minutes past when you think it’s ready—or it will just slide right off your Chocolate Ganache Drip Cake in one big puddle! Stick to dark or semisweet for the best structure.
I’ve got a ton of other **Simple Birthday Cake Designs** you might love if you don’t want rich chocolate every time. If you still have questions after trying it out, feel free to reach out to me through my contact page!
Sharing Your Impressive Chocolate Ganache Drip Cake Creation
That’s it! You did it! You made a cake that looks like it came straight from a professional bakery, and you did it right there in your own kitchen. I’m already so proud of you! Now, when you slice into that beauty and everyone starts asking who made it, you can take all the credit.
But seriously, if you took the time to whip up this decadent dessert, I absolutely want to see it! I love seeing your takes on these Creative Birthday Cakes! Tag me on our social channels when you share pictures of your stunning creation. Seeing your take on these elegant designs is truly the best part of what I do. Are you sharing this showstopper at a party? Don’t forget to leave a little rating and review right here on the site!
Chocolate Ganache Drip Cake
Ingredients
Equipment
Method
- Start with a level, frosted cake. Make sure the icing is as smooth as possible. Place the cake, uncovered, in the refrigerator so the frosting hardens slightly.
- Prepare the ganache by placing the chopped chocolate in a medium-sized heatproof bowl.
- Pour the cream into a saucepan and bring it just to a simmer. Immediately remove it from the heat and pour it evenly over the chocolate. Cover the bowl with foil and let it sit, undisturbed, for 5 minutes.
- Remove the foil and gently stir the mixture until the chocolate is completely melted and the mixture is smooth. Allow the ganache to cool for 15 minutes before pouring it into a squeeze bottle. It should feel only slightly warm to the touch.
- Test the ganache consistency before decorating. Drop a small bead of ganache onto a paper plate or cardboard box and turn it vertically to see how it drips. If the chocolate runs too fast or completely off the plate, it is too warm; cool it longer. If it is manageable, remove your cake from the refrigerator.
- Hold the squeeze bottle vertically and drop a single bead of ganache onto the very edge of the top of the cake. Squeeze the bottle until the bead drips over the edge and begins to run down the side of the cake.
- Pause and check the drip. If the ganache runs all the way to the bottom, let it cool longer next time. If you squeezed too much, remember to squeeze less next time. If the ganache did not drip as far as you wanted, squeeze a bit more in that spot.
- Draw a line along the top of the cake to the next point where you want a drip. Repeat the previous step, squeezing another bead of ganache over the edge of the top of the cake.
- Continue going around the edge, varying the length of the drips as you like. Once you have dripped ganache all the way around the cake, drizzle a thin layer of ganache over the entire surface of the cake. Use an offset spatula to spread it evenly.
- Return the cake to the refrigerator for about 15 to 20 minutes to allow the ganache to set. If you want, top the set ganache with swirls of frosting.