
When I see a kitchen project, I don’t just see ingredients; I see a visual story waiting to happen! That’s why I love teaching techniques that turn simple components into something truly show-stopping. If you’ve ever wanted to create a cake that makes everyone stop and stare before they even take a bite, this recipe for the Green Ombre Cake is for you. As a Culinary Educator, my goal is always to break down intimidating designs, and blending colors? It’s easier than you think! We’re going to walk through creating those gorgeous, smooth gradients in both the cake layers and the buttercream, making this elegant dessert totally achievable for your next celebration. If you love exploring these kinds of trend-forward recipes, make sure you check out all the fun ideas I have collected over on my Trend Recipes page!
Why You Will Love This Green Ombre Cake Recipe
I know you might look at a perfectly blended ombre cake and think, “That’s for the professionals only,” but trust me, it’s not! This recipe is designed to give you that jaw-dropping, sophisticated look right from your home kitchen. It’s guaranteed to be the centerpiece of any party, especially if you are looking for St Patrick’s Day Food Ideas Party!
- You get a stunning visual effect because the smooth gradient of green feels totally modern and elegant.
- It’s perfectly suited for spring gatherings, nature themes, or making a big splash for major holidays.
- We aren’t just making a cake; we’re learning a foolproof decorating technique that you can use again and again on future bakes!
- It proves that even simple ingredients can transform into a visual masterpiece with just a little bit of clever coloring.
Essential Equipment for Your Green Ombre Cake
Before we start mixing up this gorgeous green masterpiece, let’s make sure your kitchen is ready! Having the right gear makes the coloring and assembly phases so much smoother. You’ll want to pull out some basics, but there are a few items specific to this style of layer cake that really make a difference. I always like to have everything measured out before I even turn the mixer on!
- Mixing bowls – You’ll need several for dividing your batter and frosting!
- An electric mixer – Handheld or stand; we need this for creaming that butter.
- Four 6 or 7-inch round cake pans – This is super important, and here’s why!
- A cooling rack – Patience starts here; you can’t decorate warm cake, trust me.
- A piping bag – This helps us control where the shades of green go.
- A palette knife – Essential for that final, smooth blending that creates the ombre look.
Now, about those four pans—this is a huge E-E-A-T tip for truly professional-looking layers! Since we are dividing the batter evenly to get four distinct shades, using four separate pans ensures that all four layers bake at the exact same rate and achieve a uniform height. If you try to bake two thin layers instead of four even ones, you’ll end up struggling when stacking, and your beautiful Green Ombre Cake won’t look quite as perfectly aligned.
Ingredients for the Green Ombre Cake Layers and Buttercream
Okay, let’s talk ingredients! Since this cake is one component we rely on—the base flavor—to carry the visual punch of the ombre, making sure we have high-quality versions of everything is key. We need ingredients that mix up beautifully and taste amazing, even before the color gets involved. Remember, we are essentially making two recipes here: the cake itself, and then the frosting wraps it all up. I’ve listed everything below so you can check your pantry!
If you’re looking for ways to round out your menu for a celebration, I always have a fresh batch of easy dessert recipes ready to go!
For the Cake Layers
- 2 cups butter, room temperature, divided
- 1 cup + 2 tablespoons granulated sugar
- 4 large eggs, room temperature
- 2 teaspoons vanilla extract, divided
- 1 3/4 cups flour
- 2 teaspoons baking powder
- 1/4 teaspoon salt
- 20 drops green food coloring (This is just an estimate for the total needed, see notes below!)
For the Buttercream and Assembly
- 4 cups Powdered sugar
- 1 cup butter, room temperature (Use remaining butter from the cake ingredients)
- 2 teaspoons vanilla extract (Remaining amount)
- Sprinkles for decoration (Optional, but highly recommended for fun!)
Ingredient Notes and Color Preparation for the Green Ombre Cake
The food coloring is where the real magic starts, but you need to trust the process! The recipe lists around 20 total drops of green food coloring, but that’s just a starting point. You are going to divide your prepared cake batter into four separate bowls (one cup per bowl, remember?). You will then add different amounts of coloring to each bowl to create that distinct shade difference. For example, you might add just one drop to the first bowl, and maybe four or five drops to the final bowl. You’ll see exactly how much you need in the instructions!
Also, since the cake base is pretty straightforward, don’t skimp on flavor here! I highly recommend using a high-quality vanilla extract. It really makes a difference in the final taste, even when you’re layering on that pretty green frosting later.
Step-by-Step Instructions to Make the Green Ombre Cake
This is where the fun really starts! Don’t let the steps intimidate you; we’re building this beauty layer by layer. The key here is organization—make sure those four pans are prepped before you start mixing the wet ingredients. Also, getting everything measured out is going to save your sanity later when we’re coloring everything!
First things first: Preheat your oven to 340 F right away, and don’t forget to grease and flour (or use your favorite cake release) all four of your 6 or 7-inch round cake pans. We need them ready for action!
In your largest mixing bowl, cream together 1 cup of the room temperature butter with the granulated sugar. You need to beat this until it gets light and fluffy—it should look pale yellow and super creamy. Then, incorporate your four room-temperature eggs, adding them in one at a time and mixing well after each one goes in. Finally, mix in 2 teaspoons of vanilla extract.
In a separate bowl, whisk together your dry goods—the flour, baking powder, and salt. Now, slowly add this dry mixture into your main batter. Mix gently until everything is just combined. We don’t want to overmix this part!
Baking and Cooling the Four Green Cake Layers
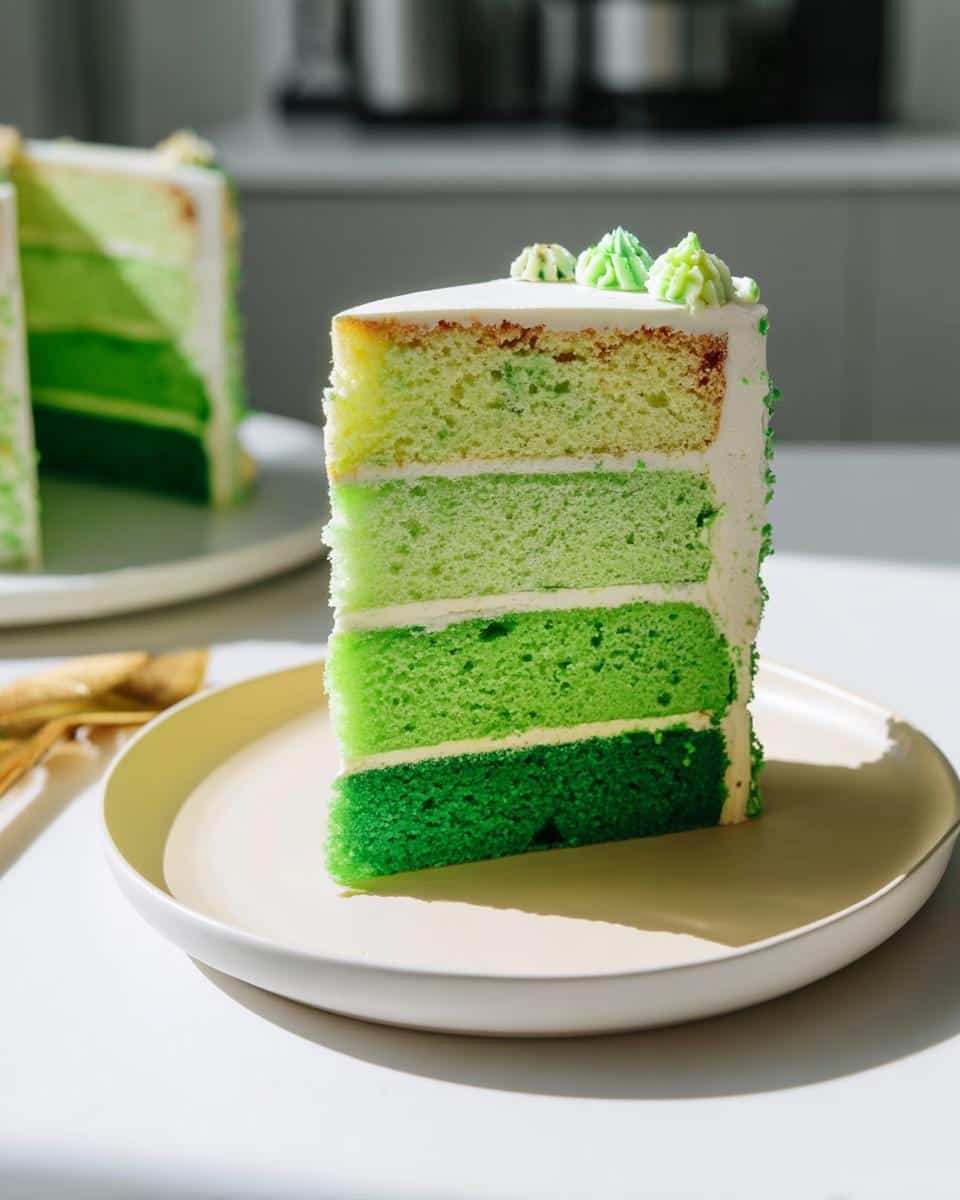
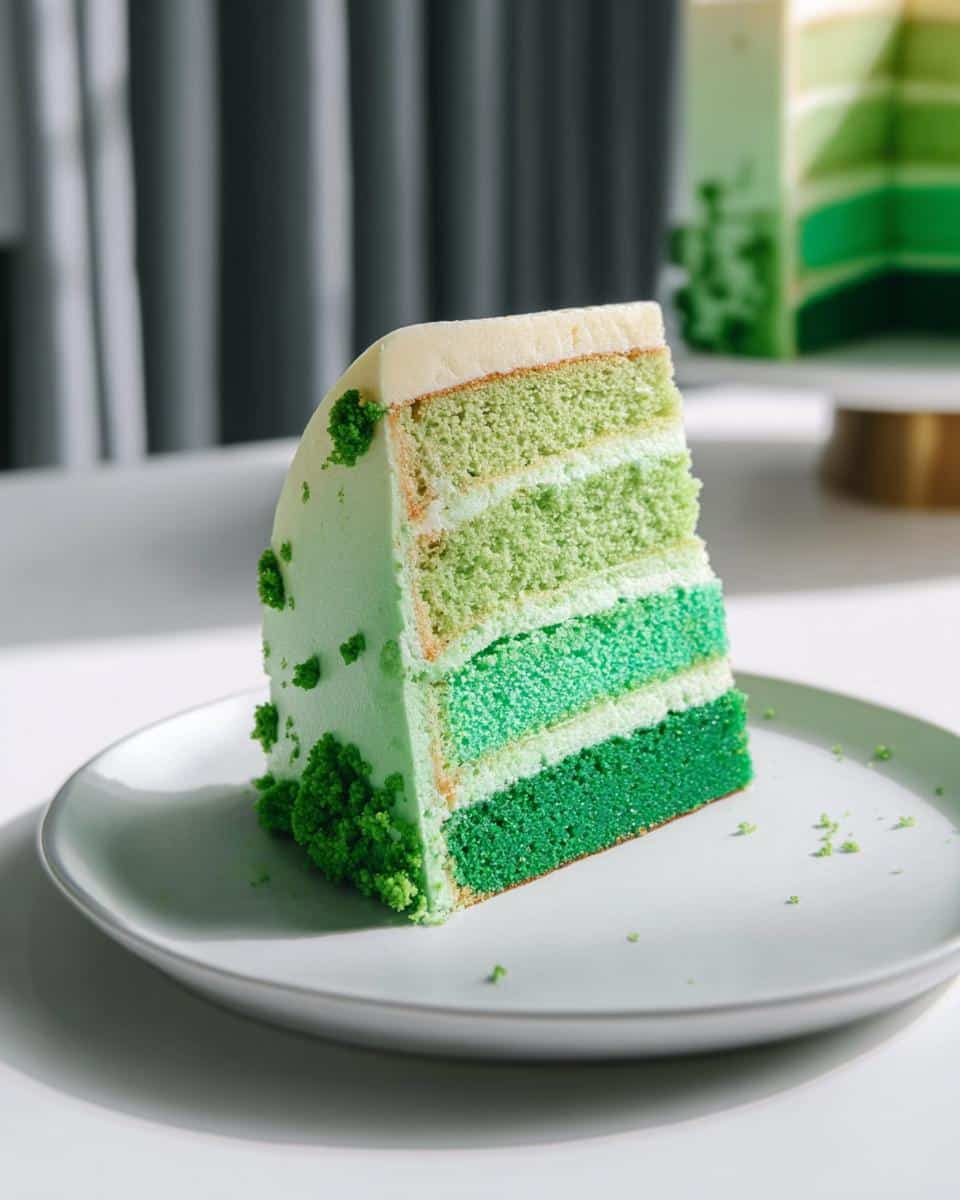
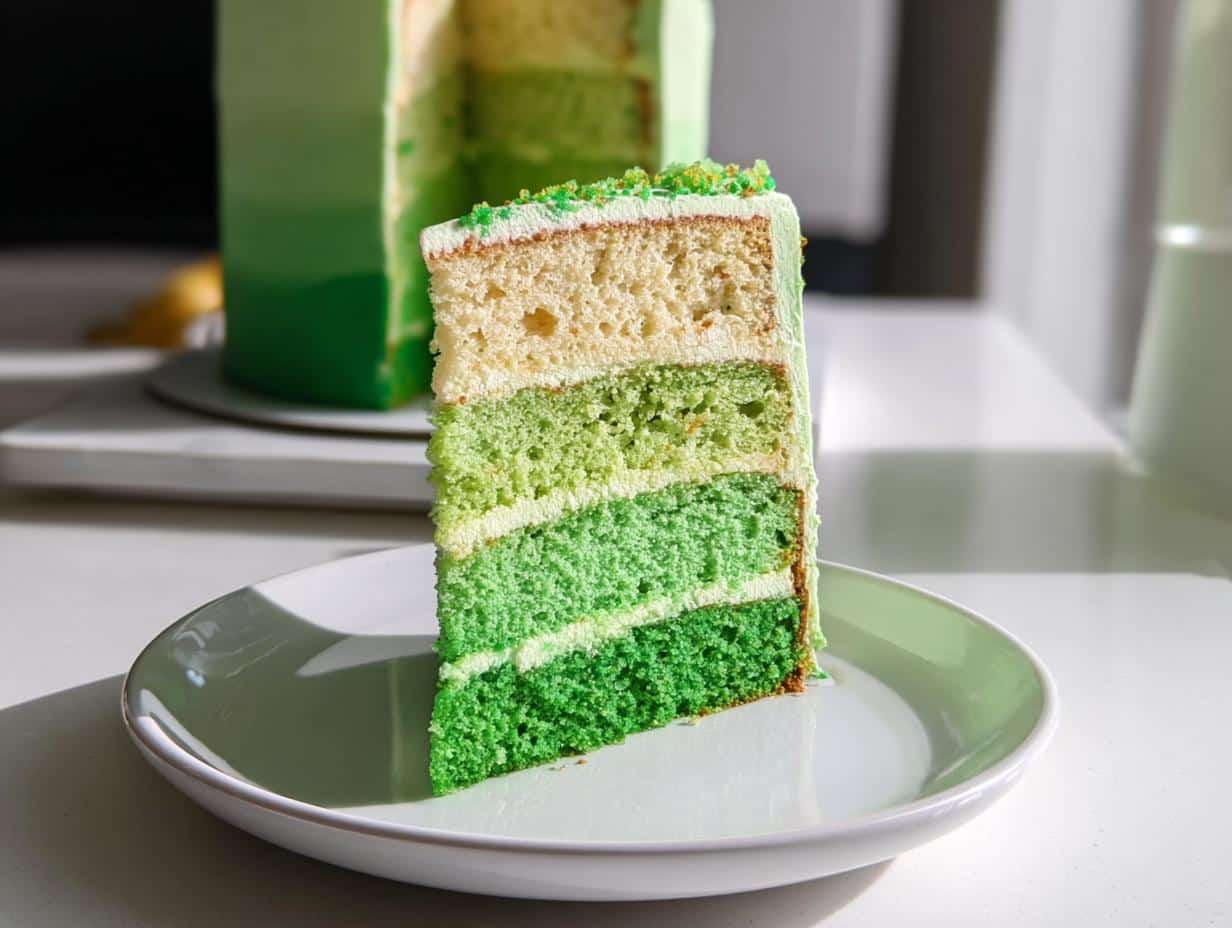
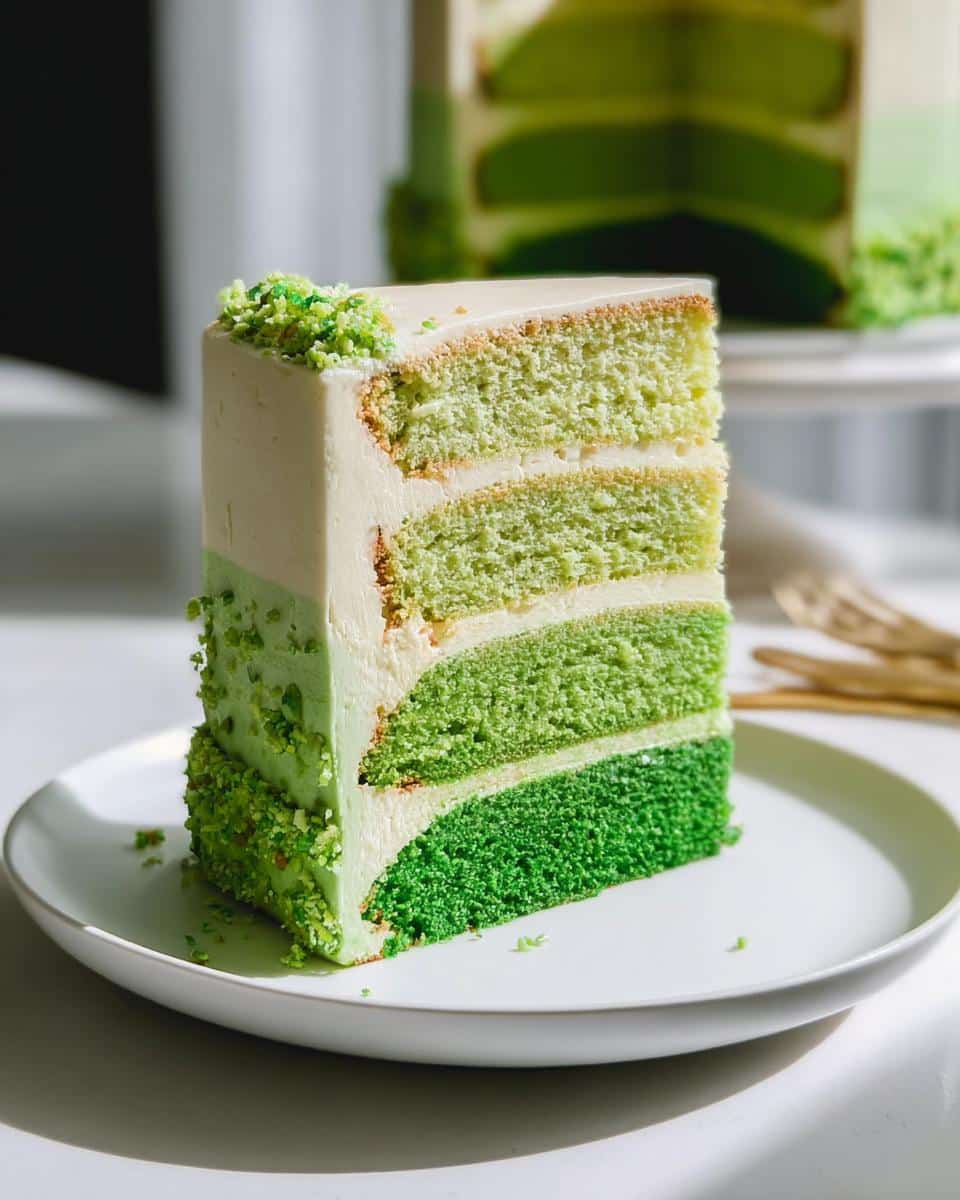
This part is crucial for the ombre effect. Take your full batch of batter—it should be about 4 cups total—and divide it *exactly* into 4 separate, clean bowls. We want one cup of batter in each bowl. Now, this is where we introduce the color!
Start adding your green food coloring into those four bowls. You need to be strategic here! Each bowl gets more color than the last. The first bowl should have just a hint of green, maybe one or two drops, making it the lightest shade. The fourth bowl should get the most coloring, aiming for the deepest green. Mix each bowl thoroughly until the color is uniform throughout *that* batter portion. If you want to check out some quick tips on how to get vibrant colors without affecting texture, I have a few notes on that over on my snack page!
Pour the four different colored batters into your four prepared pans. Pop them into the 340 F oven and let them bake for about 25 to 30 minutes. You know they are done when they spring back lightly when you touch the center. Once they come out, let them cool in the pans for about 10 minutes before carefully turning them out onto a cooling rack. They MUST be completely, totally cool before we even think about frosting them—I mean it! Warm layers equal melted frosting and a cake catastrophe!

Preparing the Buttercream and Crumb Coat for the Green Ombre Cake
While those beautiful layers are cooling down completely, let’s tackle the frosting. Take the remaining 1 cup of room temperature butter and beat it until it’s smooth. Slowly start adding in your 4 cups of powdered sugar, alternating with the remaining 2 teaspoons of vanilla extract. This should give you a nice, thick amount of frosting.
Take a small amount of the finished buttercream—just enough to completely cover the outside of the cake thinly—and add just a touch of green food coloring until it’s a very pale, almost whisper of green. Don’t overthink this shade!
Now, we assemble the layers. Stack them up on your serving plate or cake board, putting the lightest cake layer on the bottom and building up to the darkest layer on top (or reverse it if you decided to go dark-on-top!). Use a spoonful of this thin pale green frosting between each layer as you stack them. Once they are stacked, cover the entire outside of the cake with this thin frosting. This is your crumb coat, and it traps all those pesky crumbs! Once it’s coated evenly, you absolutely must get the cake into the fridge for 30 minutes. This chill time sets that base layer firm so our final color application goes on smoothly without dragging crumbs everywhere.
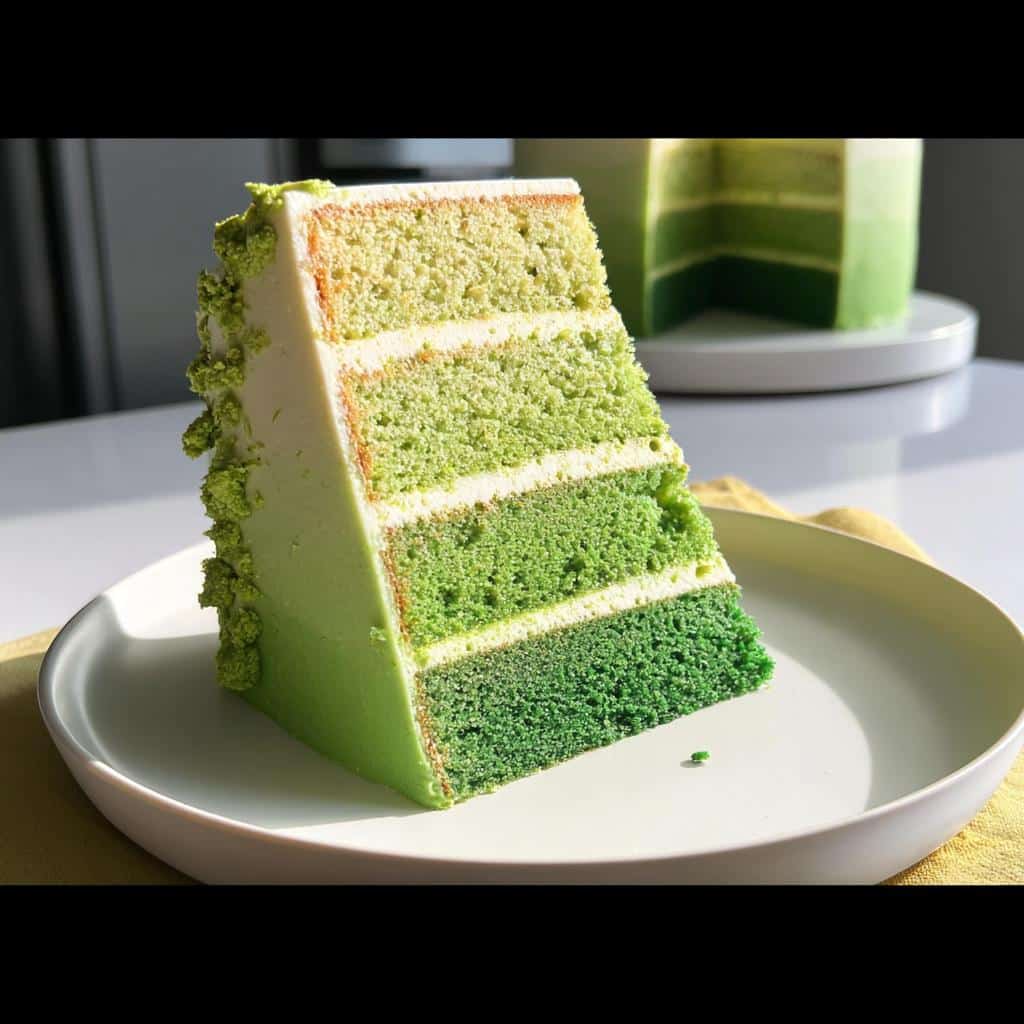
Achieving the Ombre Effect on Your Green Ombre Cake
Okay, this is the technical part, but you are going to crush it! Take your remaining, larger portion of buttercream. Divide *that* into four bowls. We need to color these four batches to match the four cake layers you baked—from deepest green to palest green—so you have four frosting shades to work with.
Get your piping bag ready. We are going to work from the top down, mirroring our layer stack. Take the palest green frosting and pipe a solid ring around the top of the cake, covering the top layer completely, and letting it spill maybe a quarter of the way down the sides. Switch your bag to the next lightest shade of green and pipe that around the edge of what you just finished, hitting the next quarter of the cake sides.
Repeat this process: the third shade covers the next section down, and the darkest green frosting goes all the way around the bottom edge of the cake. You should have distinct bands of color.
The magic happens now! Grab your palette knife. Gently place the knife against one of the colored bands and very lightly run it around the cake. Don’t press hard! Just let the knife skim the surface. As you spin the cake, the four distinct bands will melt into each other, creating that beautiful, smooth blend from dark to light that makes the Green Ombre Cake famous. If you see any harsh lines, a gentle second pass usually smooths it right out!
Tips for the Perfect Green Ombre Cake Finish
I really want you to feel confident stepping away from the mixer and trusting your decorating skills here. This cake is forgiving, but a few little tricks I picked up while I was teaching cake design will make sure your finish is absolutely flawless. These simple checks are the difference between ‘pretty good’ and ‘wow, did you buy that?’
- Room Temperature is Non-Negotiable: I know I mention it for the cake batter, but it matters just as much for the frosting! If your butter is too cold for the buttercream, it won’t mix to that ideal fluffy texture, meaning your final shades won’t pipe nicely against each other. If it’s too warm, it gets greasy and won’t hold its shape when you smooth it out. Be patient when pulling out your butter!
- Handle the Smoothing Tool Like a Feather: When you smooth the sides (after piping those four bands), you must use a light hand. Think of your palette knife as just gently grazing the frosting. If you press too hard, you’ll drag the dark green up into the light green sections, and instead of an ombre, you’ll end up with a muddy mess. Work in small, continuous rotations until the colors are just kissing each other.
- Layer Order Consistency: For the look this recipe is designed for—the lightest layer on top, darkest on the bottom—you need to stick to that visual order throughout. This is important because when you look down at the finished cake, the gradual transition *reads* better visually when it moves from light white-green at the very top to deep green at the base. It follows how our eyes naturally perceive density!
- Fixing a Messy Blend: If you look at the cake after the first smoothing pass and think you’ve gone too far and the colors have blended too much, don’t panic! You can actually re-apply a very thin layer of one of the existing shades right over the muddy spot and gently re-smooth it. Don’t feel stuck with the first attempt! That’s why having extra frosting ready is always a good idea when decorating.
If you want to see some of my other favorite kitchen wisdom and learn more about how I approach styling food, you can always hop over to my About Me page for my teaching philosophy!
Serving Suggestions for Your Green Ombre Cake
Wow, when you have a showstopper like this Green Ombre Cake, the rest of the menu needs to be just as fun but maybe a little less work on your part! Because the cake is so rich and visually stunning, I usually pair it with some lighter, fresher bites around it. This makes it the absolute perfect centerpiece for any party, especially when you’re planning your St Patrick Day Food Ideas Party.
I’d suggest serving it alongside some simple green snacks, like a fresh cucumber dill dip or maybe some light mint tea. Keep the surrounding food complementary rather than competing. This cake deserves all the attention, and trust me, everyone will be grabbing a slice!
Storage and Reheating Instructions for Leftover Green Ombre Cake
Oh, the wonderful problem of leftovers! This cake is so good, but because it’s filled with that delicious, buttery American buttercream, how you store the leftovers is super important to keeping that ombre frosting looking sharp. You want to enjoy it for days, right? Don’t just toss it in a plastic bag—that’ll ruin the pristine look we worked so hard on!
If you have slices left and the party is still going, you can keep them at room temperature for about 4 to 6 hours maximum. Because butter is a main ingredient in the frosting, it can get too soft and start sliding if it gets warm. If you need to store it longer than that, the fridge is your best friend.
To refrigerate the whole cake or leftover slices, you have to protect the frosting! Tent it loosely with plastic wrap, making sure the wrap *doesn’t* touch the buttercream itself. If you wrap it too tightly, it can pull bits of the green frosting off when you unwrap it later. In the fridge, it should stay fresh for up to 4 days. The cold won’t hurt the flavor much, but it will definitely firm up that glorious buttercream.
Now, here is the part people always forget: the reheating—or rather, the *thawing* part. If you’ve refrigerated the cake, you can’t just slice it cold. The butter in both the cake layers and the frosting will be rock hard, and it won’t taste nearly as rich! Pull the cake or the individual slices out of the fridge at least an hour before you plan to serve them. Let them sit on the counter until they come back to room temperature. Once they warm up slightly, the texture softens, the vanilla aroma pops again, and you get that perfect, tender bite just like fresh from the oven. Trust me, patience during this final step is worth the wait!
Frequently Asked Questions About Making an Ombre Cake
Whenever I share a technique-heavy recipe like this, I always get so many great questions about timing and troubleshooting! Don’t worry if this seems like a lot of moving parts; it all comes down to organized steps. I’ve gathered the most common things folks ask me about making their perfect Green Ombre Cake below!
Can I make this Green Ombre Cake ahead of time?
Absolutely! That’s one of the best parts about this recipe, especially if you’re planning a big bash. You can totally bake the four cake layers a day or two ahead of time. Once they are completely cool, wrap each one tightly in plastic wrap—no need to frost them yet—and store them at room temperature, or even freeze them (but wrap them well first!).
For the assembly, the crumb coat and the 30-minute chill time we talked about are your best friends! If you do the crumb coat the night before, you can leave the cake chilled overnight. Then, the next day, just pull it out about an hour before you want to do the final ombre piping. This makes day-of decorating so much less stressful than doing everything at once!
What are the best green foods for a party besides this cake?
If you’re diving into the green theme for your party spread, especially for a St. Patrick’s Day gathering, you’ll want a few easy things to balance out this amazing dessert! While this cake is the showstopper, having some simple Green Snacks or appetizers on the table is a must. Think easy assembly, not complicated cooking!
I always suggest prepping some vibrant green foods! Maybe some simple avocado toast points seasoned well, or even just some edamame tossed lightly with sea salt. These are fast, they look fantastic next to your centerpiece cake, and they fill everyone up while they wait for the dessert course! If you’re worried about finding treats simple enough for little helpers, check out some of my favorite easy recipes for kids!
How many shades of green should I use for the ombre effect?
For the most realistic and beautiful gradient, you need four distinct shades in the buttercream, plus the pale base color we use for the crumb coat! You have four cake layers, so you need four frosting shades to match them exactly. The colors should be subtle enough that the darkest shade isn’t a jarring black-green, and the lightest shade is barely noticeable. The key is making sure the difference between Shade 1 and Shade 2 is just one or two tiny drops of food coloring more than the previous one. When you blend them, that tiny difference makes all the difference visually!
Do I have to use four 6-inch pans, or can I use larger ones?
You *can* use larger pans, but you are going to change the structure of the cake significantly, and it makes the final coloring much harder! The recipe is written to yield four relatively thin, even layers using 6 or 7-inch pans. If you use two 8-inch pans, you’ll have two thick layers, and you won’t get the true ombre *layer* effect we are aiming for. If you decide to go bigger, you’ll need to significantly increase the time you spend dividing and coloring the batter, and the final height will be different, which throws off the frosting ratio. For this specific technique, sticking to four pans gives you the best control over your color bands!
Share Your Beautiful Green Ombre Cake Creation
Seriously, I cannot wait to see these cakes! When you pour your heart into learning a visual technique like the ombre layering, it feels so rewarding when it turns out gorgeous. Since I’m all about building confidence in the kitchen, I need to see your hard work pay off!
Once you’ve smoothed out that final shade blend, please, please snap a picture and tag me on social media! I want to see how you decided to finish yours—did you go with bright sprinkles, a simple dusting, or maybe some elegant edible pearls? Tell me in the comments below how the color blending went for you. Did you find it easier than you expected?
If you had any challenges or incredible successes, drop a rating and a note for the next baker! Your feedback truly helps me keep improving the tutorials I create for all of us creative cooks. And if you loved learning this technique, stick around! Check out the rest of my baking tutorials where we take everyday recipes and give them a little creative flair, just like we did here. You can always reach out with questions via my contact page!
Green Ombre Cake
Ingredients
Equipment
Method
- Preheat the oven to 340 F and prepare four 6 or 7-inch round cake pans.
- In a mixing bowl, beat together 1 cup butter and the granulated sugar until the mixture is light and creamy.
- Incorporate the eggs one at a time, mixing well after each addition until the egg is thoroughly combined. Add 2 teaspoons of vanilla extract and mix once more.
- In a separate bowl, mix together the flour, baking powder, and salt. Slowly incorporate this dry mixture into the cake batter.
- Divide the prepared cake batter into 4 bowls. This recipe makes about 4 cups of batter, so place one cup of batter into each of the 4 separate, clean bowls.
- Add the green food coloring to each bowl of batter in increasing amounts to give each portion a different shade of green. Mix well so the color is fully incorporated through the batter.
- Pour the 4 bowls of batter into the 4 separate cake pans. Bake the cakes for 25 to 30 minutes, until the cakes are lightly golden on top and spring back when touched. Once done, remove the cakes from the oven and cool them on a cooling rack.
- While the cakes cool, add 1 cup butter to a clean mixing bowl and slowly beat in the 4 cups powdered sugar. Add the remaining 2 teaspoons of vanilla extract to make your buttercream.
- Add a little green food coloring to the prepared buttercream until it reaches a very light green tone. Separate out about one-third of the frosting.
- Layer the cooled cakes on top of one another, placing the darkest sponge at the bottom. Use a spoonful of the separated buttercream to frost between each layer. Then, use any remaining separated buttercream to cover the entire cake. This is the crumb coat. Put the cake in the fridge for half an hour to allow the crumb coat to harden.
- Take the remaining two-thirds of the buttercream and divide it into four bowls. Using the green food coloring, add a little to each bowl in increasing amounts to give each portion a different shade of green. You should have 4 subtly different shades of green buttercream, going from light green to a deeper tone.
- Using a piping bag, start at the top of the cake and pipe the lightest shade of green buttercream onto the top of the cake and one-quarter of the way down the side of the cake (covering the top layer). Then, switch to the second shade of green and pipe around the cake until you reach the middle. Use the third shade to pipe down to the bottom quarter of the cake, then finish the cake by piping the darkest shade of green to the very bottom.
- Using a palette knife, gently go around the cake to smooth out the buttercream. This will cause the colors to blend and create the ombre coloring.
- Finish the cake with some fun sprinkles before serving.