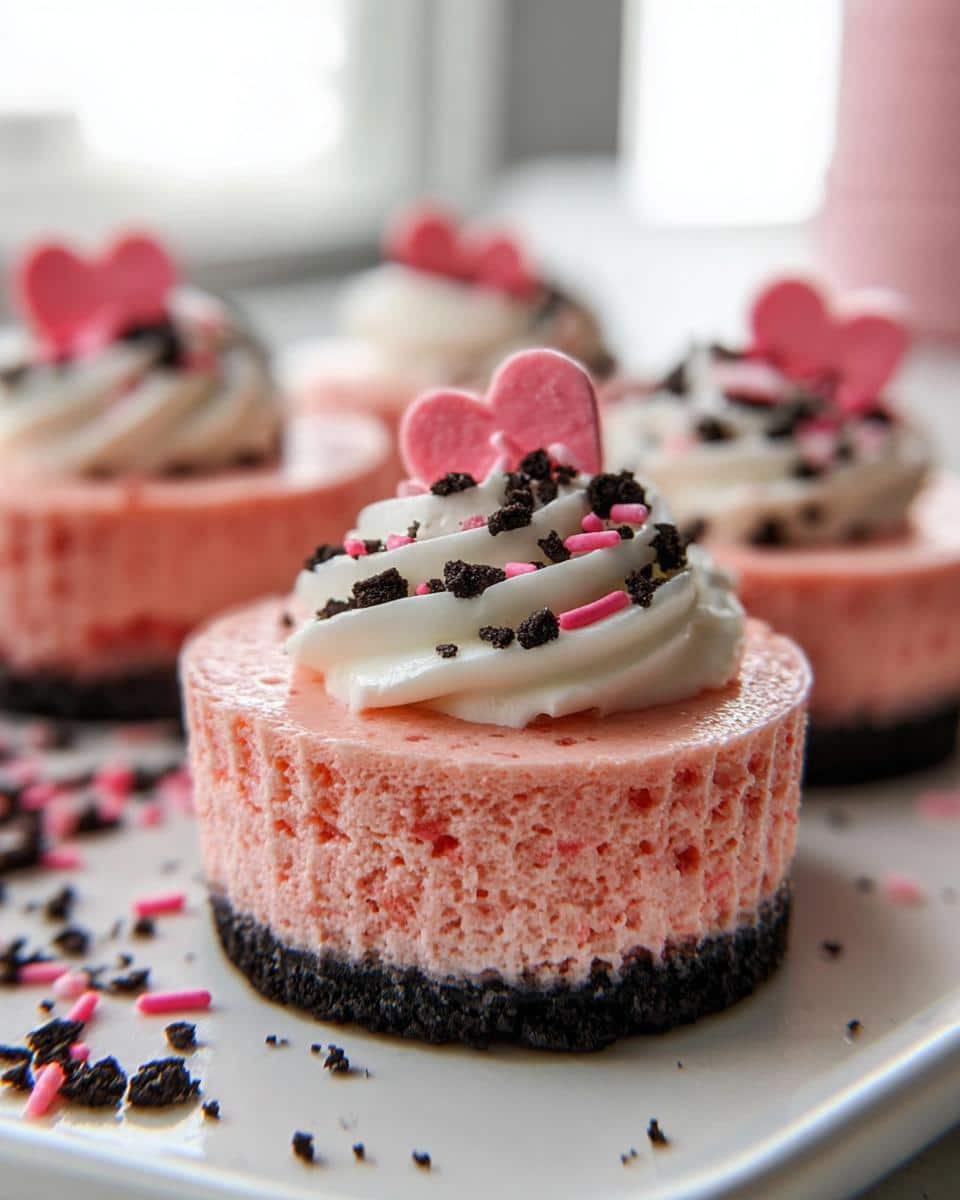
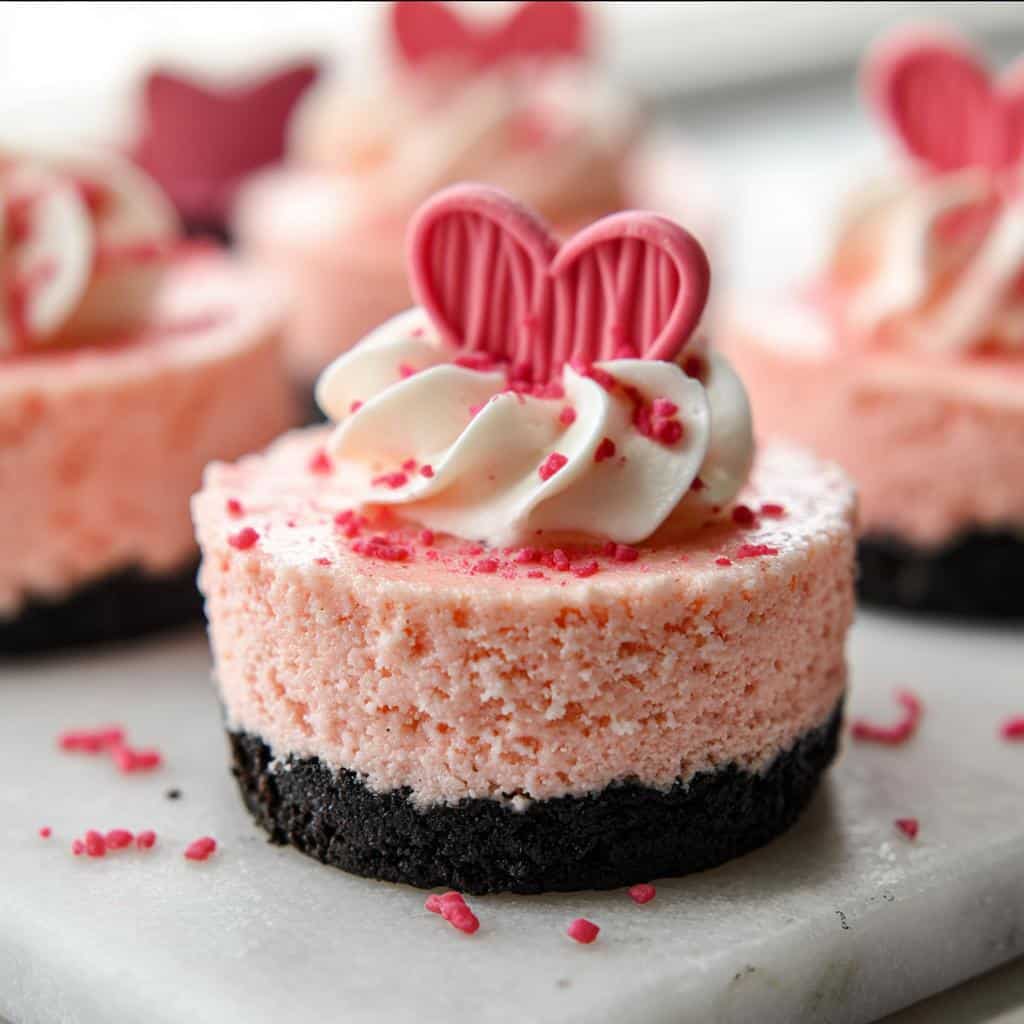
You know, there’s just something magical about desserts made just for one person, right? They feel so much more special, especially when you realize they take almost no fuss! Forget the massive, crack-prone springform pans; we are diving headfirst into perfect, creamy indulgence with these Mini Valentine Cheesecakes. They are unbelievably easy to put together, totally giftable, and honestly, they look way fancier than the tiny amount of effort they require.
As a Registered Dietitian and Flavor Strategist, I always aim for balance, and these little treasures hit that sweet spot between decadent treat and manageable baking project. Trust me, when you serve these gorgeous pink cups, everyone will instantly love them. If you’re looking for simple, show-stopping Valentine Day Desserts, you’ve found your winner!
Why You Will Love These Mini Valentine Cheesecakes
Honestly, there are so many reasons these cheesecakes deserve a spot on your Valentine’s Day baking list. They really simplify the whole festive dessert game! If you’re short on time or just worried about making one giant, temperamental cheesecake, these little buddies fix everything. They’re absolutely fantastic additions to any spread of Valentine Day Desserts.
- They offer perfect portion control—no sneaking just one tiny slice, you get a whole cupcake-sized treat!
- The no-fuss Oreo crust means you don’t even need to worry about springform pans or water baths. It’s so straightforward!
- That gorgeous pink hue makes them instantly festive for any romantic celebration or Galentine gathering.
- They chill beautifully in the fridge, making them an excellent make-ahead option, saving you stress on the actual day.
- Individual servings are naturally easier to decorate, manage, and serve compared to cutting a full cake.
- The texture is purely creamy and rich—that signature cheesecake experience in a tiny package.
Gathering Ingredients for Your Mini Valentine Cheesecakes
Okay, look at this ingredient list! It’s short, sweet, and uses things you probably already have, which is exactly how I like my Valentines Day Baking Ideas. Since these are little guys, we don’t need tons of ingredients, but the quality matters! Specifically, that cream cheese—it absolutely *must* be softened to room temperature. Trust me on this one; soft cheese creams up beautifully, giving you that super smooth texture we are after. Don’t try to rush it!
For the Oreo Crust
This is seriously easy. We’re using whole Oreos, not just the wafers—the whole cookie gives us that nice chocolatey depth against the tangy filling.
- Oreo Crumbs: 1 cup (I usually pulse about 10 to 11 whole cookies in the processor—that’s just the right amount!)
- Butter, Melted: 2.5 tablespoons
For the Creamy Cheesecake Filling
This is where the magic happens! Make sure your foundation is absolutely smooth here before we add the color! Remember that cream cheese rule!
- Cream Cheese, Softened: 2 (8 oz) packages (Softened is non-negotiable for the best mixture!)
- Sugar: 1/2 cup
- Eggs: 2 large
- Vanilla: 1 teaspoon
- Red Food Coloring: Enough to get the specific romantic pink color you desire.
Optional Toppings for Mini Valentine Cheesecakes
These are totally for flair and fun. You can keep it simple or go all out for your special someone or your Galentines Aesthetic party!
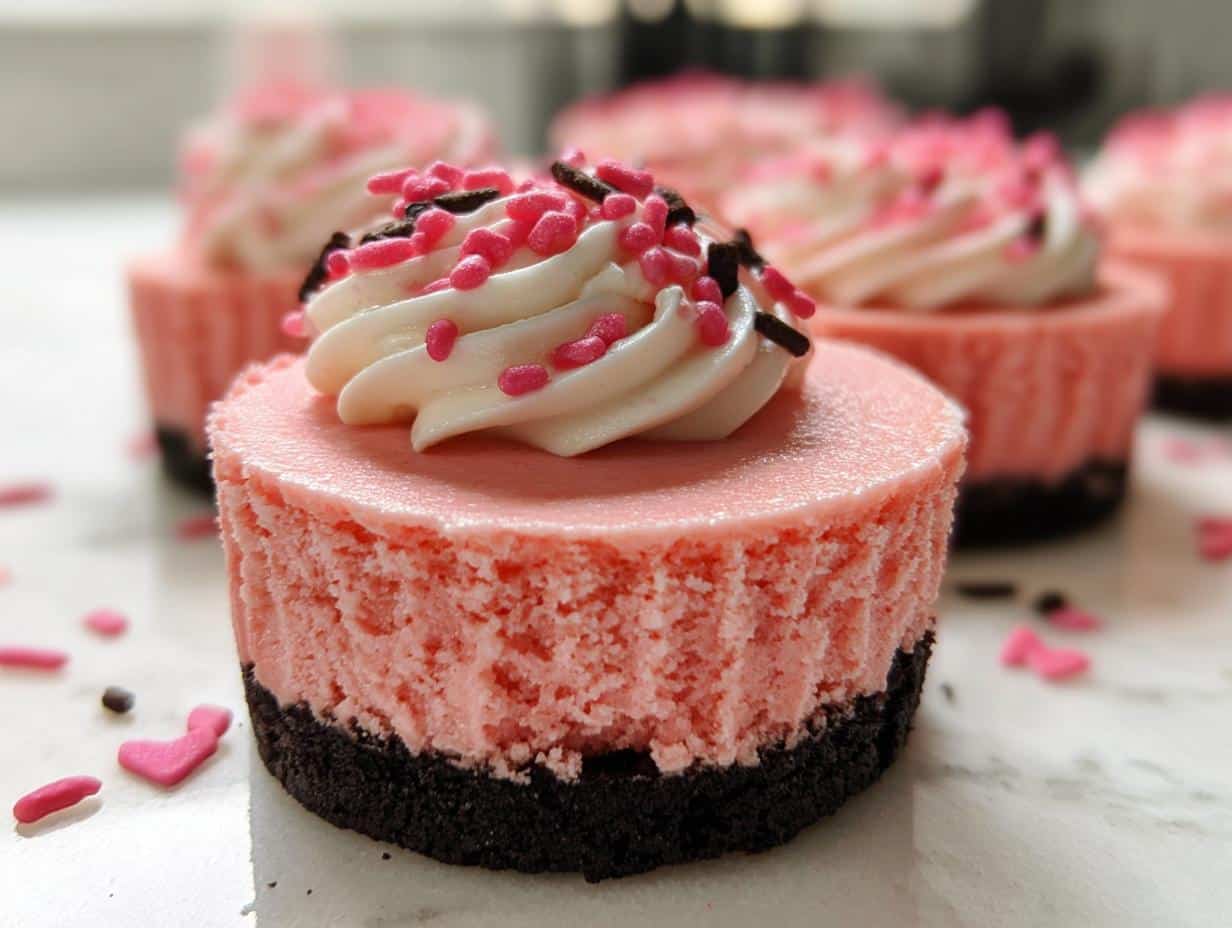
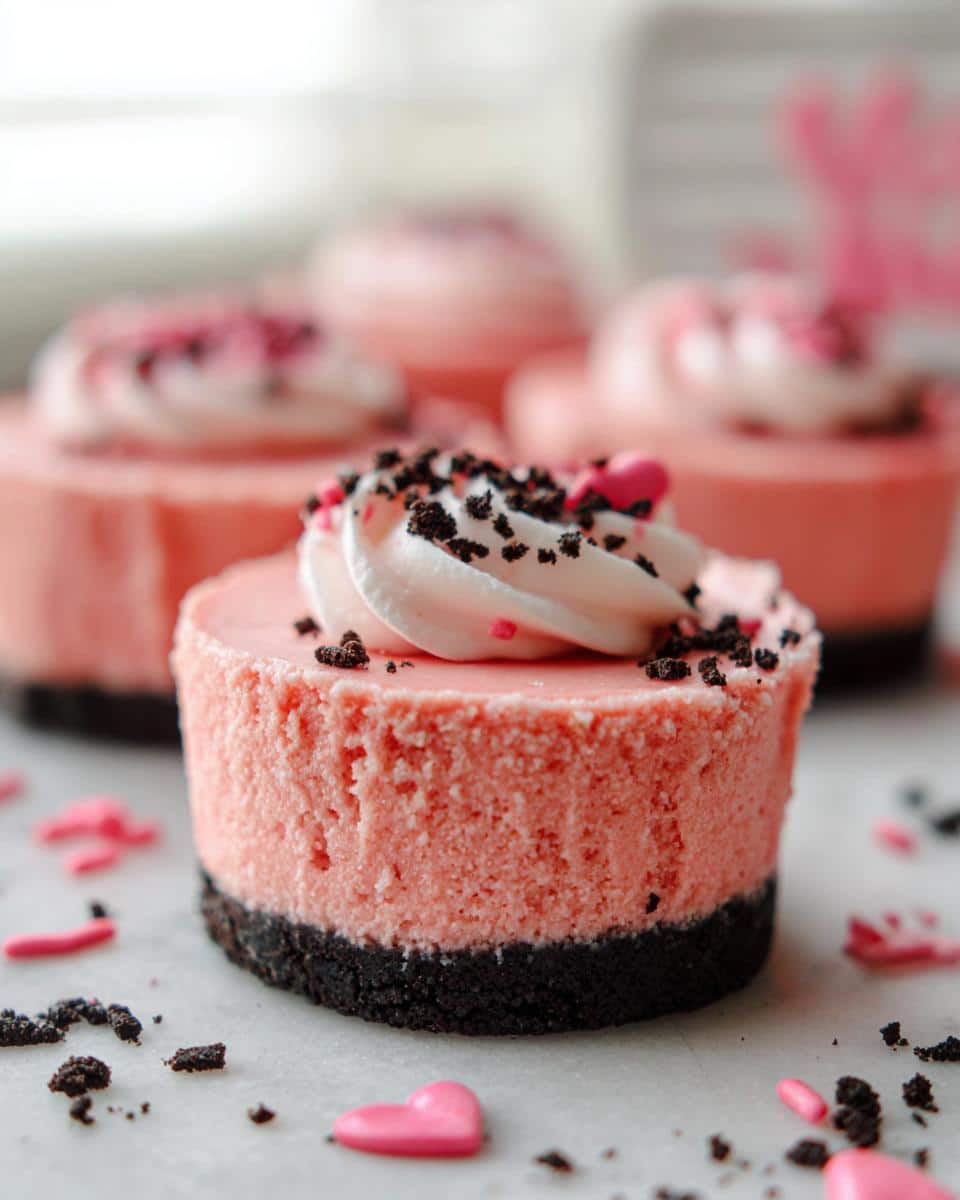
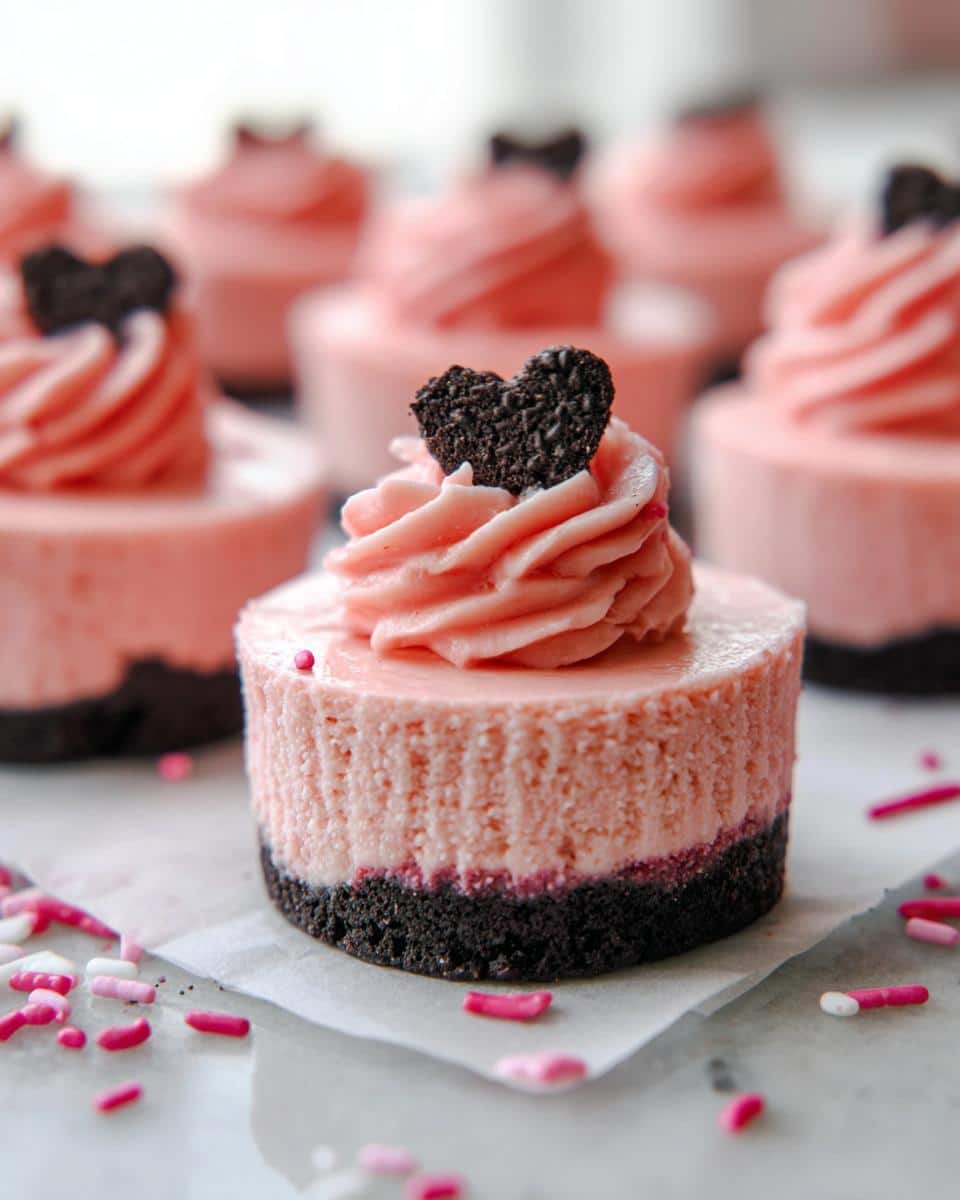
- Whipped Cream (optional, but highly recommended for fluff!)
- Valentine Sprinkles (the sparklier, the better!)
Essential Equipment for Perfect Mini Valentine Cheesecakes
Before we even think about turning on the oven, let’s make sure your kitchen is ready. Having the right tools makes this job virtually foolproof, which is a massive win when you’re aiming for beautiful Valentines Day Treats.
For these individual cheesecakes, you don’t need a lot of fancy gear. In fact, if you have a standard muffin tin, you’re already halfway there! I find that setting out the tools first prevents that frantic searching halfway through mixing, which is usually when I spill something.
Here is the short list of what you’ll need to make these come out perfectly:
- Cupcake Pan: This is your best friend! You will need standard liners if you plan to lift them out easily later.
- Food Processor: This is key for crushing those Oreos into that perfect, sandy crumb for the crust. If you don’t have one, a sturdy Ziploc bag and a rolling pin will work, but it takes more muscle!
- Medium Bowl: You need one good mixing bowl for bringing together the cream cheese, sugar, eggs, and coloring.
That’s it! No stand mixer needed for this recipe, which makes the cleanup way easier too. See? I told you these were simple Valentines Day Baking Ideas!
Step-by-Step Instructions for Baking Mini Valentine Cheesecakes
Alright, let’s get mixing! Baking these mini Valentine cheesecakes is exactly like following a super straightforward roadmap. The key here is not rushing the steps, especially when we are blending those smooth ingredients together. By following this sequence, you’re guaranteed to get that creamy texture that makes these the ultimate Valentines Day Food Ideas!
Preparing the Crust for Your Mini Valentine Cheesecakes
Step one is getting that oven ready to go! You want a nice warm environment for our little crusts to set up properly.
- First off, preheat your oven way up high to 350 degrees.
- I always make sure to line my cupcake pan with liners; it saves so much heartache later when they need to come out!
- Now for the crumbs: Pulse your Oreos in the food processor until you get lovely crumbs, then pulse in that melted butter until everything just starts sticking together.
- Spoon that mixture evenly into the liners. Don’t be shy here—you need to press it down firmly across the bottom of each cup. A firm base means a sturdy cheesecake!
Mixing the Smooth Cheesecake Filling
This step requires a little patience to ensure no lumps survive. Remember, the cream cheese needs to be soft enough that your mixer doesn’t have to strain!
- In your medium bowl, beat that softened cream cheese with the sugar. I mean, really beat it until it looks fluffy and definitely smooth.
- Next, beat in your eggs one at a time, followed by that splash of vanilla. Scrape down the sides with a spatula frequently so everything gets incorporated evenly.
- Finally, add the red food coloring slowly. Keep mixing until you achieve that perfect, gentle pink shade you want for all your romantic preparations!
- Spoon the batter over the top of your crusts, filling each cup about three-quarters full—around 1/4 cup of filling per cup usually does the trick.
Baking and Cooling the Mini Valentine Cheesecakes
The bake time is short, which is why these are such a lifesaver! If you overbake them, they might crack on you, so watch closely.
- Bake these little guys for about 15 to 17 minutes.
- When they are done, the edges should look set, but the very center will still have a slight jiggle to it—that’s the secret!
- Pull the pan out of the oven and let the cheesecakes cool completely right there in the pan on a wire rack. Don’t rush this cooling time!
- Once they’ve cooled down to room temperature, transfer the whole pan to the refrigerator and let them chill until they are totally firm before decorating. This chilling sets that incredible texture.
Tips for Making the Best Mini Valentine Cheesecakes
Even though these are simple, I always like to share my little secrets that push a good dessert into the *amazing* category. When it comes to cheesecake—even mini versions—texture is everything! If you want them perfectly creamy and pink without any fuss, keep these quick tips in mind. These little pointers will make sure your Valentines Day Treats look professionally done!
My main goal when baking these is zero cracking. Cracks happen when the temperature changes too fast, or if the mix has too much air whipped into it. Since we aren’t using a water bath for these minis—because who has time for that on Valentine’s Day?—we have to be mindful of how we mix and cool them.
- Don’t Overmix the Filling After Adding Eggs: Once the eggs go in, you only mix until *just* combined. Overbeating eggs introduces tons of air bubbles, and those bubbles expand in the oven, leading to puffing and then sinking, which definitely causes cracks when they cool. Stop when you just don’t see streaks of egg white anymore!
- Room Temp Cream Cheese is Your Best Friend: I can’t stress this enough. If your cream cheese is cold, you *have* to overmix to get it smooth, which means more trapped air. Make sure it’s actually soft to the touch before you even start blending it with the sugar.
- Cool Them Down Slowly: Once the 15 minutes are up, pull the pan out, but resist the urge to move them immediately to the counter or the fridge. Let them sit on the stovetop or a cooling rack for a good 30 minutes. Gradual cooling prevents that sudden temperature shock that causes the tops to shrink too fast.
- Use High-Quality Red Coloring: If you want that deep, romantic pink, don’t use too much liquid coloring, as it can thin out the batter. Use gel food coloring if you have it—you only need a tiny dot, and it gives you vibrant color payoff without changing the texture of your filling!
Creative Variations for Your Mini Valentine Cheesecakes
While the Oreo crust and pink filling are absolutely stunning for classic Valentines Day Dessert Ideas, sometimes you just want to jazz things up a bit, right? I love experimenting, even when I’m working with a tried-and-true recipe. These mini cheesecakes are such a fantastic base because they are so versatile. You can easily swap out the crust or throw in some extra flavor to make them your own signature creation. Trust me, these little tweaks take zero extra time but give you endless possibilities for your romantic celebrations!
Here are three ways I love to shake up this recipe. They are simple changes, but they completely transform the final flavor profile, making them perfect for any Valentines Day Baking spread.
Swap the Cookie Crust
If you get tired of Oreos—which, let’s be honest, is rare—you can easily pivot the crust for a totally different vibe. This is a great way to introduce complementary flavors!
- Graham Cracker Base: Swap the Oreos for graham crackers and use melted butter for the binder. This gives you a more traditional, buttery base that lets the pink filling shine even brighter.
- Shortbread Magic: Use crushed shortbread cookies! They are buttery and less intense than chocolate, which is wonderful if you plan on topping them with something tangy, like raspberries. You’ll want to use just slightly less butter here since shortbread often has more fat already.
- Ginger Snap Kick: For a surprising warm spice note, use finely crushed ginger snaps. The snap pairs unbelievably well with the creamy vanilla filling. This one is definitely my favorite for a more grown-up treat!
Infuse the Filling with Zest
Since we are keeping the color pink, let’s add a little brightness to that creamy interior! Zest is packed with intense flavor oils, and just a tiny bit goes a long way when mixed into the filling before it goes into the oven.
- Blend in the zest of one whole lemon along with the sugar. The lemon cuts through the richness of the cream cheese perfectly, making the dessert feel lighter.
- If you want something softer, try adding orange zest. It blends beautifully with the vanilla and gives the dessert a subtle, sweet citrus background note. This is fantastic if you are creating Valentines Day Meal pairings with fruit.
Go Beyond Basic Sprinkles for Topping
The topping is your chance to make these visually stunning right before serving. Forget just tossing sprinkles on! Think about texture contrast.
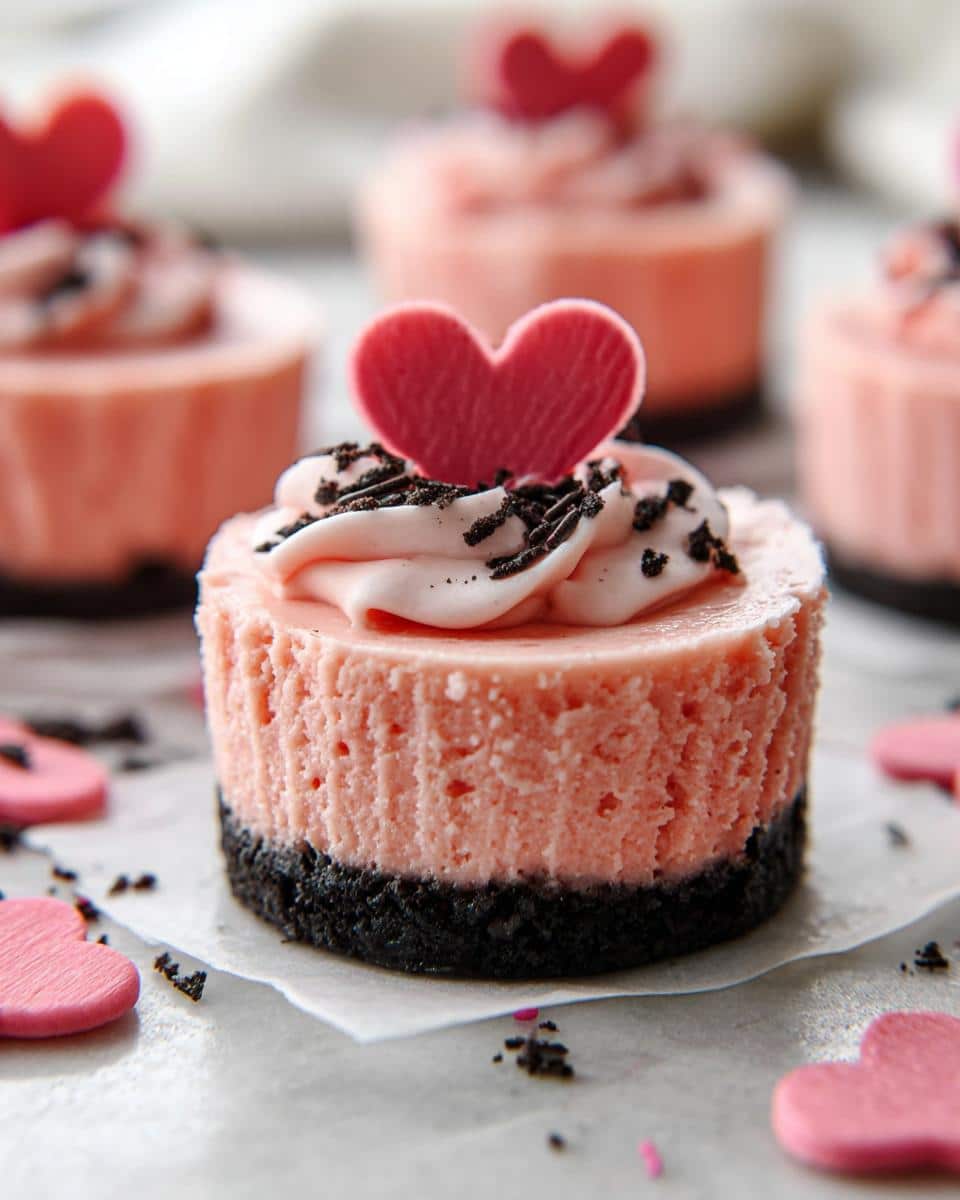
- Chocolate Drizzle: Melt down some high-quality dark chocolate chips. Once the cheesecakes are fully chilled, use a fork to drizzle thin, delicate ribbons all over the top. The dark chocolate provides the best contrast against the pale pink.
- Fresh Berry Crown: Top each one with a single, perfect raspberry or a slice of strawberry. It adds a pop of color and fresh fruit flavor that everyone adores in Valentine Day Desserts.
- Mini Chocolate Hearts: If you can find those little candy-coated chocolate hearts, place just one right in the center of the whipped cream dollop. It’s cute, easy, and makes them instantly photo-ready!
Storing and Serving Your Festive Mini Valentine Cheesecakes
Now that you’ve created these tiny masterpieces, the next big question is: how do we keep them perfect until it’s time to dive in? Honestly, making these ahead of time is one of the biggest selling points for these mini Valentine cheesecakes! They actually *need* that chill time to firm up properly.
You will need at least four hours in the fridge for the filling to set completely after baking and cooling. If you let them go overnight, even better! They hold up beautifully, which really takes the pressure off your hosting duties when you’re planning other Valentines Day Meals or just trying to get everything ready.
Proper Storage for Optimal Freshness
When storing these, you want to protect that smooth top surface. If you stack them right away, you’ll end up with a delicious mess! You can absolutely store them in the cupcake pan, provided you cover it tightly with plastic wrap. But I usually find they stick together a bit when lined up like that.
My preferred method is transferring them to an airtight container where they can sit snugly in a single layer. If you don’t have a container big enough, line the bottom lightly with parchment paper, add a layer of cheesecakes, put another thin sheet of parchment over them, and start the next layer. They should stay perfectly good in the refrigerator for about five days.
When to Add the Final Touches
Here is a super important tip for keeping your presentation flawless: toppings come last! If you add whipped cream or those pretty sprinkles the day before, the moisture from the cheesecake will make the whipped cream weep and the sprinkles might start to bleed color.
Wait until about 30 minutes before you plan to serve them to whip up your cream or scatter your decorations. This small step ensures that every single one of these Valentines Day Treats looks exactly as beautiful and fresh as it did when you first decorated it. They are wonderful served chilled straight from the fridge, especially when they are paired with a strong cup of coffee or a crisp glass of prosecco!
Frequently Asked Questions About Mini Valentine Cheesecakes
I totally get it—when you find a perfect recipe like these little gems, you want to make sure everything goes right! I’ve gathered up the questions readers ask most often about turning these into the stars of their Valentine Day Desserts spread. Hopefully, these quick answers save you some guesswork during your Valentines Day Baking Ideas session! If you want to learn more about my approach to balanced flavor, check out my bio here.
Can I make these Mini Valentine Cheesecakes ahead of time?
Yes, you absolutely can, and I highly recommend it! They need at least four hours in the fridge to get that firm, creamy texture we want. You can bake and cool them completely the day before you plan to serve them and keep them covered tightly in the refrigerator. Just wait to add any whipped cream or delicate sprinkles until right before you serve them so everything stays perfectly fresh looking!
How do I achieve the perfect pink color for these Valentines Day Treats?
The secret here is patience and starting small! Cream cheese is naturally white, so you need that food coloring. Use gel coloring if you have it because it’s more concentrated. Add just one toothpick dip or one tiny drop at a time to your filling mixture, mixing gently after each addition. You can always add more color, but you can’t take it away once it’s in there, so go slow until you hit that sweet, soft pink!
Are these Mini Valentine Cheesecakes suitable for a Galentines Aesthetic gathering?
Oh, definitely! These are *perfect* for a Galentines Aesthetic gathering. Because they are individual, they are so easy for guests to grab while mingling. For a fun Galentine vibe, skip the gentle pink and go wild with the toppings! Think neon pink and blue sprinkles, maybe a drizzle of white chocolate, or even using crushed purple cookies for the base instead of Oreos. They are super flexible for fun presentations!
What is the best way to ensure the crust stays firm?
The key to a firm crust is pressing it down really well! After you combine your Oreo crumbs and melted butter, use the back of a small spoon or the flat bottom of a shot glass to really compact that mixture into the bottom of the liner. Make sure it’s packed tightly before you pour in the wet filling. That pressure helps the butter bind everything together so it doesn’t crumble when you grab it!
Do I need to use cupcake liners for these cheesecakes?
While you technically *could* apply cake release goop directly to the metal of the cupcake pan, I strongly advise using liners. These are mini cheesecakes, and they are notoriously delicate when warm. The liner gives you a clean way to hold it, peel the paper down, and transfer the entire perfect little dessert to a serving plate without worrying about tearing the crust. It makes serving them so much tidier!
Nutritional Estimates for Mini Valentine Cheesecakes
Okay, now for the part I have to address as a Registered Dietitian! These are undeniably rich, buttery, and sweet because they are cheesecake, after all. They look small, and they are portion-controlled, which is great, but we still need to be mindful of what we are enjoying. These Mini Valentine Cheesecakes are definitely a treat to savor, especially those buttery Oreo crusts!
I always emphasize that these numbers are just estimates—my way of saying, enjoy them in the moment! The exact count can swing based on the brand of Oreos you use or how thick you pack that crust. For the most accurate data, you’d need to input every single ingredient into a tracking app, but for general planning purposes for your Valentine Day Desserts, this should give you a good ballpark figure per cheesecake (based on 12 servings).
- Calories: Roughly 180–210 kcal
- Total Fat: Around 12–15g (Most of this comes from cream cheese and butter, naturally!)
- Protein: Approximately 3–4g
- Total Carbohydrates: About 16–19g (This includes the sugar and the cookie crumbs.)
Keep in mind that these figures don’t account for any toppings like whipped cream or sprinkles, which will definitely nudge those numbers up a little higher. Think of these as a wonderful, indulgent centerpiece for your celebration rather than an everyday snack. Enjoy every single creamy, perfectly pink bite!
Share Your Beautiful Mini Valentine Cheesecakes
Whew! Look at what you made! Honestly, seeing all these individual, gorgeous little cheesecakes warming up a platter is just the best feeling. These Mini Valentine Cheesecakes really deliver on being elegant without demanding hours of your time, and I genuinely want to see how you decorated yours!
Baking should always be fun, and sharing the results is half the joy. When you make these creamy delights, please don’t keep all that beauty to yourself! I love seeing the creative twists people put on my classic recipes, especially for something as fun as Valentine’s Day. It helps other readers feel confident trying the recipe for their own Valentines Day Treats too.
- Let Me Know What You Thought! If you made these little cups, hit the star rating right at the top of the post! Your feedback helps me know what’s working and what I should talk about more on the blog.
- Tell Me About Your Decorating Wins: Did you go for simple sprinkles, or did you try a beautiful raspberry crown? Leave a comment below and tell me how you customized your filling color and crust—I love hearing the inspiration behind your choices!
- Tag Me on Social Media: Seriously, snap a picture of your finished Mini Valentine Cheesecakes! Tag me when you post them up to show off your gorgeous work. It truly makes my day when I see your successful bakes come through my feed. If you need help reaching out about future recipe ideas, you can always use my contact form!
Happy baking, sweet friends! I hope these little treats bring a smile to someone special’s face this Valentine’s Day!
Mini Valentine Cheesecakes
Ingredients
Equipment
Method
- Preheat your oven to 350 degrees. Line a cupcake pan with liners.
- Pulse about 10 to 11 Oreos in a food processor to make crumbs. Pulse in the melted butter until the mixture combines well.
- Divide the crumb mixture evenly between each liner and press down firmly to form the crust.
- In a medium bowl, beat the softened cream cheese and sugar until the mixture is smooth.
- Beat in the eggs and vanilla into the cream cheese mixture.
- Mix in red food coloring until you reach the pink color you want.
- Spoon about 1/4 cup of the cheesecake mixture into each cup, filling them evenly.
- Bake for 15 to 17 minutes. The centers of the cheesecakes should still look slightly jiggly when done.
- Remove the pan from the oven and let the cheesecakes cool completely in the pan. Then, refrigerate them until they are firm.
- Top with whipped cream and sprinkles if you choose to use them.