There’s a particular kind of quiet satisfaction that comes when a cake you’ve baked at home looks like it walked right out of a high-end bakery window. That’s what we’re aiming for today. We are diving deep into the craft required for the Minimalist White Cake Smooth Finish—a design where precision matters more than ornamentation. As a culinary historian, I find that the most enduring beauty often lies in the classics, executed perfectly. This recipe hinges on mastering those foundational skills, ensuring a flawless texture and that crisp, clean edge everyone admires. Trust me, achieving that bakery style smooth cake here at home is absolutely within your reach.
Before we begin assembling, I always share my full culinary standard disclaimer for clarity on ingredient substitutions. Every step here is designed for structural elegance.
Why This Minimalist White Cake Smooth Finish Recipe Stands Apart
When a cake design is this simple, the technique has to be flawless. My approach pulls from decades of classic pastry structure, making sure this isn’t just another pretty dessert, but one built to last gracefully at a big event. We aren’t hiding anything behind heavy decoration; we are celebrating structure here.
This recipe is superior for anyone aiming for true Wedding Cake Ideas because it prioritizes clean lines and a stable foundation. Here is why this structure works so well:
- It uses temperature-controlled ingredients, which is the key to a uniform, fine crumb.
- The buttercream ratio is designed specifically for spreading and smoothing, not just flavor.
- The pure white canvas allows for subtle texture variation to shine through.
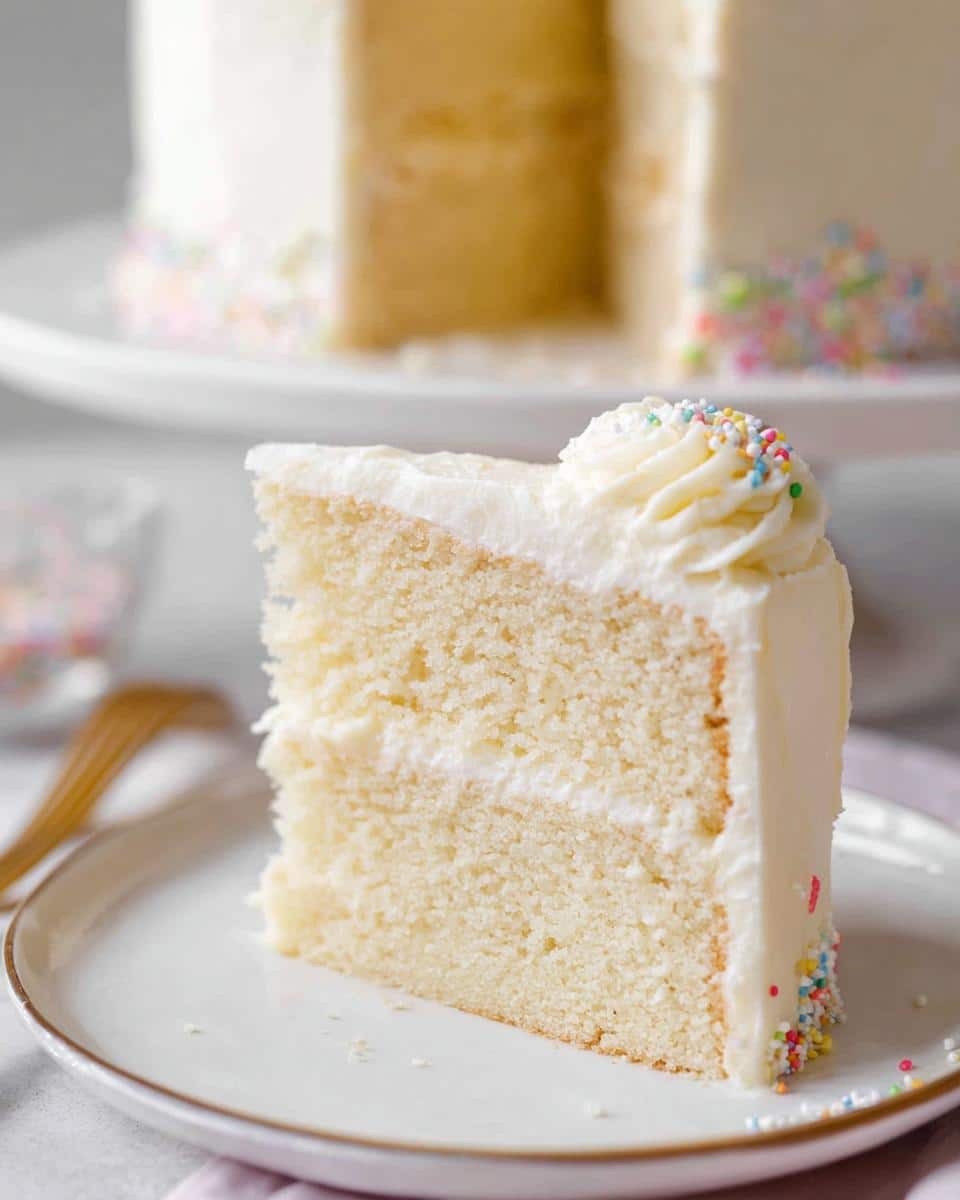
Achieving Bakery Style Smooth Cake Texture
The textural secret truly starts in the cake itself. We use a slightly higher proportion of egg whites for lift and structure without adding the yellow hue of the yolks. When you measure your flour carefully—don’t scoop, spoon and level!—you guarantee that the cake is tender but sturdy enough to hold up under that final layer of frosting without compressing.
The Appeal of Minimalist White Cake Smooth Finish for Celebrations
The modern eye gravitates toward clean silhouettes, and the Minimalist White Cake Smooth Finish offers that incredible elegance. It acts as the perfect backdrop, whether you’re celebrating a quiet anniversary or a major milestone. It’s a testament to the idea that sometimes, less really is more, allowing the quality of the bake to speak for itself.
Essential Equipment for Your Minimalist White Cake Smooth Finish
To get that sharp, professional geometry we are aiming for, you need to use the right tools. Think of it like setting up a clean workshop; when your tools do their job well, the technique flows so much easier. Don’t try to rush this part—having the proper equipment makes the difference between a rustic look and a truly smooth finish.
Here is what I always pull out for this specific project:
- Two 8-inch round cake pans. Make sure they are flat-bottomed!
- Your favorite heavy-duty mixer, whether it’s a hand model or a big stand mixer.
- A couple of sturdy cooling racks, absolutely crucial for letting those layers come down in temperature evenly.
- A medium bowl just for combining the dry ingredients quickly.
- And finally, large mixing bowls dedicated to the batter and the buttercream.
Ingredients for the Classic White Cake and Smooth Finish Buttercream
Now for the heart of the matter—the components that give us that pristine whiteness and luxurious texture. Since this cake is all about purity of flavor and appearance, using the right ingredients at the right temperature isn’t just helpful, it’s mandatory. Take your butter and eggs out ahead of time, please! Room temperature makes worlds of difference when you start creaming.
Here is exactly what you’ll need for both layers of this elegant dessert:
For the Cake:
- 3 cups all-purpose flour (that’s about 360g, measured precisely!)
- 2 teaspoons baking powder
- 3/4 teaspoon salt
- 2 cups granulated sugar (400g)
- 1 cup unsalted butter, softened (227g)
- 2 teaspoons vanilla extract
- 1/2 teaspoon almond extract (if you want just a little background note)
- 1 cup whole milk, room temperature (240ml)
- 5 large egg whites, all brought to room temperature
For the Vanilla Buttercream:
Remember, for the smoothest finish, your butter needs to be truly soft but not melty. This is crucial for that professional look later on!
- 1 1/2 cups unsalted butter, room temperature (340g)
- 1/2 teaspoon salt
- 5 cups confectioner’s sugar (600g), sifted if you can!
- 2 teaspoons vanilla extract
- 1 to 4 tablespoons whole milk (watch this closely, we start low!)
Step-by-Step Guide to Baking the Perfect Minimalist White Cake
Baking this structure requires a bit of focused attention, but please don’t let that intimidate you! It’s about rhythm. First things first, get your oven set to 350°F. When prepping those 8-inch pans, I highly recommend lining the bottoms with parchment paper after you grease them. This small step ensures an easy release, which is vital when you need your layers perfectly intact. That little bit of fuss saves so much stress later on, believe me!
Next, we take our dry ingredients—the flour, baking powder, and salt—and whisk them together in a medium bowl. This just ensures the leavening agents are distributed before they meet the wet ingredients. In the big bowl, cream that softened butter with the sugar until it looks light and truly fluffy. That takes a few minutes, but it incorporates the air we need.
Add the egg whites one by one, mixing gently until they vanish into the batter before adding the next one. Then it’s time to build that structure slowly. Be sure to check out these easy baking recipes if you need something quicker next time, but for this smooth finish, patience pays off now.
Mixing Techniques for a Tender Cake Batter
The most critical part of achieving a tender crumb that’s perfect for smoothing frosting is how you add the flour and milk. You must alternate! Never dump everything in at once, or you’ll deflate all that beautiful air you just whipped into the butter.
Start with one-third of your dry mix, then half the milk, then another third of the flour, the rest of the milk, and finish with the last of the flour. Use the lowest speed on your mixer. You just want everything combined until barely smooth. A few little streaks of flour are fine; scraping down the bowl and giving it one last gentle fold by hand ensures you haven’t overdeveloped the gluten, keeping that cake beautifully soft.
Divide that perfect batter evenly between your prepared pans and pop them in the oven for about 35 to 40 minutes. They are done when the centers spring back slightly when touched. Cool them completely on racks before you even think about frosting them—warm cake and cold buttercream are natural enemies!
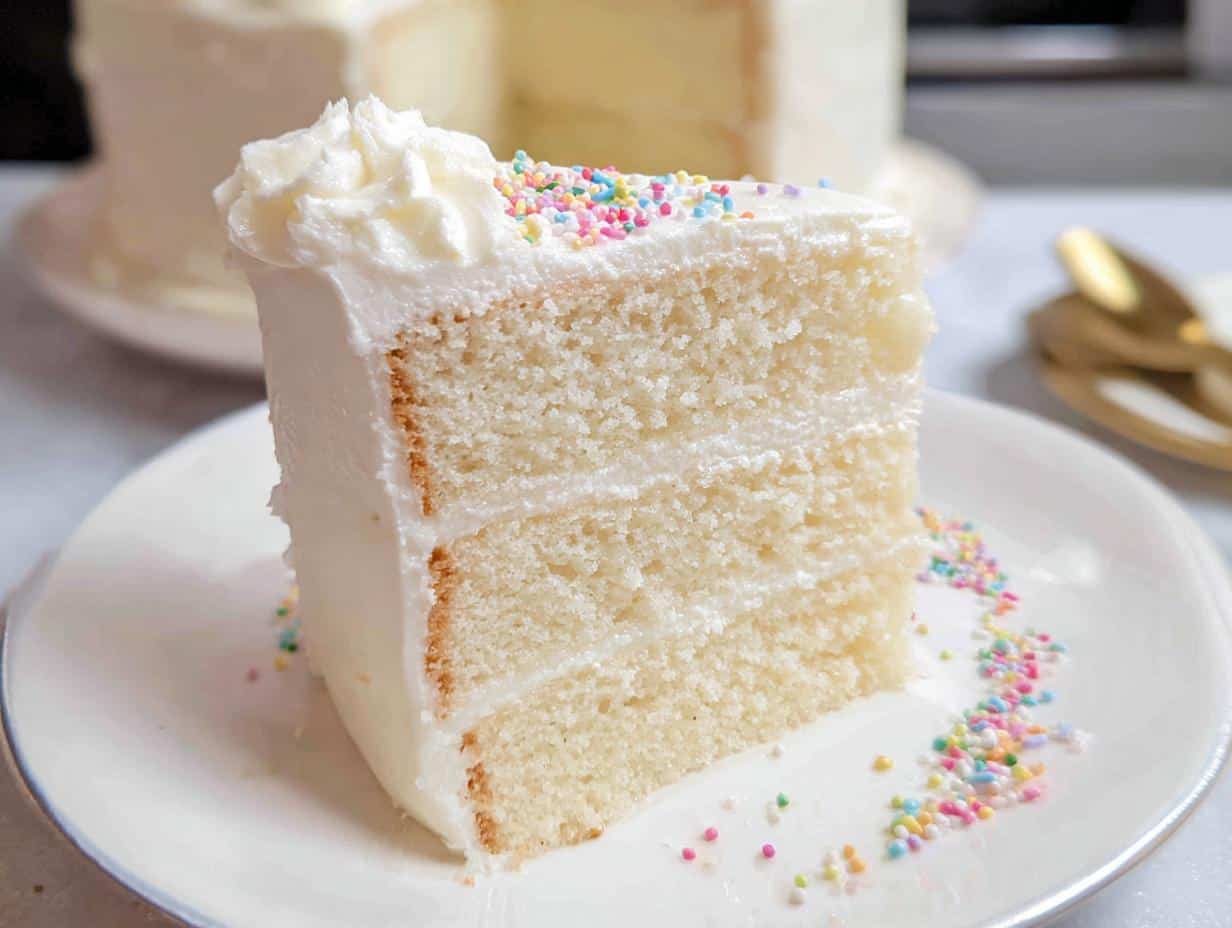
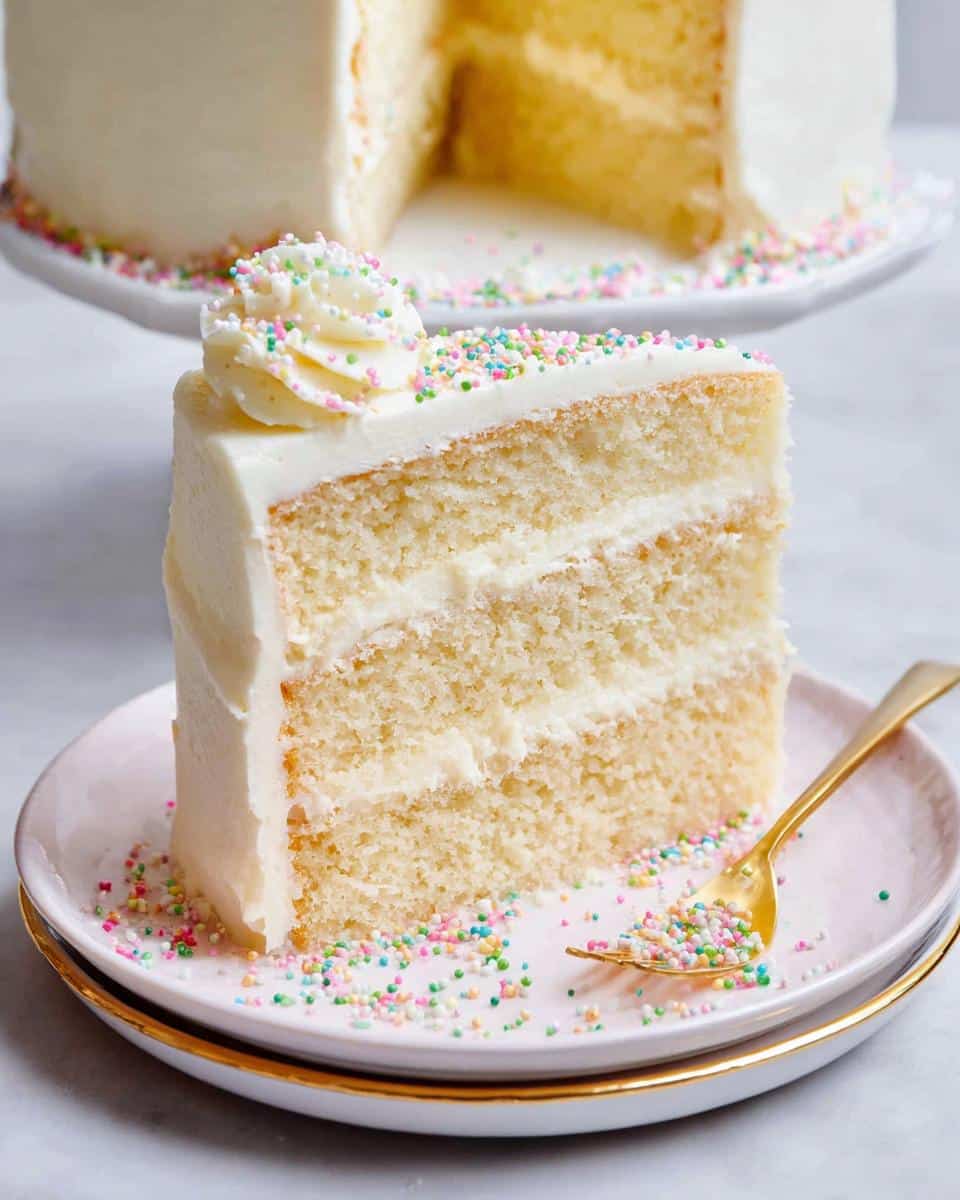
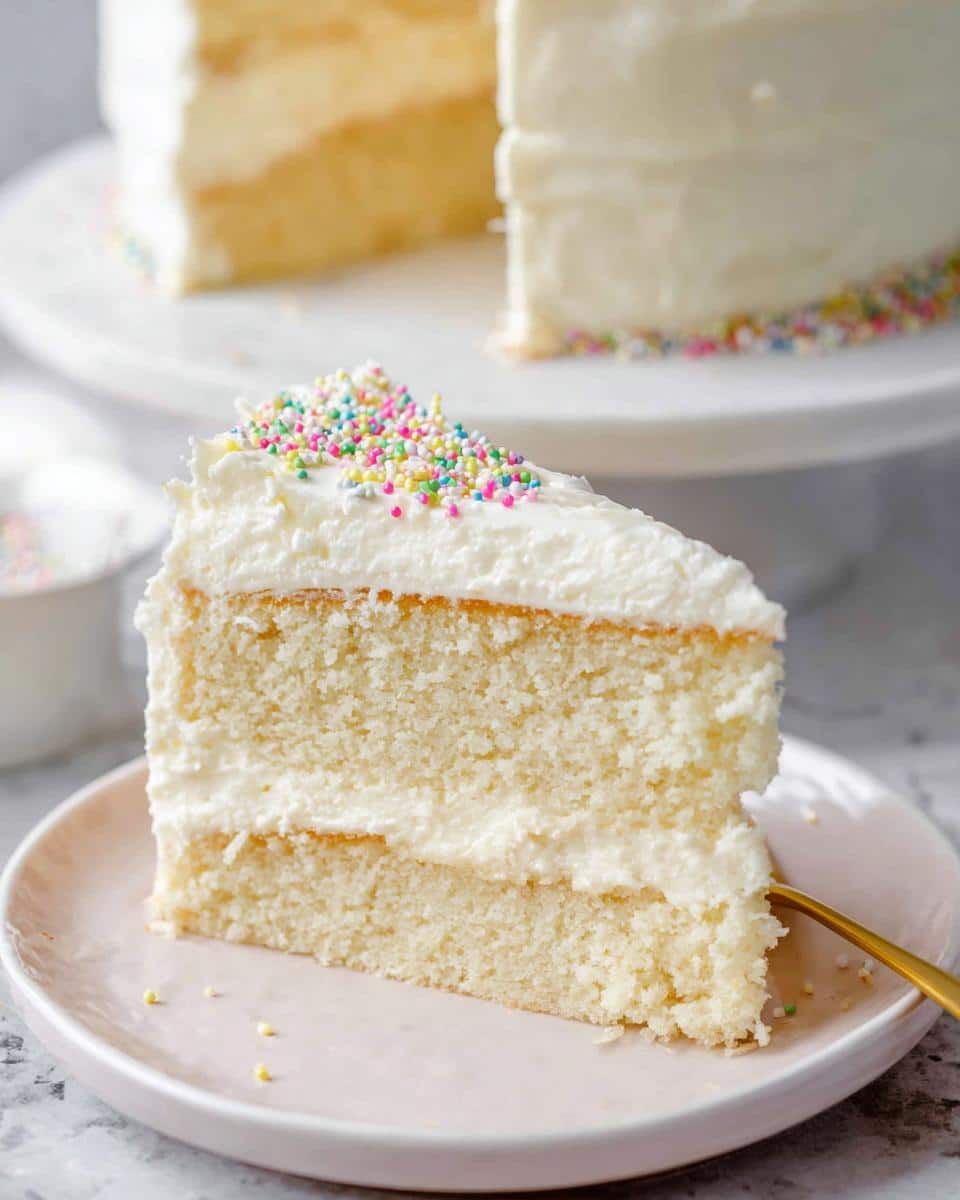
Mastering Smooth Cake Frosting Techniques for a Minimalist White Cake Smooth Finish
This velvety vanilla buttercream is what transforms a nice cake into a showstopper, the key to that stunning Minimalist White Cake Smooth Finish. We start by beating the room-temperature butter and salt until it’s incredibly soft—this takes a solid two minutes and gets rid of any lumps before the sugar goes in. If your butter isn’t soft enough here, your frosting will be grainy, and we can’t have that if we are aiming for a bakery style smooth cake!
Once creamy, you slow the mixer down and add all five cups of confectioner’s sugar, followed by your vanilla. It’s going to look thick and dry at first—that’s normal! Now, add the milk one tablespoon at a time. I usually stop around the third tablespoon. You want it stiff enough to hold a peak, but soft enough to spread without tearing the cake layers underneath. Beat it on medium-low for a good two or three minutes until it’s airy and pale. For more insights into the dedication behind these classic builds, you can read a bit about my philosophy right here.
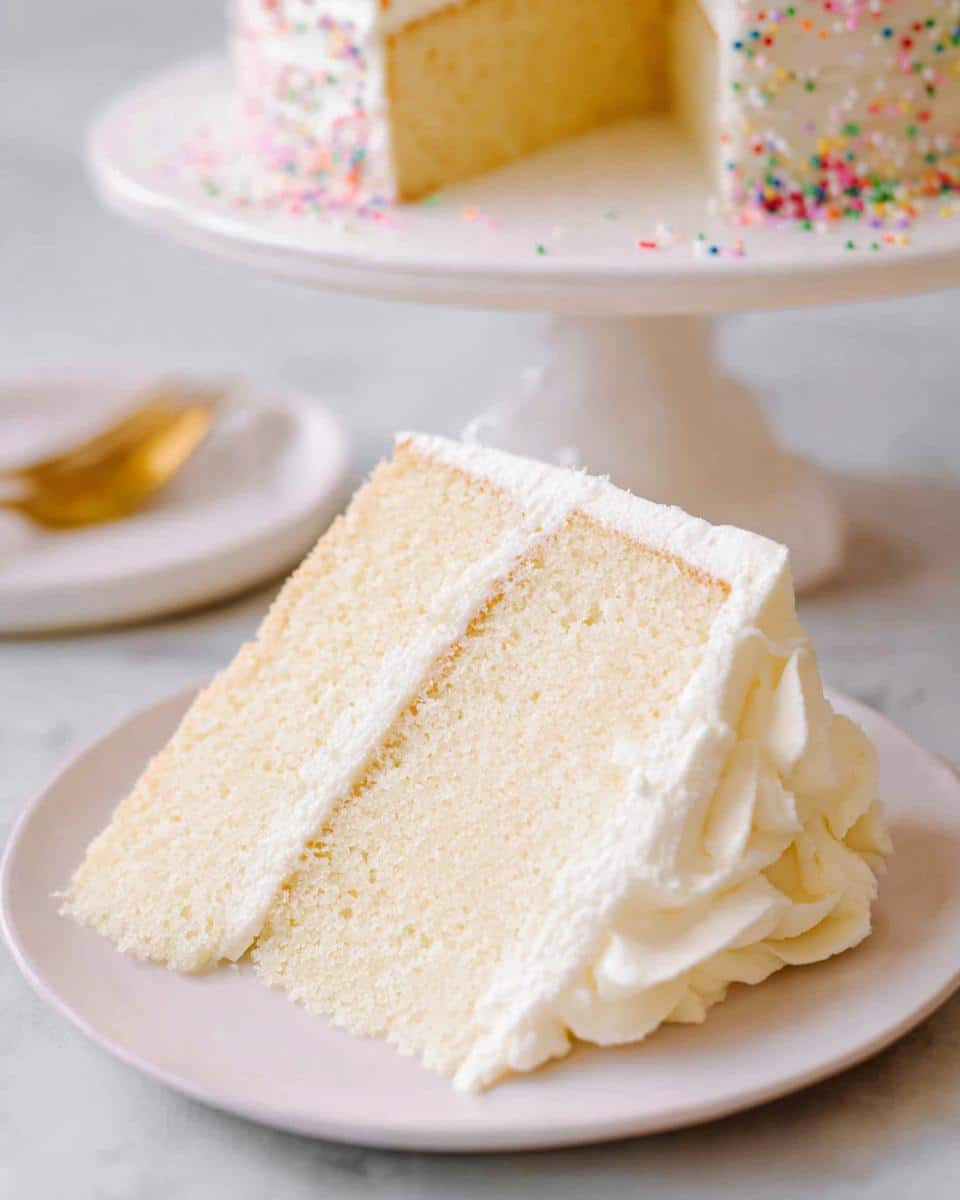
Assembly and Achieving Sharp Edges
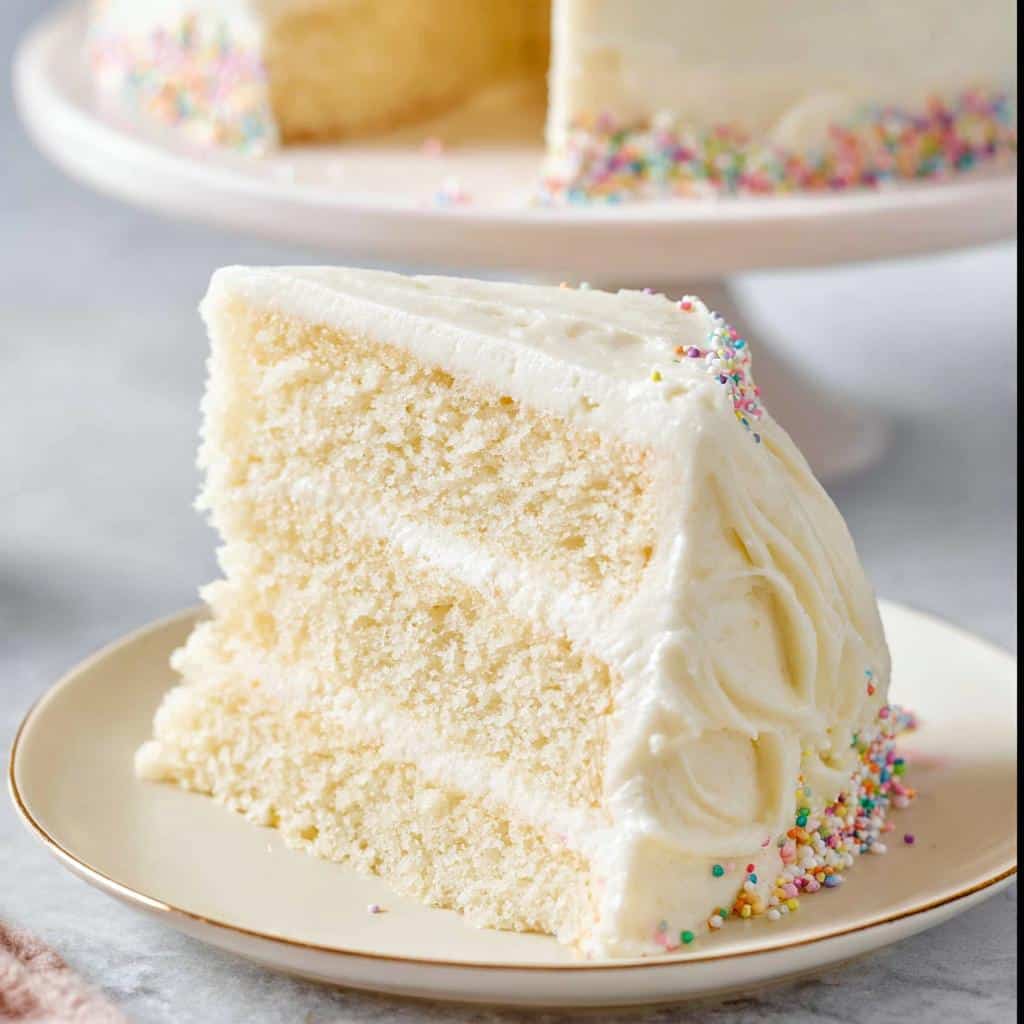
Once your cake layers are completely cool—and I mean bone-cold—you can stack them up. Remember that tip James Porter mentioned about using cake strips? They help keep those tops perfectly level, which is critical for sharp edges. Place one layer top-side up on your stand, frost that first layer generously, and then top it with the second layer, making sure the bottom of that second layer faces up. This gives you the absolute flattest surface to start your final coat.
First, apply a very thin coat of frosting all over the whole cake—that’s your crumb coat. This traps any loose crumbs. Chill the cake for about 15 minutes until that coat is just firm to the touch. Then, apply a much thicker, generous second layer of buttercream. Use an offset spatula or a bench scraper held vertically against the side of the cake, rotating your turntable slowly. Keep that scraper steady and let the tool do the work; this pressure control is what pulls away the extra frosting and leaves you with that gorgeous, signature smooth finish.
Tips for Success with Your Elegant White Cake Recipe
Achieving an elegant cake that looks this simple requires us to respect a few old rules of the kitchen. These aren’t strict limitations, they are just tried-and-true methods that guarantee perfection when you are aiming for a flawless presentation suitable for any milestone. If you follow these pointers, you’ll build confidence in your technique straight away and avoid common pitfalls.
Always make sure your cake layers are cooled completely before you even unwrap them from the parchment—seriously, they should feel room temperature or slightly cool to the touch. Warm layers melt the buttercream instantly, leading to sloppy sides. Also, when you are mixing the batter, remember that room temperature ingredients emulsify better, creating that stable structure we need for stacking.
And finally, if you’re worried about the layers being dome-shaped, I always recommend using cake strips. They insulate the outside of the pan, forcing the cake to bake evenly from edge to center. It keeps those layers flat, saving you the trouble of leveling later on!
Variations on the Minimalist White Cake Smooth Finish Aesthetic
Just because we are aiming for a minimalist look doesn’t mean we can’t have a little fun! This perfect white backdrop is a dream for subtle decoration, making it great inspiration for Pretty Birthday Cakes or even just Cute Simple Cakes. Don’t feel like you need piping bags for every design.
If you want to add just a touch of visual interest, consider scraping the final layer of buttercream very lightly with the back of a spoon or fork to create delicate, continuous horizontal lines around the side—it adds texture without adding clutter. Another lovely trick is simply dusting the top edge with a tiny bit of edible gold dust right before serving. It catches the light beautifully and keeps that elegant, clean aesthetic intact.
Storage and Reheating for Your Classic White Celebration Cake
Planning ahead is half the battle when you’re making a cake for a big celebration, especially if you want that smooth finish to look pristine for days. Once your cake is fully frosted, you can actually chill it uncovered for about 30 minutes until that outside layer is firm. This sets the shape nicely for travel or storage.
After that initial chill time, cover the cake loosely with plastic wrap, making sure the wrap doesn’t touch the frosting itself! If it’s too close, it’ll stick and ruin your hard work. This cake holds up beautifully in the refrigerator for three days. Just let it sit on the counter for about an hour before serving so the buttercream softens back up to its lovely texture.
Frequently Asked Questions About Minimalist White Cake Smooth Finish
It’s natural to have a few lingering questions once you get down to the final execution, especially when aiming for such a clean look. These are the little details that separate a good cake from a great one, and I want you to nail that Simple Birthday Cake Designs look every time.
Can I make this cake ahead of time for a wedding?
Absolutely! For stability, I recommend baking and chilling the layers a day ahead, and even applying that first crumb coat. You can store the fully crumb-coated cake in the fridge for up to two days. Wait until about 4 to 6 hours before serving to apply that beautiful final layer of frosting—this keeps the texture perfect for your event.
What is the secret to getting perfectly flat layers?
The number one trick here isn’t leveling after baking, although that helps. It’s controlling the temperature *during* baking using those damp cake strips I mentioned earlier. They keep the outside of the pan from getting too hot, which prevents the edges from setting too fast and creating that dome shape in the center. It minimizes waste!
How do I ensure my buttercream stays pure white?
If you need a stark, bright white for that true minimalist look, you have two steps. First, ensure your butter is totally incorporated and not visible in soft specks. More importantly, swap out your regular vanilla extract for clear vanilla extract. It provides the flavor without the slight yellow tint that brown vanilla adds. It’s one of the best Easy Cake Decorating Ideas swaps for color perfection!
Master 1 Minimalist White Cake Smooth Finish Secret
Ingredients
Equipment
Method
- Preheat oven to 350°F. Lightly grease two 8-inch round pans with baking spray or butter and flour, then line the bottoms with parchment paper.
- In a medium bowl, whisk together the flour, baking powder, and salt. Set aside.
- In a large mixing bowl with a hand mixer or stand mixer fitted with the paddle attachment, beat the butter on medium speed until creamy, about 30 seconds. Add the sugar and beat until light and fluffy, about 3 minutes.
- Add the egg whites, one at a time, mixing until incorporated well before adding the next. Stop and scrape the bowl down occasionally. Add the extracts and beat until fluffy, about 30 seconds.
- With the mixer on low, add a third of the flour mixture followed by half of the milk. Repeat with another third of the flour, the remaining milk, finally ending with the remaining flour. Scrape down the bowl and ensure the batter is well mixed. Divide the batter among the prepared cake pans.
- Bake for 35 to 40 minutes or until the centers spring back when gently pressed. Let the cakes cool completely in the pans set on wire cooling racks. Once cooled, invert the cakes onto the racks and remove the parchment paper.
- For the Frosting: In a large mixing bowl with a hand mixer or stand mixer fitted with the paddle attachment, beat the butter and salt on medium speed until very soft and smooth, about 2 minutes.
- With the mixer on low speed, gradually add in the confectioners’ sugar. Scrape the bowl down ocassionally. Beat in the vanilla. Slowly beat in 1 tablespoon of milk and continue beating on medium-low speed adding more milk as needed until the texture is smooth and fluffy, about 2 to 3 minutes.
- For the Assembly: Place one cool cake layer top-side up on a cake stand. Spread 1 cup of frosting over the top of the cake all the way to the edge. Top with the other cake layer, placing it bottom-side up.
- Spread the remaining frosting all over the top and sides of the cake. If you wish, reserve ½ cup of frosting to pipe decoration onto the cake.