Oh my goodness, if you haven’t paired rich, dark chocolate with bright, cool mint, you are seriously missing out! Honestly, nothing screams ‘special occasion’ quite like these Mint Chocolate Cupcakes. I’m Emma Brooks, and as someone who balances nutrition with real-life cravings, I promise these hit that perfect spot between indulgent and absolutely delicious. The secret here isn’t just the deep cocoa base; it’s the light, fluffy white chocolate mint buttercream that just sings on your tongue. They were a total showstopper at our last neighborhood gathering, and I just know you’ll find them easy to nail!
If you’re looking for more simple sweets that truly taste amazing without the fuss, check out some of my go-to easy dessert recipes!
Why You Will Love These Mint Chocolate Cupcakes
I know you’re looking for reasons to jump into the kitchen right now, so let me tell you why these Mint Chocolate Cupcakes are about to become your new favorite go-to treat. They truly tick every box!
- They are unbelievably easy! Seriously, these are fantastic easy chocolate cupcakes that come together faster than you think—under an hour total!
- The moisture level is unbelievable. We use a specific technique in the batter that keeps these chocolate cakes tender for days.
- That frosting! Who doesn’t love white chocolate? It makes the traditional mint flavor feel lighter and extra luxurious.
- Perfect for parties! Whether it’s a holiday, a birthday, or you just need something green for a fun event, these fit the bill perfectly.
- The balance is spot-on; you get that rich, deep cocoa flavor followed by that cool, refreshing hint of mint. It’s not overpowering at all.
- They freeze beautifully frosted, making them such a practical recipe when you need a make-ahead dessert.
Trust me, once you try pairing that deep chocolate with that cool, creamy frosting, you’ll see why I make these all the time.
Essential Equipment for Perfect Mint Chocolate Cupcakes
Okay, we aren’t using a ton of fancy tools here, which is part of why this recipe feels so approachable! You only need a few basics to whip up these beauties in about 40 minutes total. Don’t stress if you don’t have a stand mixer—a trusty handheld one works just as well, especially for the buttercream.
Here’s the rundown of what you’ll need to gather before we even think about preheating that oven:
- A small bowl for whisking your dry stuff together.
- A large bowl; this is where your wet ingredients and the final batter will come together.
- A good handheld or stand mixer. This is essential for getting that buttercream fluffy and light!
- A wire rack. This seems simple, but it’s vital for getting air circulation around those cakes so they cool evenly.
Now, here’s a quick tip from my kitchen to yours, especially important for the batter and the frosting: make sure your butter and eggs are at room temperature! It’s one of those little things that Registered Dietitians like me always stress because it makes a huge difference. When your butter is soft (not melty) and your eggs are room temp, they emulsify so much better with the sugar. That means you trap more air pockets when mixing, which is exactly why your chocolate cupcakes will be tender, not dense and heavy. It’s worth planning ahead by about an hour!
Gathering Ingredients for Your Mint Chocolate Cupcakes
Getting everything ready before you start mixing is honestly half the battle! It keeps the process smooth, and since we’re aiming for that total 40-minute timeline, organization is everything. I’ve broken down the ingredients below into the three stages, just like I do when I’m prepping. Seeing it all laid out makes you feel so organized, and it helps you double-check those little notes that make all the difference in flavor!
We’re going to look at the cake base, the dreamy frosting, and finally, the fun garnishes. Ready to raid the pantry? While you’re looking, you might want to save this recipe for other times of the year, they’re just as good as any festive dessert recipes!
For the Chocolate Cupcakes Base
This part creates the moist, deep chocolate foundation. Remember what I said about temperature? It applies here!
- 1.25 cup cake flour: If you only have all-purpose flour, that’s totally fine, just use that instead!
- 1 cup granulated sugar.
- 0.5 cup unsweetened cocoa powder.
- 1.5 teaspoons baking powder.
- 1 teaspoon espresso powder: This is totally optional, but trust me, it just deepens the chocolate flavor without making it taste like coffee!
- 0.5 teaspoon kosher salt.
- 0.5 cup vegetable oil: You can swap this out for canola oil or even a very light olive oil if you prefer.
- 2 large eggs: These absolutely have to be at room temperature so they mix evenly into the batter. Don’t skip this!
- 0.5 cup whole milk.
- 2 teaspoons peppermint extract.
- 0.5 teaspoon vanilla extract.
For the White Chocolate Mint Buttercream
This buttercream is what sets these apart from your average chocolate cupcake. The key here is patience with the chocolate!
- 1 cup unsalted butter: Make sure this is softened to room temperature! We need it soft for creaming.
- 3 cups powdered sugar: Sift this if you notice any clumps!
- 4 ounces white chocolate: This is the superstar! You need to melt this down carefully and let it cool almost completely—it should be melted but cool to the touch before it ever touches the butter, or you’ll end up with soup!
- 1 teaspoon peppermint extract.
- 2 drops green food coloring: This is optional, but if you’re making these for St. Patrick’s Day, this is where you get that lovely light green swirl. It makes them perfect St Patrick Day Food Ideas Party treats!
- 1 teaspoon milk: Only add this if your frosting looks too stiff when you’re done mixing.
Garnish for Your Mint Chocolate Cupcakes
These little finishing touches are what make them pop, especially if you’re planning a green theme or looking for fun St Patrick Party Food.
- As needed: thin mint cookies, or Andes mints—crushed up is just divine!
- As needed: chocolate shavings.
- As needed: fresh mint sprig—just for that final touch of elegance and freshness.
Step-by-Step Instructions to Bake Mint Chocolate Cupcakes
Alright, now for the fun part! Since we’re aiming for a total time of about 40 minutes for these amazing Mint Chocolate Cupcakes, sticking to the order is key. As I always tell my readers, baking is just like following a great strategy—it works best when you stick to the game plan! We’re going to mix the cake layers first, get those in the oven, and while they cool down, we’ll whip up that incredible buttercream. You got this, especially if you have some little helpers joining you—this recipe is fantastic for easy recipes for kids!
Preparing the Chocolate Cupcake Batter
First things first, go ahead and preheat your oven right now to 350\u00b0F. We want it nice and hot and ready to go!
Grab that small bowl and whisk together all your dry ingredients: the flour, sugar, cocoa powder, baking powder, and that optional espresso powder, plus the salt. Whisking them really well ensures everything is nicely distributed, which helps avoid those dreaded pockets of baking powder later on.
Next, move to your large bowl where you’ll mix the wet components. Whisk together the oil, your room-temperature eggs, milk, vanilla, and peppermint extract until they look happy and combined.
Now for the big mix! Gently pour those dry ingredients right into the wet mixture. And here’s my expert tip: mix them until they are *just* combined. Seriously, stop mixing when you still see a few flour streaks! If you mix too long, you activate the gluten too much, and those beautiful tender cupcakes turn into tough little hockey pucks. Don’t worry if the batter looks a little thin—that’s exactly how it should be for this recipe. Pour about \u00bc cup of batter into each lined cup, making sure they aren’t more than halfway full.
Baking and Cooling the Mint Chocolate Cupcakes
Time to bake! Pop those pans into the preheated oven and let them bake for 18 to 22 minutes. You know they’re done when a cake tester (or even a toothpick if you don’t have one) comes out clean. If it comes out with wet batter, give them another minute or two.
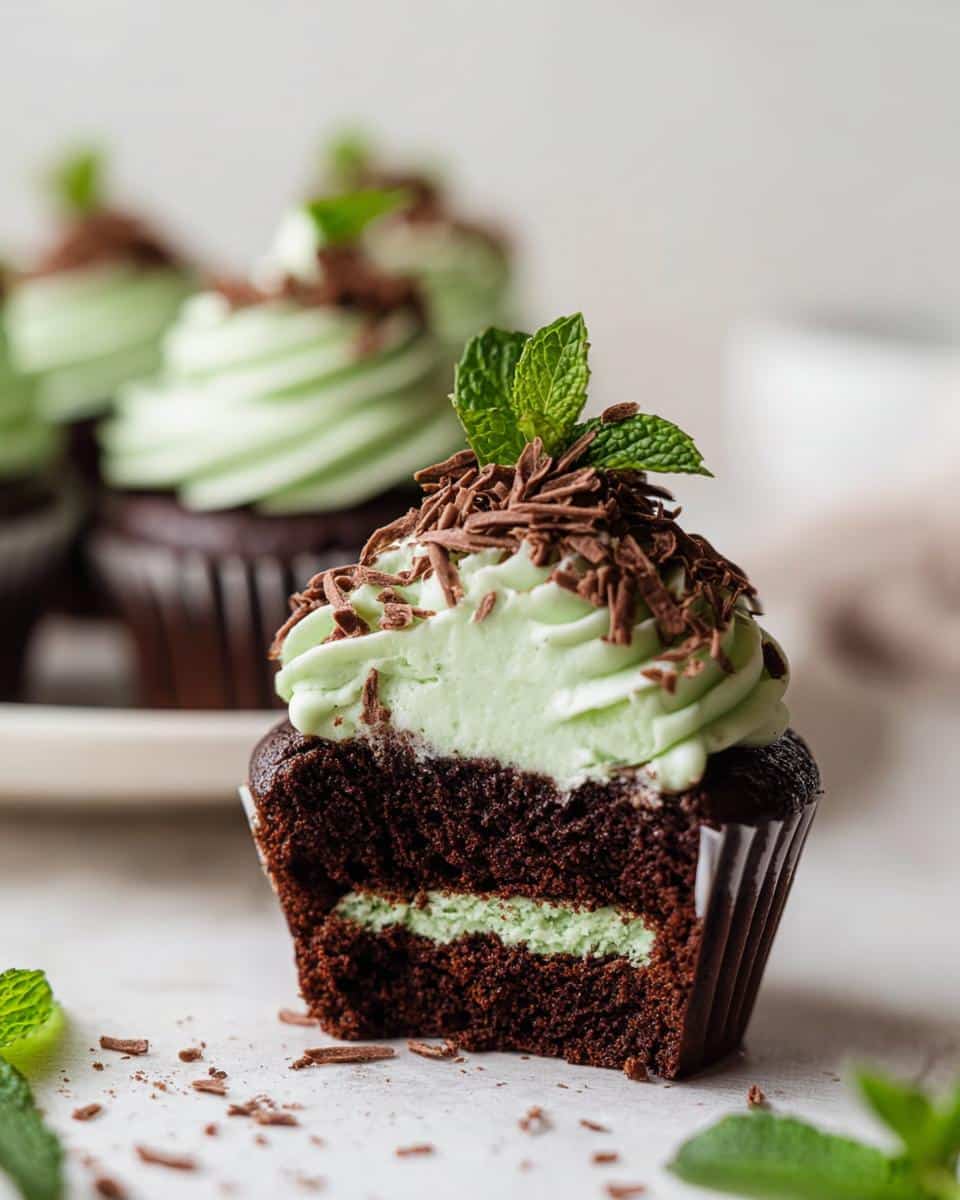
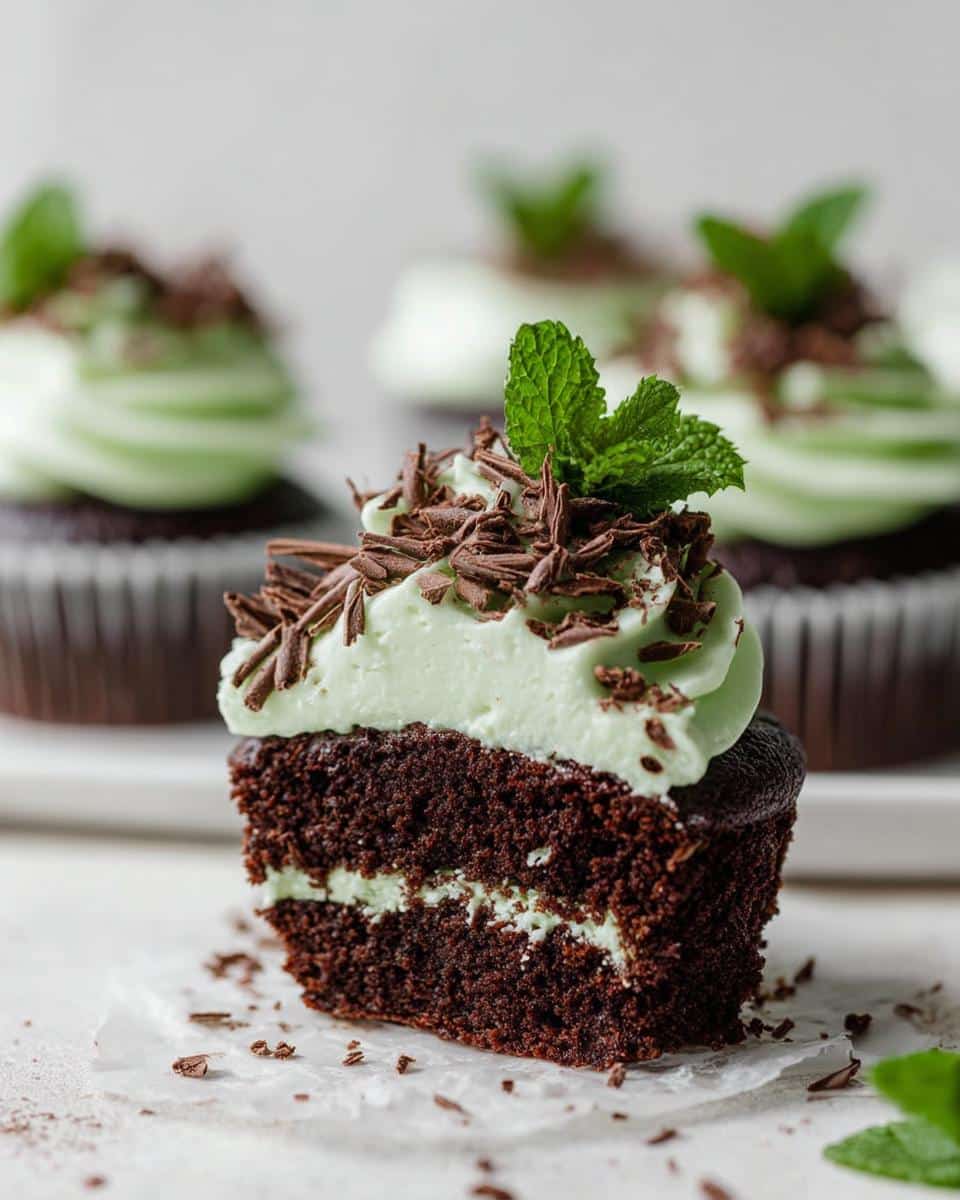
Once they come out, immediately move the cupcakes out of the hot pan and set them on a wire rack. This prevents the bottoms from overbaking from the residual heat. The most important instruction I can give you here? Make sure those chocolate cakes cool completely before you even *think* about frosting them. If they are even slightly warm, that gorgeous white chocolate buttercream will just turn into a runny, sticky mess. Patience, friend, patience!
Making the White Chocolate Mint Buttercream
While those cakes are cooling down, let’s make that gorgeous frosting. Get your mixer ready with the paddle attachment, and cream that room-temperature butter with the powdered sugar. You need to beat this until it looks smooth and pale—this is how we incorporate air!
Now for the chocolate! Remember, you need to melt your white chocolate gently (I usually use 20-second bursts in the microwave) and let it cool down until it’s just barely warm to the touch—not hot! Set the mixer speed down low and slowly, slowly drizzle that cooled melted white chocolate into the butter mixture. If you dump it in fast, you’ll deflate all the air you just worked so hard to create!
Once that’s incorporated, drop in your peppermint extract. Now, crank the mixer up high and beat this for about 3 to 4 minutes until it’s truly light and fluffy. If, after all that whipping, the frosting feels super stiff, add just a teaspoon of milk to loosen it up a bit until it’s perfectly pipeable.
Assembling and Decorating Your Mint Chocolate Cupcakes
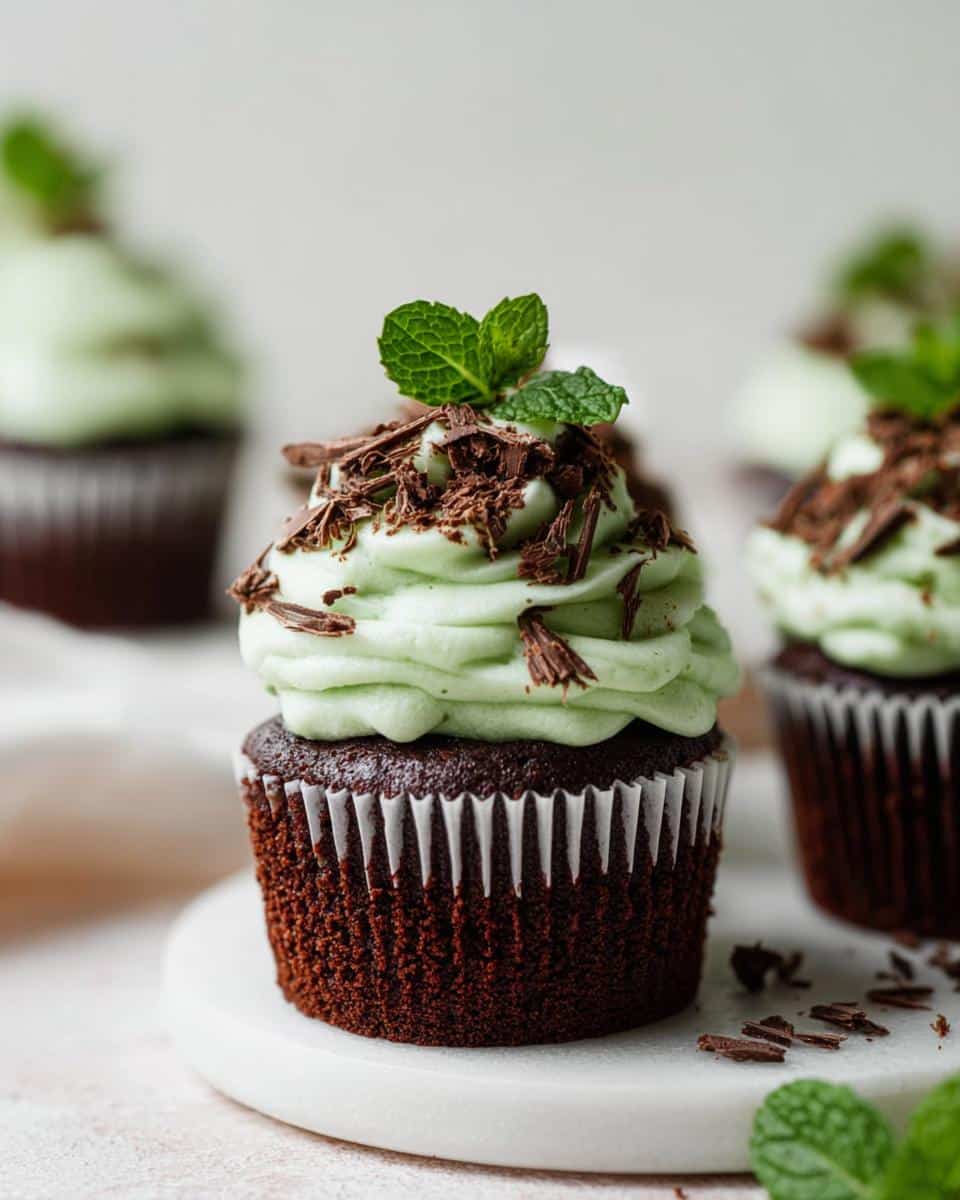
Once those cakes are completely cool—I mean stone-cold—it’s time for the final show! Frost them however you like, whether you use a piping bag for fancy swirls or just use an offset spatula for a rustic look. Piping is always more fun, in my opinion!
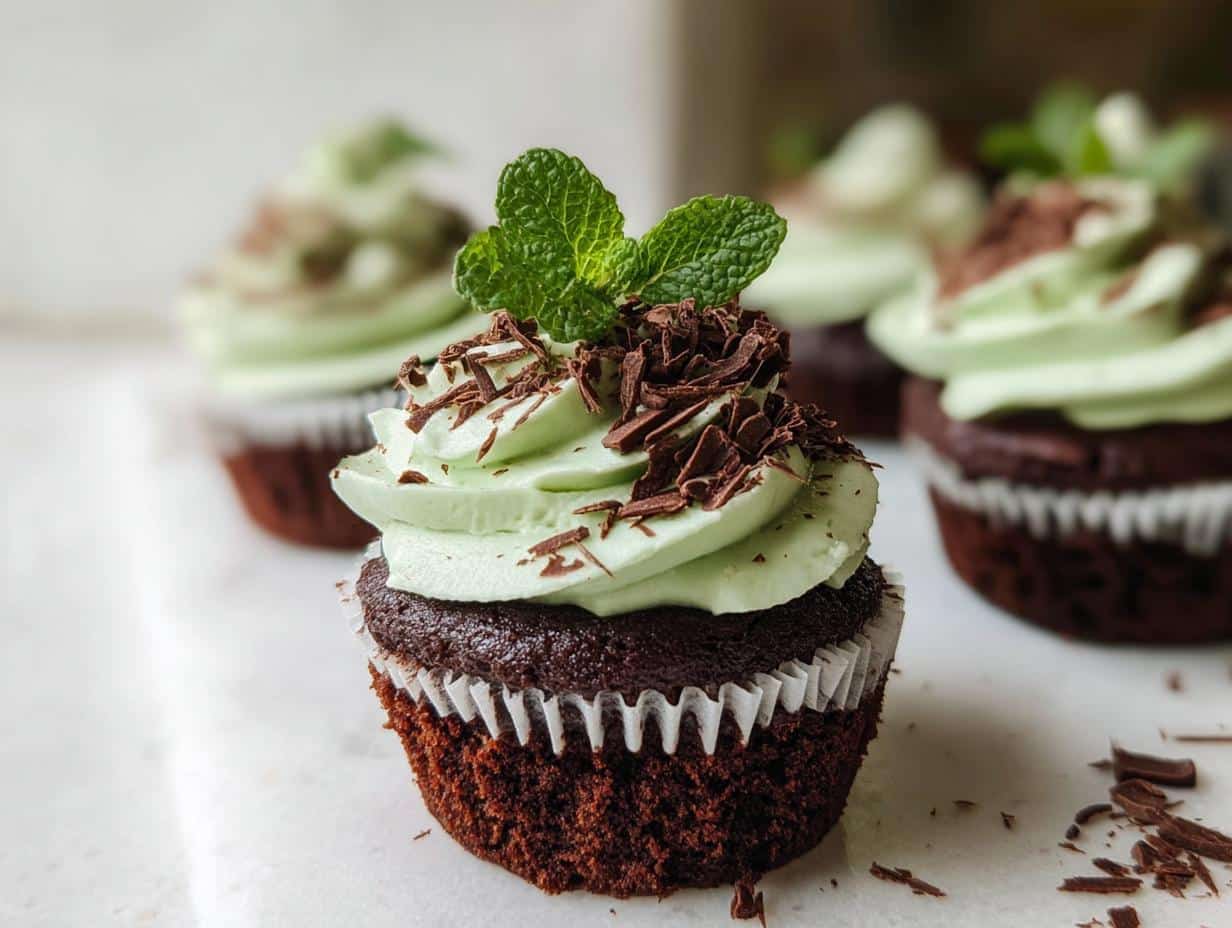
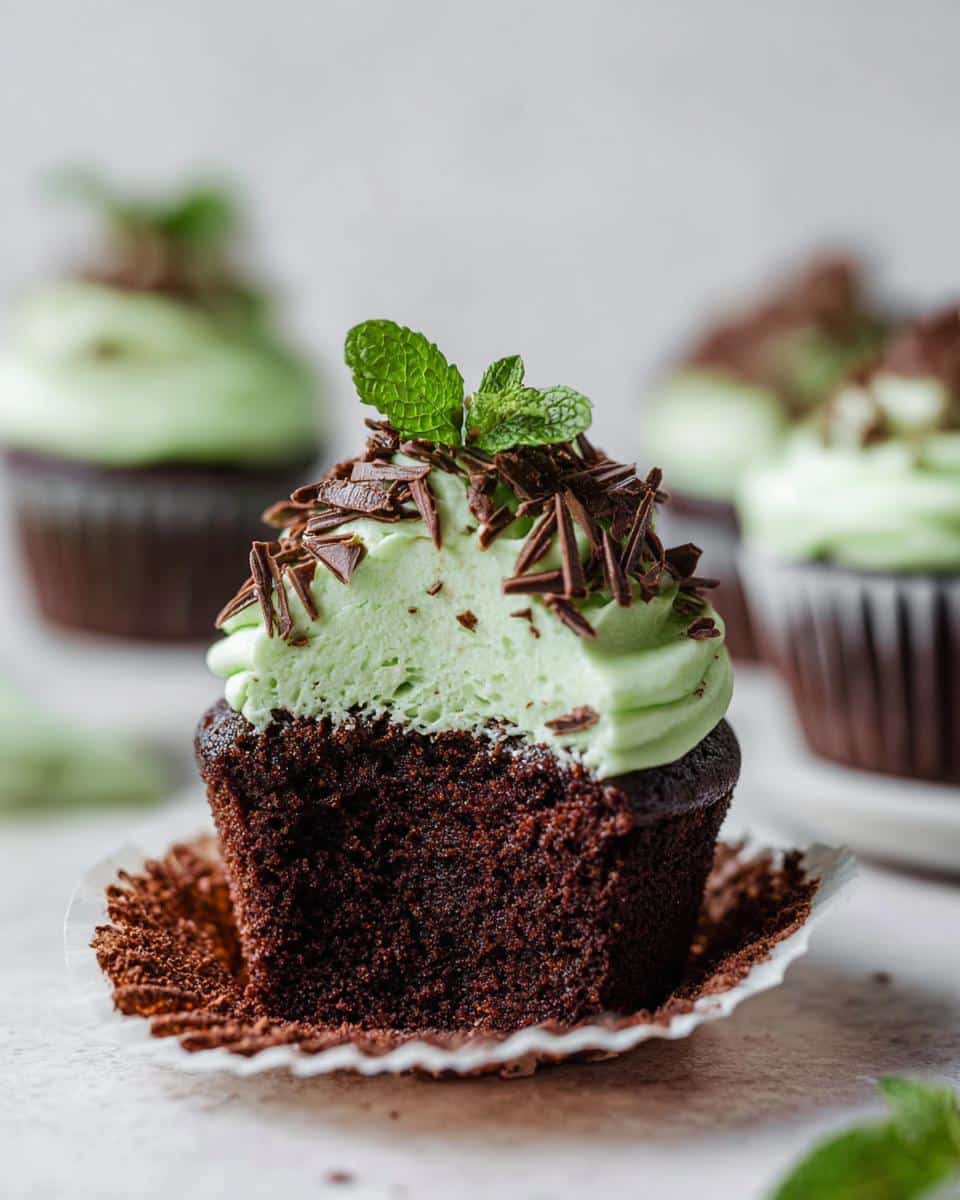
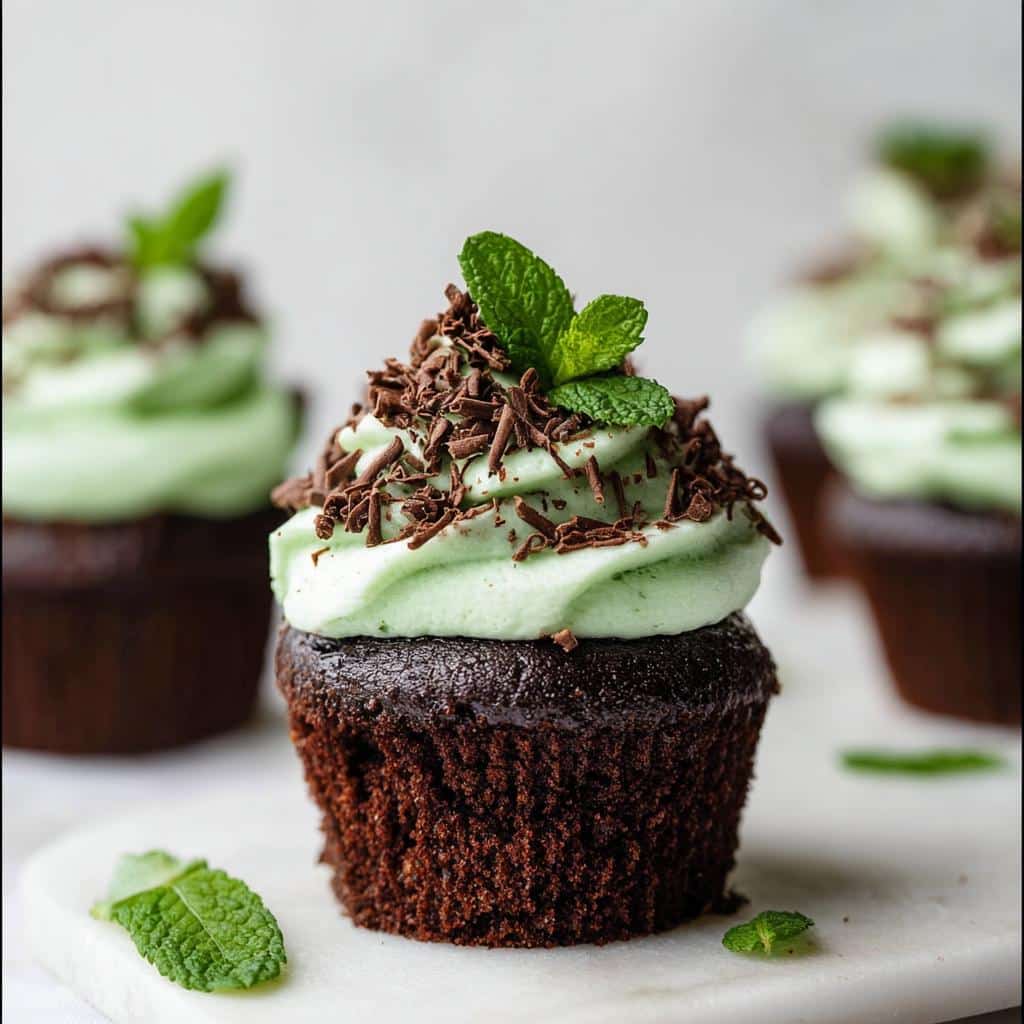
This is where you make them festive. Sprinkle on those crushed Thin Mints or Andes mints and finish with a chocolate shaving or a tiny sprig of fresh mint. When you get that vibrant green color going with the optional food coloring, I guarantee these will look fantastic as your Green Foods For Party centerpieces!
Tips for Success with Your Mint Chocolate Cupcakes
Even with a straightforward recipe like this one, baking sometimes requires a little insider knowledge to go from “good” to “absolutely unforgettable.” Since I focus on making sure every bite is satisfying yet balanced, I’ve learned a few tricks over the years for these Mint Chocolate Cupcakes. Keep these tips handy, and you’ll be baking like a pro!
We want these treats to feel indulgent, but we don’t want them to weigh us down, right? That balance is key to joyful eating!
- Don’t Fear the Thin Batter: When you mix the dry ingredients into the wet for the cake base, the batter is going to look much thinner than a typical cake batter. That’s normal, and it’s crucial! If you try to thin it out by adding more flour, you’ll end up with a dense, heavy cupcake. Trust the formula; that thin batter bakes into that soft, moist crumb we love.
- Peppermint Purity Check: Make sure you’re using pure peppermint extract and not just plain mint extract. They have very different flavor profiles! Peppermint is cool and sharp—exactly what we want to cut through the richness of the chocolate and white chocolate. A little goes a long way, so don’t be tempted to pour too much in!
- Buttercream Temperature Control: This is the most frequent point of failure for people dealing with melted chocolate in frosting. When you drizzle that melted white chocolate into the creamed butter and sugar, the chocolate must be mostly cool! If it’s still warm, it will immediately melt the butter structure you just built, leaving you with a greasy, soupy mess instead of fluffy frosting. Let it cool until you can barely feel warmth when dipping a fingertip in.
For more delicious, balanced baking ideas, take a peek at my favorite trending recipes on the site. Happy baking!
Ingredient Notes and Substitutions for Mint Chocolate Cupcakes
When you’re baking, especially when you’re trying to keep things simple like we are with these Mint Chocolate Cupcakes, sometimes you just don’t have that exact ingredient the recipe calls for. Don’t panic! As I learned back when I was figuring out how to make rich flavors work with my nutrition goals, flexibility is sometimes necessary. I want you to feel confident swapping things out if you need to, but I also want you to know how that change *might* affect the final texture of these easy chocolate cupcakes.
Here are the main swaps I get questions about:
Flour Swap: Cake Flour vs. All-Purpose
The recipe calls for cake flour, and that’s simply because it has a lower protein content than regular all-purpose flour. Lower protein means less gluten development, which translates directly to a softer, more delicate crumb. It’s one of the keys to making these cupcakes feel less heavy!
If you only have all-purpose flour, go ahead and use it! Just be extra careful when mixing. Remember the tip about mixing until *just* combined? That rule becomes even more important if you use AP flour because it develops gluten faster. You still want that soft cake, so under-mixing is your best friend here.
Oil Revisions for the Cake Base
I listed vegetable oil because it’s neutral in flavor, which allows that mint and chocolate to really shine through. But if you only have canola oil, use that! They behave almost identically in terms of moisture absorption. Light olive oil works in a pinch, too, but make absolutely sure it’s a very mild, light one, or you might get a slightly grassy flavor in the background, which isn’t quite what we want with mint!
A word of caution about using applesauce or yogurt as a fat replacement here: while those are great for making some desserts healthier, that oil plays a huge role in the tender structure of this particular chocolate cake base. If you swap the oil entirely for a puree, you’ll end up with something much more muffin-like than cupcake-like, so I recommend sticking to the liquid oils for these!
Chocolate Quality in the Buttercream
For the buttercream, we rely on real white chocolate—not white chocolate chips, if you can help it! Chips contain stabilizers that help them keep their shape when baked, but they don’t melt as smoothly as high-quality baking bars. Using a good quality white chocolate bar that melts down into a silky liquid ensures that when it chills slightly and mixes with your butter, it creates that smooth, luxurious texture for the frosting.
If you use chips and the frosting seems too gritty or won’t incorporate fully, just increase your mixing time slightly, or add that extra teaspoon of milk to help smooth everything out. We definitely want smooth, not grainy, when it comes to icing!
Serving Suggestions for These Festive Treats
The fun part about making these incredible Mint Chocolate Cupcakes is figuring out how to serve them! Because they are so festive, especially when you add that bright green coloring, they really lend themselves to themed parties. You don’t have to stop at just dessert when you’re planning your menu!
If you’re hosting a gathering for St. Patrick’s Day, these are the perfect sweet note to end on. They’re certainly more beautiful than plain old fruit, and they fit right in with all the other fun, colorful food. While they aren’t technically St Patrick’s Day Appetizer Ideas, they certainly bring the holiday cheer!
Here are a few ways I love to serve these beauties:
- With Coffee: Honestly, the deep chocolate base is just begging for a good cup of coffee or espresso. It brings out the richness of the cocoa beautifully. This is my favorite way to enjoy one as an afternoon treat when I need a little boost.
- As the Grand Finale: If you’re serving up some savory Irish Party Food for dinner, these cupcakes are the perfect, refreshing finale. The mint cleanses the palate after a heavier meal.
- Kids’ Party Favorite: If you’re looking for easy, kid-friendly treats, these are a massive hit. They look impressive but are so simple to make, meaning less stress for you!
- Paired with Drinks: A cold glass of whole milk is the absolute classic pairing for any chocolate cupcake, and these are no exception. For the adults, a small pour of a creamy liqueur, maybe an Irish Cream, works wonderfully alongside the mint flavor.
Just remember what I said in the notes—wait until they come to room temperature for about an hour after pulling them out of the fridge if you stored them. That helps the buttercream soften up just enough for the best possible bite. Enjoy every second of watching people enjoy these!
Storage and Reheating Instructions for Mint Chocolate Cupcakes
One of the best things about these Mint Chocolate Cupcakes is that they hold up really nicely! Because we used a sturdy white chocolate buttercream, they don’t immediately wilt like some lighter frostings might. That’s great news for party planning or just for having a few treats ready for yourself later in the week.
My biggest rule when storing these, and I’ve tested this extensively (it’s part of being a flavor strategist, keeping everything tasting great!), is that they must go into the refrigerator if you aren’t serving them within a few hours. That buttercream has butter and white chocolate in it, so it needs the chill to stay firm.
You can safely keep these frosted cupcakes in an airtight container in the refrigerator for up to three days. Just make sure the container isn’t squishing the pretty frosting swirls!
Bringing Them Back to Their Best Flavor
Here’s the crucial step I mentioned in the recipe notes: these taste *dramatically* better when they aren’t ice-cold. When chilling, the cold mutes the flavor of the chocolate and the brightness of the mint extract. It also makes the cake base feel harder.
So, if you plan on serving them for dessert or a snack, pull them out of the fridge about one hour beforehand. Let them sit right on the counter until they come up to room temperature. That hour allows the butter in the frosting to soften just enough so it melts beautifully in your mouth, and the cake regains all its moisture.
When to Add Delicate Garnishes
If you’ve gone all out and decorated your Mint Chocolate Cupcakes with fresh mint or those pretty chocolate shavings, pay attention here! These fresh garnishes are the only things that shouldn’t go into the fridge if you can help it.
If you’re making them the day before, just frost the cupcakes, put them in the fridge plain, and then, right before you pull them out to come to room temperature, apply your toppings. Fresh mint leaves will wilt quickly in the fridge humidity, and shaved chocolate can sometimes “sweat” or feel a little damp if stored cold. Adding those delicate touches at the very last minute ensures your presentation is as perfect as the flavor!
Frequently Asked Questions About Mint Chocolate Cupcakes
I always get so many questions once people see how gorgeous these Mint Chocolate Cupcakes turn out! It’s totally normal; we want to make sure every batch is perfect. As a dietitian, I love that we can make something this decadent feel balanced, but I know readers often worry about timing, color intensity, especially when thinking about party planning, and general make-ahead strategy. Here are the big ones that pop up!
Can I make these Mint Chocolate Cupcakes ahead of time?
Oh yes, you absolutely can, and I recommend it if you’re hosting! The cake base itself is very hardy. You can bake the cupcakes completely, let them cool, and store them in an airtight container at room temperature for up to two days. They stay lovely and moist.
However, when it comes to the frosting, it’s a different story. If you frost them ahead of time, they need to go into the fridge because of the butter and white chocolate. If you frost them the day before, just remember my golden rule: pull them out about an hour before anyone eats them so the frosting softens up. If you want the absolute freshest look, bake the cakes one day, then frost them the morning of your party. That way, you skip the refrigeration time entirely!
How can I make these Green Snacks brighter for St Patrick’s Day For Kids Treats?
This is the fun part, especially if you’re making these specifically for a theme! The recipe calls for just two drops of green food coloring in the buttercream, which gives you a soft, lovely pastel mint look. If you want that vibrant, shamrock-level green—perfect for St Patrick’s Day For Kids Treats—you’ll need to go bolder with the coloring.
Instead of liquid food coloring, I highly recommend switching to gel food coloring if you can find it. Gel colors are much more concentrated, so you only need the tiniest dab, and they won’t interfere with the consistency of your buttercream like adding extra liquid might. Add half a toothpick tip of gel color, mix it in slowly, and keep adding tiny amounts until you hit that vibrant green hue you’re looking for!
Are these suitable as St Patrick’s Day Appetizer Ideas?
Well, I’m not going to lie, because these are sweet and rich, they are definitely a dessert! They aren’t really anything you’d want to serve before the main course alongside some salty dips or savory appetizers. But when you’re thinking about a full party spread, especially for St Patrick’s Day Appetizer Ideas, you absolutely need a show-stopping sweet finish!
These Mint Chocolate Cupcakes serve as the grand finale! They provide the necessary festive color, and that cool mint flavor is a refreshing contrast to heavier savory foods. Think of them as the perfect, slightly lighter way to end your St. Paddy’s feast!
Nutritional Estimates for These Chocolate Mint Desserts
Now, I know some of you are looking at these gorgeous, rich Mint Chocolate Cupcakes and wondering if you can truly enjoy them guilt-free. As a Registered Dietitian, I always believe in balance, not restriction! Remember, all our treats here at Top Chicken Eats are designed to be deeply satisfying, which means you only need one, not five, to feel completely happy.
Because this recipe yields only 3 cupcakes—perfect for a small treat or sharing with a couple of friends—the numbers can look a little high per serving if you compare them to a plain snack. I took my best shot at estimating the macros based on standard ingredient densities, but please know these are just ballpark figures! Different brands of cocoa, white chocolate, and oil will change things slightly. Use these numbers as a guide, not gospel!
Here is a realistic estimate for one of these incredible Chocolate Mint Desserts:
- Calories: Approximately 650 – 700 kcal
- Total Fat: Around 38g (This is where the butter and oil sit!)
- Carbohydrates: Roughly 75g (Mostly from the sugar and the flour)
- Sugar: About 55g (This is a sweet treat, for sure!)
- Protein: Approximately 6g
See? It’s definitely an indulgent dessert, but that’s okay! When you enjoy something this truly delicious, you savor it, and you only need one. The moisture from the cake and the richness of the buttercream mean these satisfy that craving immediately. Don’t forget, if you skip the heavy frosting and go for a plain dusting of powdered sugar, you can shave off a good chunk of those calories and fats. It’s all about choices, and either way, you deserve this deliciousness!
Share Your Favorite Festive Dessert Recipes
Whew! We did it! You now have what I consider to be the ultimate recipe for moist chocolate cake topped with the creamiest, coolest white chocolate mint buttercream. Seriously, these Mint Chocolate Cupcakes are a guaranteed winner, and I’m already so excited for you to try them. As someone who loves sharing food that nourishes the soul, I truly hope this joins your collection of favorite festive dessert recipes.
But the fun doesn’t stop just because the baking is over! I absolutely love hearing how your kitchen adventures turn out. Did you use the green food coloring? Did you try crushing up those Thin Mints on top? Tell me everything!
Please, please, please take a moment to leave a quick rating below—a simple five-star review helps other bakers know that this recipe is reliable and truly delicious. If you had any hiccups or substitutions that worked great for you, drop that in the comments too!
- Rate It: Click those stars so I know how you loved these chocolate mint desserts (I’m hoping for five!).
- Comment Below: Tell me if you made these for St. Paddy’s or just a Tuesday craving!
- Share a Snap: If you posted a picture of your beautiful finished cupcakes on social media, tag me! I get so much joy from seeing your results.
Thank you so much for baking with me today. Seeing your smiling faces (even virtually!) through your reviews makes all the testing and stirring so worthwhile. Head over to my contact page if you ever have specific questions, and happy baking!
Mint Chocolate Cupcakes
Ingredients
Equipment
Method
- Preheat the oven to 350°F.
- In a small bowl, whisk together the flour, sugar, cocoa powder, espresso powder, baking powder, and salt. Set this mixture aside.
- In a separate large bowl, whisk together the vegetable oil, eggs, milk, vanilla, and peppermint extract.
- Gently mix the dry ingredients into the wet ingredients until they are just combined. The batter will appear thin.
- Pour about ¼ cup of batter into each cupcake liner. The liners should be about halfway full.
- Bake at 350°F for 18 to 22 minutes, or until a cake tester comes out clean.
- Remove the cupcakes from the pan and let them cool on a wire rack.
- Let the chocolate mint cupcakes cool completely before you begin frosting them.
- Melt the white chocolate and allow it to cool almost to room temperature. It should be melted but cool to the touch. Melt the chocolate in the microwave in 20-second intervals, stirring after each interval.
- In a large bowl using a mixer fitted with a paddle attachment, cream the butter and powdered sugar together until the mixture is smooth.
- Set the mixer to low speed and slowly drizzle in the melted white chocolate until it is fully incorporated into the buttercream.
- Add the peppermint extract and green food coloring, then beat on high speed for 3 to 4 minutes until the buttercream is light and fluffy.
- If the frosting is too thick, add 1 to 2 teaspoons of milk to thin it slightly.
- Frost the cooled cupcakes. Garnish with chocolate shavings, thin mint cookies, and a sprig of fresh mint.