Oh, my gosh, are you scrambling for the perfect Valentine Day Desserts that don’t require you to turn on the oven? I totally get it, especially when life gets busy but you still want something incredibly special for your sweetie—or maybe all your best girlfriends for a big Galentines Aesthetic party!
That’s why I’m sharing my absolute favorite cheat code: this unbelievably creamy, super-fast **No-Bake Valentine Fudge**. Seriously, it’s the definition of impressive results with minimal effort.
As a Registered Dietitian and Flavor Strategist, I always look for the balance, even in indulgent treats. This recipe nails that—it’s richly satisfying without overcomplicating things. Trust me, whipping this up means you save time while still delivering gorgeous, heartfelt homemade chocolate treats.

We’re pairing creamy white chocolate with a gorgeous pink swirl here. Before you dive into the steps, you can check out more of my easy dessert recipes for inspiration!
Why This No-Bake Valentine Fudge is Your Go-To for Valentine Day Desserts
Listen, Valentine’s Day can get hectic, right? Between finding the perfect gift and actually spending quality time with people, who has hours to stand over a hot stove? That’s why this fudge is a total lifesaver and quickly becomes one of my favorite Valentines Day Treats.
When I’m juggling client work and recipe testing, I need something that spells indulgence but takes mere minutes of active prep time. This hits every single mark for fantastic Valentine Day Desserts. You just melt, pour, and chill—no complicated tempering or worrying about that oven temperature!
Here’s why you’re going to fall head-over-heels for this simple fudge:
- Maximum Impact, Minimum Time: Prep is lightning fast, around 15 minutes total. That’s less time than it takes to decide what movie to watch!
- No Oven Required: Since we are avoiding the hot appliances, you can make this fudge even when your kitchen is already crowded with other elaborate Valentine’s Day Meals prep.
- Texture Perfection: It sets up incredibly smooth and creamy. As a Flavor Strategist, I promise the white chocolate and condensed milk mixture creates that melt-in-your-mouth texture we all crave in homemade chocolate treats.
- Ideal for Gifting: Cut them into little hearts or squares, wrap them up in cute cellophane, and you have gorgeous, personalized Valentines Day Treats ready to go.
These no-bake cookies are another favorite for those super busy times, but fudge just feels a little more decadent for Valentine’s, you know?
Essential Ingredients for Perfect No-Bake Valentine Fudge
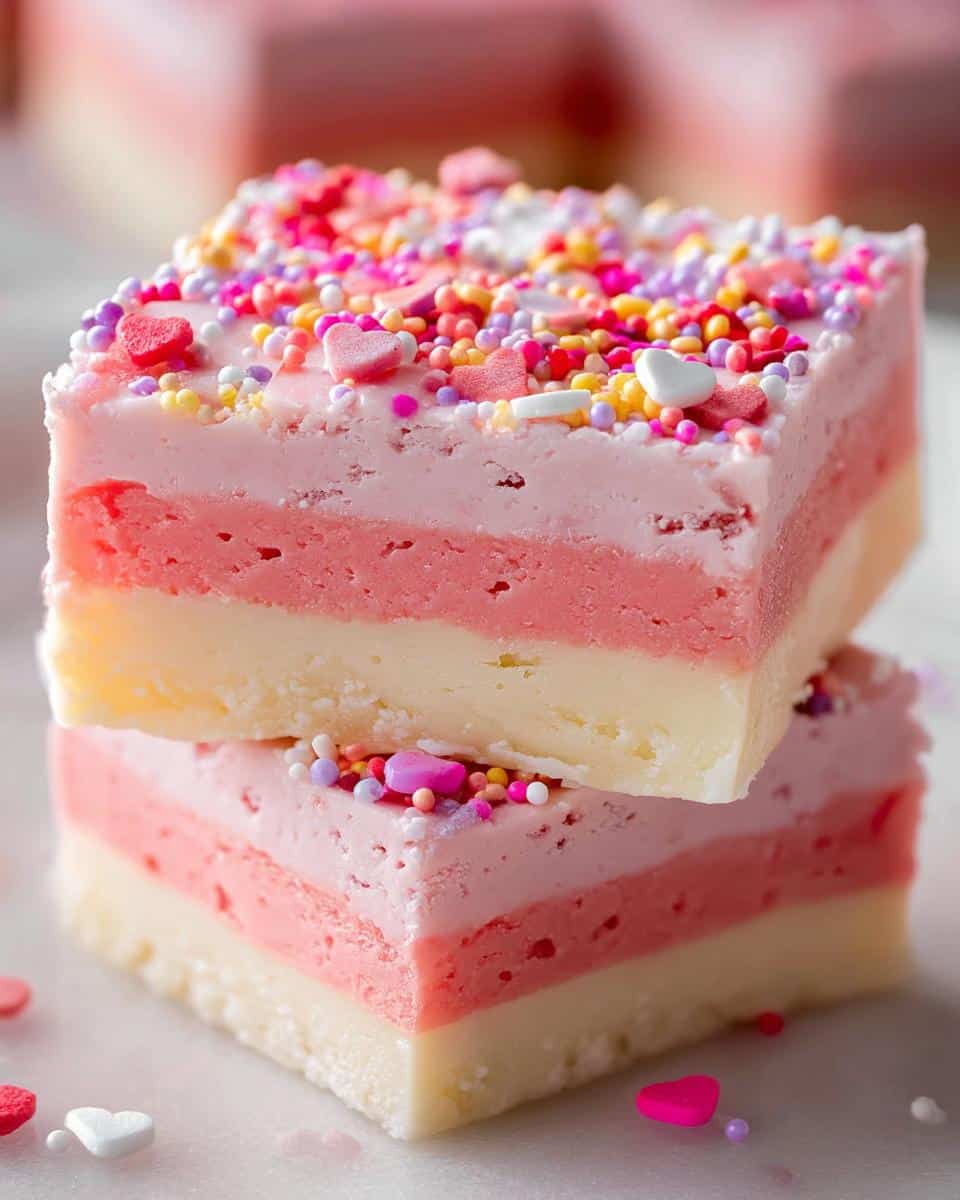
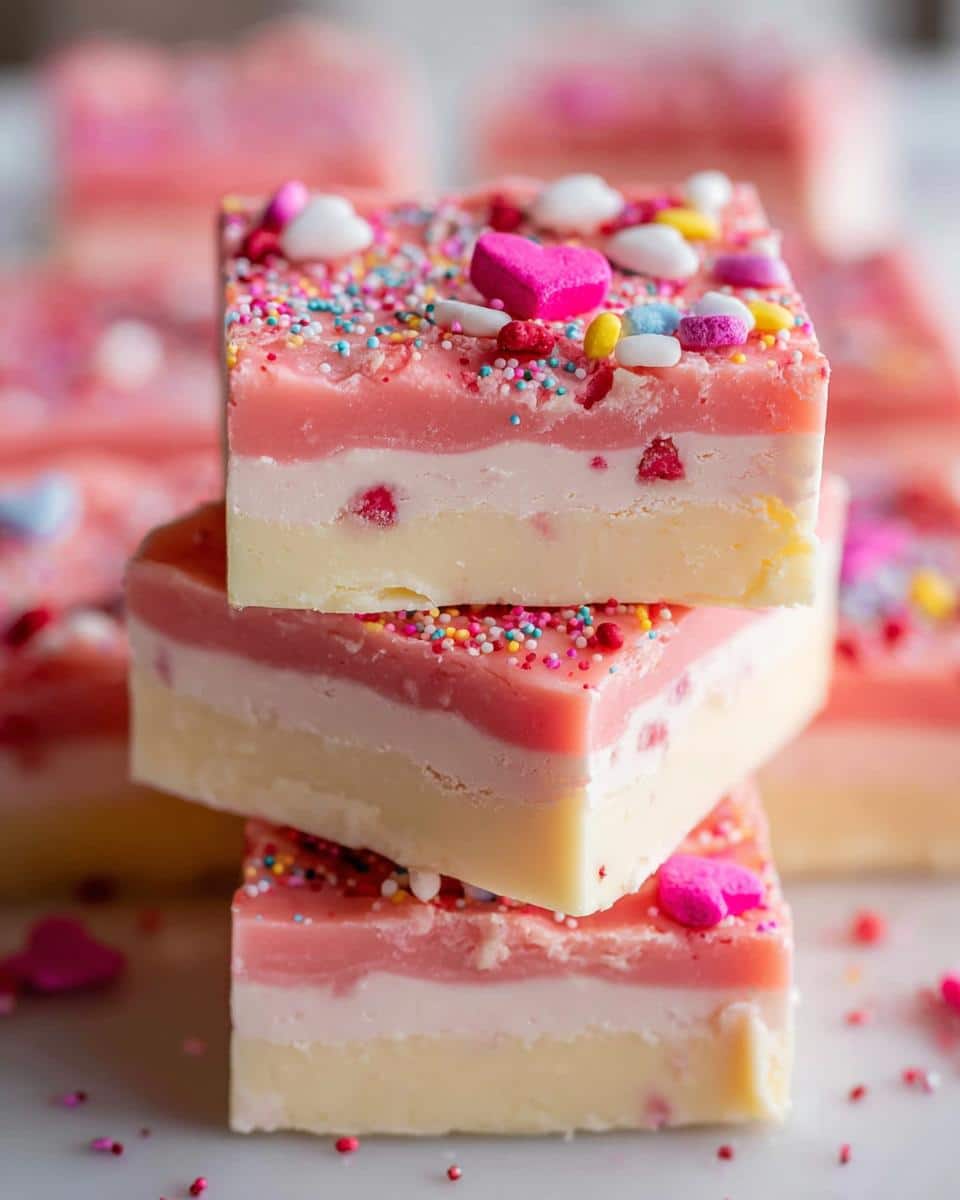
Now, the beauty of this **No-Bake Valentine Fudge** is that the ingredient list is short, but quality really matters because there’s nowhere for an off-flavor to hide! I always remind my readers, especially when we are making something so simple, that precision helps us achieve that silky smooth consistency we are aiming for. This recipe is split into two distinct halves, which is key for that gorgeous layered look that screams Valentine’s Day.
We’re using white chocolate chips, not wafers, to get that quick melt, and don’t skip the salt—it really wakes up the sugar!
For the Fudge Base Ingredients
For the very important first pink layer, you’ll need exactly 12 ounces of white chocolate chips, and make sure you only use half of your total sweetened condensed milk—that means 7 ounces, or one whole can split between the two layers. We also need a teaspoon of vanilla extract and just a tiny pinch of salt. Oh, and this is vital: you need red food coloring here to get that perfect pink hue for your base!
For the Topping and Second Layer of No-Bake Valentine Fudge
The second layer is basically the same, but without the color, which keeps things simple! Grab the remaining 12 ounces of white chocolate chips and the other 7 ounces of sweetened condensed milk. Remember the remaining teaspoon of vanilla and that final pinch of salt go in here too. Finally, for the festive finish, have about 1/4 cup of sprinkles or whatever fun decorative candies you love ready to go right before the white layer sets.
Step-by-Step Guide to Making No-Bake Valentine Fudge
Okay, this is where the magic happens, and I promise you, it’s easier than making toast! Since this is a no-bake recipe, our main tool besides the microwave is patience—but only for chilling time, not active prep time.
Preparing the Pan and Melting the First Pink Layer of No-Bake Valentine Fudge
First things first, grab that 8×8 inch pan and line it with parchment paper. You want plenty of overhang around all four sides—this is your safety handle for lifting the finished fudge out later, so don’t skimp on the paper!
Next, take half of your white chocolate chips and half of that can of sweetened condensed milk. Dump them into your microwave-safe jug. Now, for melting: microwave this in 30-second intervals. After each 30 seconds, pull it out and stir well before putting it back in. This slow process prevents scorching, which can make your fudge grainy. We want smooth, luxurious texture, remember?
Layering and Setting the Festive Fudge
Once that first mix is perfectly melted and glossed over, pull it out. Stir in half the vanilla, half the salt, and now, this is the fun part—start adding your red food coloring drop by drop until you reach that perfect romantic pink shade!
Pour this gorgeous pink mixture right into your prepped pan and smooth the top out evenly. Slide that carefully into the fridge to chill for just 30 minutes. This quick chill helps the layer set so our second layer doesn’t just sink right into it.
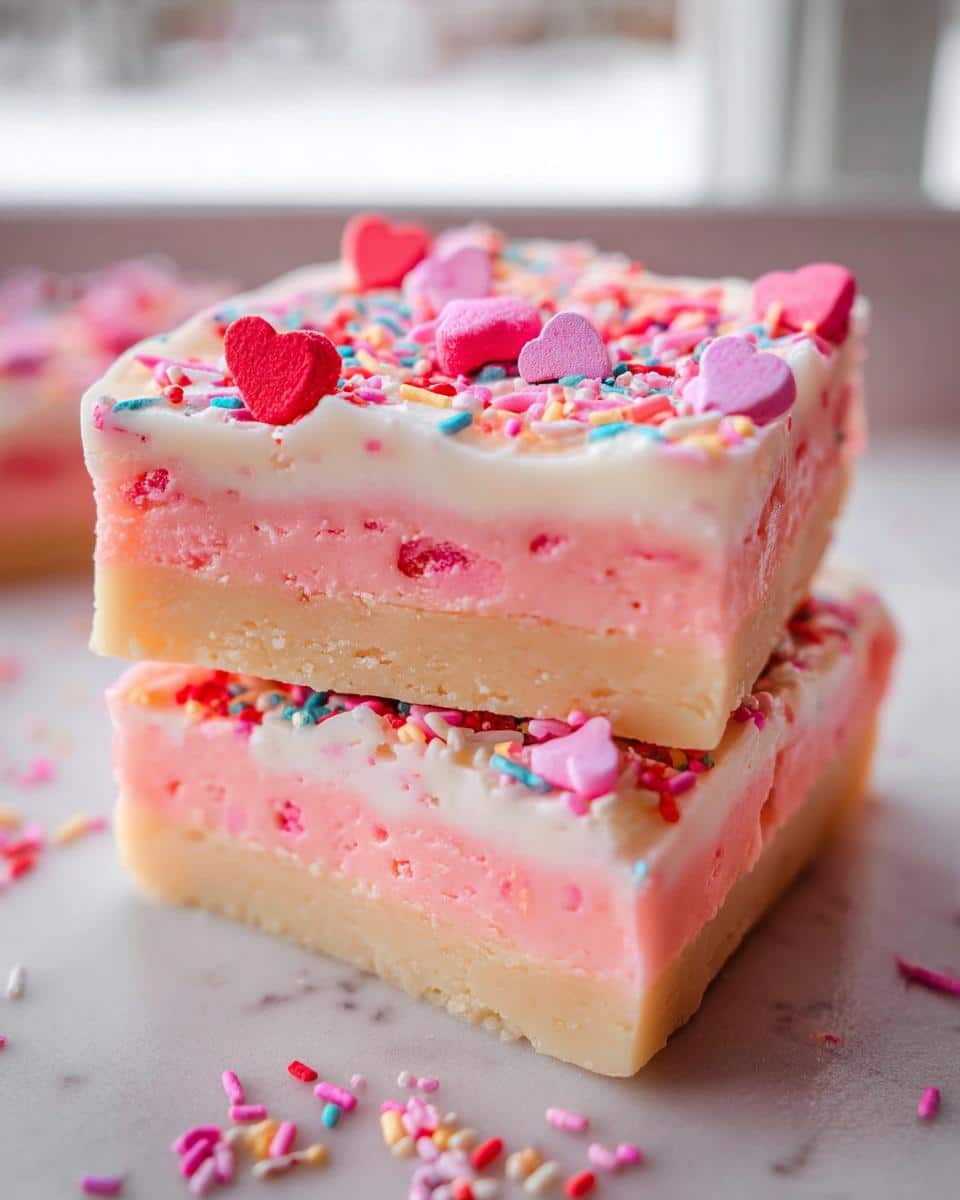
While that’s chilling, you’ll repeat the melting steps exactly for the second (white) layer. Pour that white fudge right on top of the set pink layer. And here’s what you have to do right away before the top starts to skin over: grab your sprinkles or decorative candies and scatter them across the top! You can look at other chocolate dessert ideas for inspiration, but for this, stick to festive colors.
Final Chill and Cutting Your No-Bake Valentine Fudge
Once the sprinkles are placed, that white layer goes back into the refrigerator for a proper chill—I like to let mine go for a full 2 hours. You want it totally firm before you try to slice it. Trying to cut it too early results in a melted mess, and nobody wants that!
When it’s rock solid, gently use those parchment paper overhangs like handles to lift the entire block of fudge out onto your cutting board. It should pop right out! Take a sharp knife and cut the fudge into squares or triangles, depending on how fancy you want to get. A quick wipe of the knife between cuts keeps those layers looking super sharp!
Tips for Achieving the Best No-Bake Valentine Fudge Texture
Finding that perfect, creamy mouthfeel in fudge is what separates an okay batch from a truly spectacular one. Since we aren’t baking, texture is all about temperature control and how gently we handle the melted chocolate. Don’t worry if your first attempt is a little softer than you hoped; I’ve learned a few tricks over the years!
When I’m mixing the melted white chocolate and sweetened condensed milk, my biggest tip related to consistency is to stir gently. Seriously, you don’t need to whisk this like crazy! Over-stirring or whipping the mixture too hard can actually introduce tiny air bubbles that cause the fudge to set up oddly crumbly or even slightly grainy—which is the nemesis of smooth fudge!
And please, learn from my occasional impatient moments: allow that full 2-hour chill time, maybe even longer if your kitchen runs warm. A fudge that seems firm when you touch it might still be gooey in the middle, leading to messy slices. If it’s taking too long to firm up, just slide it back into the fridge. A proper chill ensures those clean cuts you see in the pictures!

If you’re looking for other amazingly simple treats, check out some easy snacks and small bites ideas on the site. Confidence in texture comes with practice, and this fudge is a great place to start building those skills!
Ingredient Notes and Substitutions for Your Valentine’s Day Treats
Since this **No-Bake Valentine Fudge** relies almost entirely on just two main ingredients—the chocolate and the condensed milk—you really need to use decent quality components. As a Flavor Strategist, I notice that cheap white chocolate chips sometimes contain added stabilizers that don’t melt as smoothly, and we definitely don’t want a grainy texture here!
If you’re looking to mix things up, you can absolutely swap out the white chocolate for semi-sweet or milk chocolate chips if strawberries and cream flavor isn’t your jam. Just remember, if you switch to milk or dark chocolate, you’ll want to leave out the red food coloring in the first layer, as the color won’t show up nicely anyway.
For the topping, if sprinkles feel too juvenile for your vibe, try a light drizzle of melted dark chocolate over the white layer right before it sets for a sophisticated look. Or, for a little crunch that pairs well with the sweetness, chopped toasted pecans work wonderfully in place of the festive Valentine’s Day Treats sprinkles.
Serving Suggestions for Your Valentines Day Food Ideas
Once you lift that gorgeous pink-and-white slab out, you have so many fun presentation options beyond just slicing it into squares! These simple Valentines Day Treats look amazing when wrapped individually. I grab little mini cupcake liners or pretty cellophane bags for gifting.
If you are serving this for a cozy night in, this rich fudge pairs *perfectly* with a strong cup of coffee or a warm mug of hot chocolate—seriously, they balance the sweetness beautifully. For a cute presentation for brunch or a Galentine’s party, try cutting the fudge into small triangles instead of squares for a different dimension!
For a fun twist, you can pop one piece onto a small spoon alongside some fresh raspberries. If you need drink pairing ideas for the occasion, I wrote a whole post about my favorite cozy drinks that would complement this richness so well!
Storage and Keeping Your No-Bake Valentine Fudge Fresh
Even though this fudge is so dangerously delicious you probably won’t have any leftovers, sometimes you just need to pace yourself! Since there’s no baking involved, storage is a breeze. You absolutely must keep this fudge in an airtight container.
I find that the best place for leftovers is right in the refrigerator. It stays perfectly firm and delicious for at least a week, maybe even ten days! Honestly, I’ve never tested it longer than that because it disappears too fast around here. If you’re thinking ahead for next year’s Valentines Day Treats, you can definitely freeze this fudge!
Wrap individual pieces tightly in plastic wrap, and then tuck them into a freezer-safe bag. It keeps beautifully for up to three months. Just let it thaw on the counter for about 30 minutes before enjoying your quick treat!
Frequently Asked Questions About Quick Valentine’s Day Desserts
Can I make this fudge without white chocolate chips?
That’s a great question for making alternative Valentines Day Treats! While this specific recipe is built around the creaminess that white chocolate provides when mixed with condensed milk, you certainly can substitute it. I recommend using high-quality semi-sweet or milk chocolate chips if you prefer a richer chocolate flavor instead of the sweet vanilla notes of white chocolate. Just remember that using darker chocolate might make your pink layer less vibrant, so you might need an extra drop of red food coloring for that bright pink look we love!
How do I prevent the layers from mixing?
Preventing layer bleed is all about that handy chill time, which is crucial when assembling these layers for your Valentine Day Desserts. After you pour in the first pink layer, you need to give it a solid 30 minutes in the refrigerator. You want it firm enough to hold its shape before you gently pour the second white layer over top. If the first layer is too soft, the two mixtures will merge, and you won’t get that crisp, beautiful separation needed for a stunning presentation. Don’t rush that 30-minute window!
Can this fudge be used for Galentines Aesthetic gatherings?
Absolutely! This is my number one recommendation for any Galentines Aesthetic party or gathering. Why? Because it looks professionally made but takes almost zero effort, leaving you more time to focus on friendship and fun! The pink and white checkerboard style is perfectly festive for groups of friends. You can even cut the squares smaller and serve them on platters alongside punch for an easy-to-grab treat. They look fabulous with pink and red décor!
Is this recipe suitable for beginners learning Valentine’s Day Baking?
Yes! If you’re new to making homemade chocolate treats, this is your starting point. There’s no measuring flour, no creaming butter, and zero chance of burning anything because there’s no oven involved! The only trick is microwaving in short bursts, which is easy to manage. If you’re looking to build your confidence in the kitchen, this no-bake wonder is perfect for getting those quick Valentine’s Day Desserts done right the first time around. You can learn more about my simple cooking philosophy over on my About Page!
Share Your Festive No-Bake Valentine Fudge Creations
I truly hope you enjoyed making this quick and truly delicious **No-Bake Valentine Fudge**! As I mentioned, making something sweet for the people you love shouldn’t be stressful, and this recipe is designed to bring pure joy.
If you made this recipe and it completely stole your heart—and I really think it will—please pop back over here and give it a big 5-star rating! Those ratings really help other folks find the best, easiest Valentines Day Treats available.
I absolutely *live* to see how you decorate yours! Whether you went all out with themed sprinkles or kept it simple with just a dusting of powdered sugar, snap a picture! Tag me on social media so I can gush over your gorgeous layered fudge. It makes my day to see my recipes coming to life in your kitchens.
If you ran into any snags or have a quick substitution tip of your own for these Valentine Day Desserts, please drop a comment below. I read every single one, and I’m always here if you need help troubleshooting or just want to share how much you loved the results. If you have general questions about recipe modifications, feel free to reach out through my contact page!

No-Bake Valentine Fudge
Ingredients
Equipment
Method
- Line an 8×8 pan with parchment paper, leaving excess paper over the edges to help remove the fudge later.
- Combine half the white baking chips and half the sweetened condensed milk in a microwave-safe jug.
- Microwave the mixture in 30-second intervals, stirring between each interval, until the mixture is melted and pourable.
- Add half the salt, half the vanilla, and red food coloring to the melted mixture. Mix until you achieve the desired shade of pink.
- Pour the pink mixture into the prepared pan and smooth the surface. Refrigerate for 30 minutes.
- Repeat the melting process using the remaining sweetened condensed milk, salt, and vanilla, but omit the food coloring to create a white layer.
- Pour the white mixture over the set pink fudge layer. Smooth the top and immediately sprinkle with decorative candies or sprinkles.
- Place the pan in the refrigerator for 2 hours, or until the fudge is firm.
- Lift the fudge from the pan using the parchment paper edges and place it on a cutting board.
- Cut the fudge into squares or triangles before serving.