You know, food has to look good before it tastes good, especially when you’re feeding a crowd. That’s just a fact of life! I’ve spent my career tracing how traditions move through kitchens, and often, the presentation is half the story. Forget complicated pastries; sometimes the most impressive thing you can do is show off nature’s beauty. That’s why this Rainbow Fruit Platter is one of my absolute favorite things to bring to a gathering. It’s stunning, it’s healthy, and honestly, it sets up itself. We’re taking simple, fresh fruit and turning it into a centerpiece, dip included!
Why This Rainbow Fruit Platter Recipe Stands Out
I really think this platter is a game-changer for hosts everywhere. It’s not just pretty; it actually gets people excited about eating well. You won’t have leftovers because everyone digs right in. Look, the best recipes are the ones that tell a story without needing an oven, and this one whispers history just by showing off vibrant colors.
- Visual Appeal and Party Impact: The bright bands make this a guaranteed hit. Whether you need something light for a brunch or a sneaky way to sneak in some Green Foods For Party needs for Saint Patrick Day Food, this works perfectly. It really pops!
- Simplicity of Assembling Your Rainbow Fruit Platter: Honestly, you only need about 20 minutes of hands-on work. There’s no baking, no sautéing—just chopping and arranging. It’s totally stress-free, making your Rainbow Fruit Platter the easiest showstopper on the table.
Gathering Ingredients for Your Rainbow Fruit Platter
This is where the magic starts to take shape, but unlike a big casserole, we are dealing with fresh, vibrant components. You need two main things: the fruit for our structure and the dip to tie it all together with a rich tang. Getting the prep right here means the assembly goes like smooth sailing later on. Trust me, you don’t want to be frantically cutting a kiwi when the guests are walking up the drive! The beauty here, as a historian of food presentation, is how much history we respect by just using good, seasonal produce. If you need inspiration on why fruit is so important, have a peek at what the folks over at these wonderful nutritional sites have to say.
Fruit Selection for the Rainbow Layers
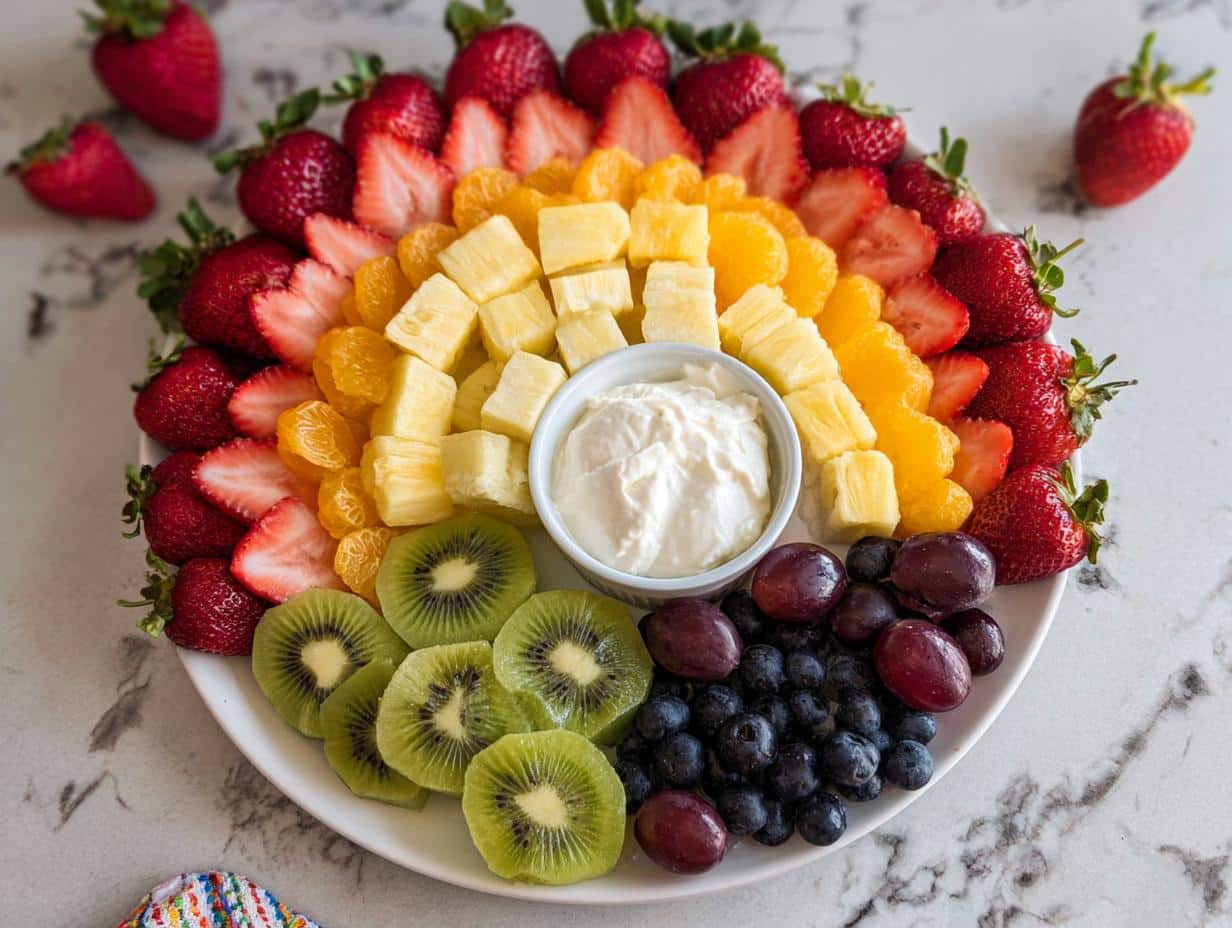
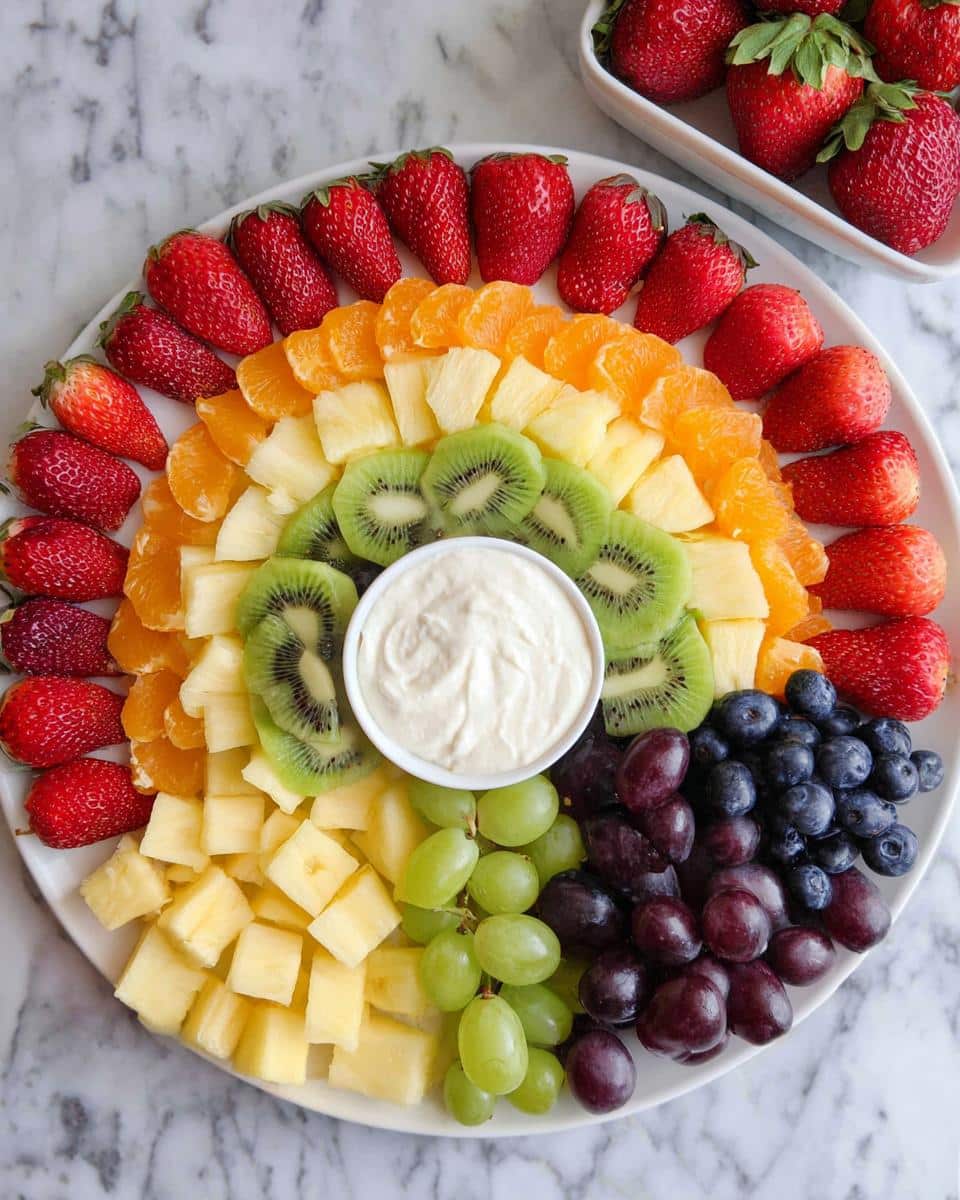
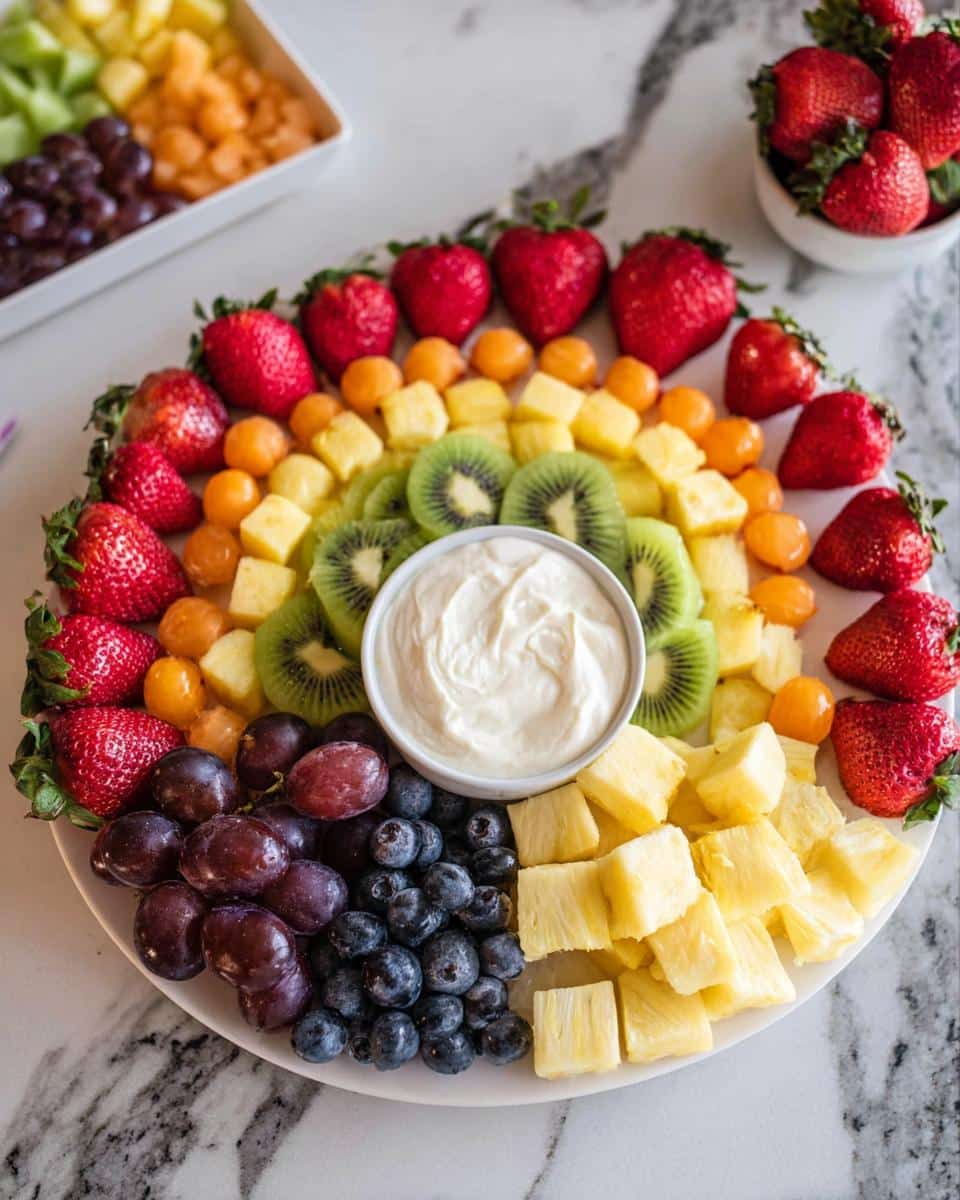
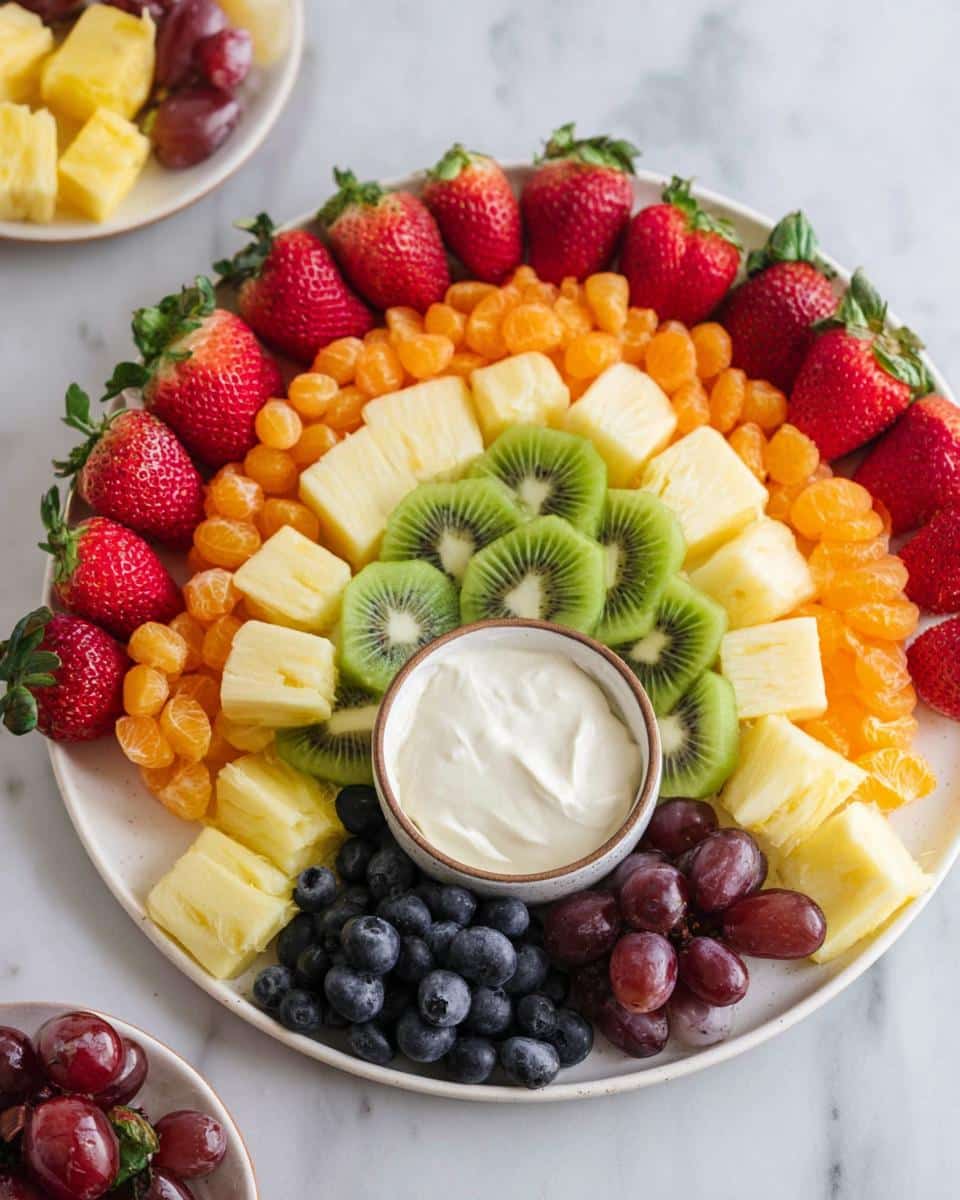
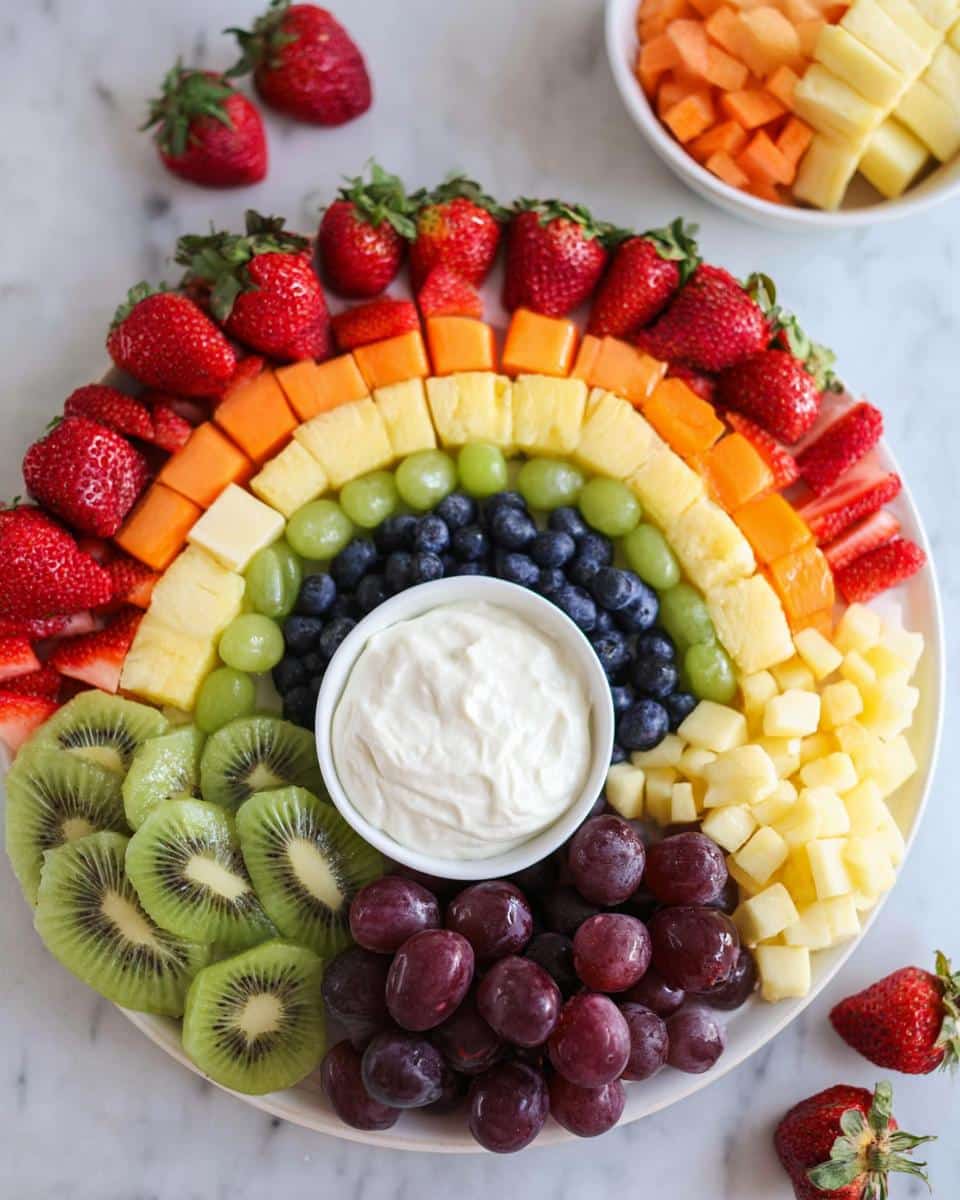
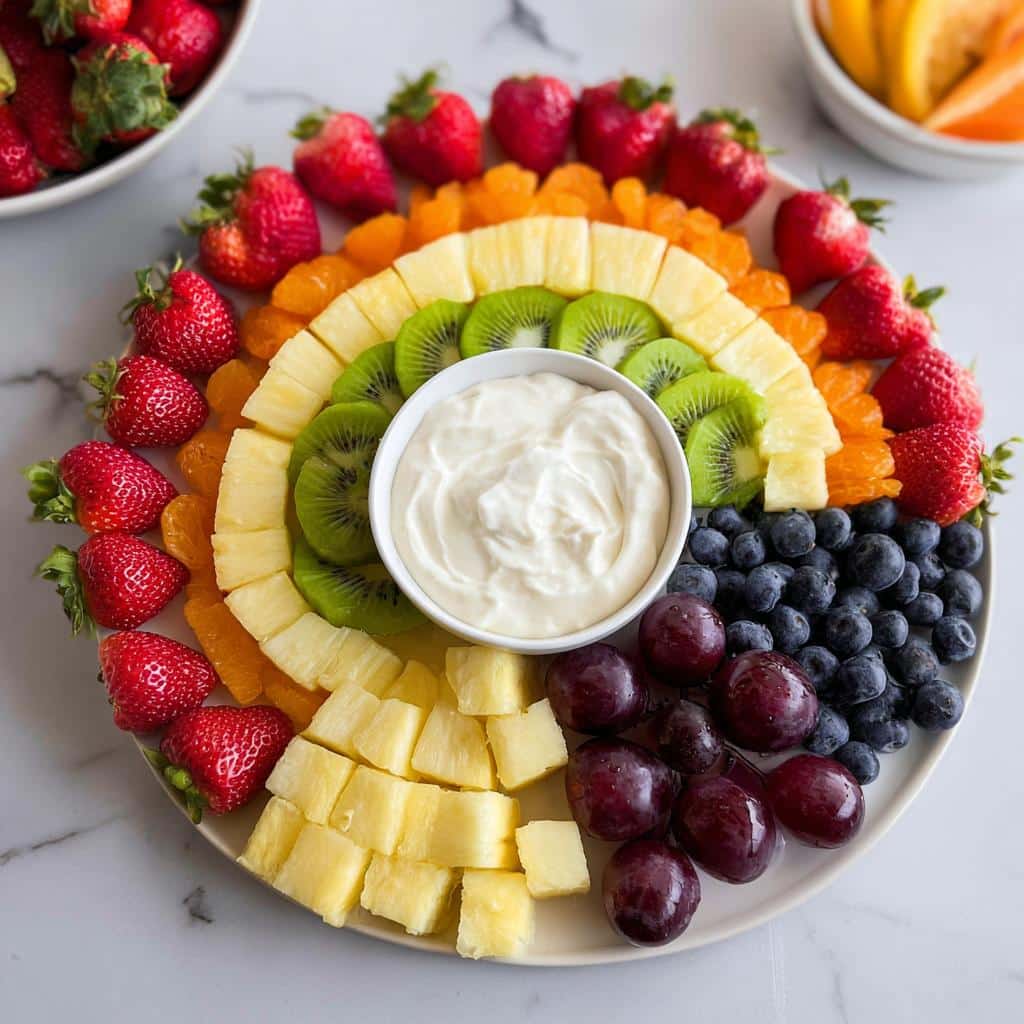
We gotta stick to the stripes for that perfect visual impact. Remember, your cuts need to look uniform so they line up nicely. You’ll need about two cups of strawberries, and make sure you cut those into proper halves or quarters—no big chunks allowed! Grab your goldenberries or some clementines for the orange layer. Then, think bright yellow with a small pineapple, cut into cubes just the size of those pineapple chunks. For the green, we’re using kiwi chunks, or you can swap those out for about 16 green grapes if you prefer. Finally, we finish with the blue blueberries and the purple grapes to close the arch of your Rainbow Fruit Platter.
Making the Simple Cream Cheese Dip
The dip has to be light and airy, so this part requires a little coordination. You absolutely need four ounces of cream cheese that’s sitting at true room temperature. This is non-negotiable for smoothness! Grab your powdered sugar—you can use honey or maple syrup if you’re opting out of sugar—and a splash of vanilla and salt to balance it all out. The superstar here is the cold heavy cream; it needs to be ice-cold when you slowly start adding it. We whip it until it holds stiff little peaks. That cold temperature on the cold mixture is what gives us that fantastic, scoopable texture.
Expert Tips for the Perfect Rainbow Fruit Platter Presentation
When I look at food, I see culture and history laid out on a plate. For a Rainbow Fruit Platter to truly shine, it’s not just about having the right ingredients; it’s about intention in the arrangement. My grandmother used to say that a meal wasn’t finished until the table looked inviting. We’re treating this platter with that same respect. You want those colors to look so sharp they almost leap off the serving dish!
Preparing Fruit for Maximum Freshness
Listen, if your fruit is wet, your presentation is going to look sad and soggy fast. It’s vital that after you wash everything—and I mean everything—you pat it completely dry. Use paper towels and be patient. Also, when you’re cutting, consistency is your best friend. If your strawberries look like wedges and your pineapple looks like cubes, the rows won’t sit neatly next to each other. Uniformity is the secret weapon in keeping this display sharp until the very last guest leaves.
Arrangement Strategy for Your Rainbow Fruit Platter
Here’s the crucial layout step: don’t start with the fruit! Set your dip bowls down first in the center of your 12-inch platter, or wherever you want the base of your ‘U’ shape to be. These bowls act as anchors. Then, you build the rainbow outward, starting with red (strawberries) and working your way through the colors. If you’re making this for a holiday like Saint Patrick Day Food, really pile up those green kiwi or grapes! Emphasize that layer to really hit those Green Foods For Party vibes without sacrificing the rainbow integrity.
Step-by-Step Instructions for Your Rainbow Fruit Platter
Okay, let’s get this amazing Rainbow Fruit Platter put together. Since the dip needs time to firm up properly, we tackle that first—and this requires a little bit of patience, which, trust me, is worth it for that perfect texture.
Preparing the Cream Cheese Dip First
First thing’s first: put your beaters and the large mixing bowl in the fridge for a full hour. Seriously, don’t skip this chilling step! Once everything is good and cold, pull them out. Start beating your room-temperature cream cheese with the sugar, vanilla, and salt until everything looks smooth. Now, turn the speed way down, and slowly drizzle in that ice-cold heavy cream. Once it’s all incorporated, blast the mixer up to high and whip it for about three to five minutes. You are looking for stiff peaks—that means when you lift the beaters out, the peaks stand straight up. Cover it and pop it back in the fridge for that required 60 minutes to chill completely.
Assembling the Rainbow Fruit Platter
Now that your dip is relaxing in the cold, it’s time for the fun part! Place your small dip bowls right where you want the ends of your rainbow arch to be on your platter. Next, grab all that perfectly prepped and dried fruit. You’re going in order, starting with the red strawberries to form the bottom row. Follow that with your orange citrus, then the yellow pineapple. Keep those rows tight and clean! Then you lay down the green kiwi or grapes, followed by the blueberries, and finish with the purple grapes at the top of the arch. Once the entire thing is laid out beautifully, cover the whole platter—fruit and dip bowls—and put it back in the fridge until you’re ready to serve. Don’t forget to put those little serving spoons right where they need to be!
Ingredient Notes and Substitutions for the Rainbow Fruit Platter
We want this Rainbow Fruit Platter to last and to look incredible, so let’s talk quick swaps if you can’t find exactly what I listed. The most important thing is keeping the color band intact. If you can’t find kiwi, using those green grapes instead is perfectly fine; just try to keep the chunks about the same size so the line stays neat—that’s my big presentation secret!
For the orange layer, if goldenberries aren’t around, grab two or three clementines and peel them, breaking them into segments. They give you that bright pop we need. Remember, the fruit has to look happy and ripe; dull fruit means a dull platter, especially when you are trying to hit those vibrant colors for events like a St Patrick’s Day Food Ideas Party!
Ensuring Vibrant Color Through Sourcing
When you are shopping, give the fruit a good once-over. You’re looking for that deep, saturated color on everything. For the greener items, like the kiwi or grapes, if they look pale, they might not stand out enough against the white dip in the center or the yellows next to them. For the berries, make sure they smell sweet; that’s how you know they’ll still taste great even a day later, which is helpful if you’re prepping some Green Snacks ahead of time.
Serving Suggestions for This Party Platter
This Rainbow Fruit Platter is so versatile, but since it’s naturally light and fresh, it needs companions that complement that vibe—we don’t want to weigh everyone down before the main course!
The dip here is rich enough to stand on its own, but I always love serving a few other little things alongside it. If you are using a lot of green fruit for your St Patrick’s Day Food Ideas Party, this platter transforms beautifully into one of the best St Patrick’s Day Appetizer Ideas you could imagine. It feels festive without being heavy.
For a proper party setup, try pairing the sweetness with something salty or savory. Think simple, crunchy baguette slices or small squares of mild white cheese—maybe some fresh mozzarella balls if you’re keeping things light. For a full St Patrick Party Food spread, you could serve some seasoned nuts on the side. That salty crunch works wonders against the sweet, cool fruit.
If you want to lean into that Irish Appetizers theme, you don’t have to ditch the fruit! Just make sure you have a plate of simple savory cheese and crackers nearby. The contrast between the sweet, tart fruit and the salty, yeasty cracker is just classic appetizer gold. Everyone grabs a piece of fruit, scoops some of that tangy dip, and then moves onto something savory. It’s the perfect little dance of flavors!
Storing Leftovers of Your Rainbow Fruit Platter
Oh, heavens, if you actually manage to have leftovers of this Rainbow Fruit Platter, you’re a true magician! Usually, it vanishes before I can get the serving spoons washed. But just in case you have some stragglers, we need to treat the fruit and the dip separately because they behave very differently once they’ve been out.
The best way to keep things tasting fresh is to deconstruct the platter. Scoop the cream cheese dip right back into an airtight container. Since it has all that sugar and fat, it holds up really well! You can stash that in the fridge for up to three days. I find it’s actually better the next day after it’s settled.
For the fruit, you definitely want to separate them by color if you can, but at the very least, get them all into a sturdy, airtight container. Remember, especially the berries and the pineapple—they start releasing juices once they’ve been cut and sitting out for a while. If you stored everything snugly, you should still have perfectly good fruit for up to three days. It won’t look as stunning as it did on the platter, obviously, but it’s still great for snacking or tossing into a smoothie!
Frequently Asked Questions About the Rainbow Fruit Platter
When people bring this Rainbow Fruit Platter out at gatherings, I always get asked the same few things! It’s natural; everyone wants their snack spread to be as impressive and easy as possible. These little logistical questions can make or break your party timing, so let’s clear them up now!
Can I make the Rainbow Fruit Platter the night before?
Oh, I wouldn’t recommend assembling the whole thing the night before, sweetie. Fruit tends to weep—that’s when it releases all its juice—and things can get mushy, especially that lovely red strawberry line. The dip is fine chilling overnight, but for the best presentation, cut your fruit that morning and assemble it about an hour before serving. It keeps those edges sharp!
What if I need a dairy-free dip for my St Patrick Party Food?
That’s an easy fix! If you need a dip that skips the dairy for your St Patrick Party Food, skip the cream cheese and heavy cream. Instead, whip up a base using an equal amount of thick, plain coconut cream (the thick part from a chilled can) mixed with a little powdered sugar or maple syrup. It whips up beautifully and keeps the consistency right.
How can I make this platter fit a specific theme, like green for St Patrick Day Food?
If you’re making this as a dedicated St Patrick Day Food centerpiece, you’ve got a real advantage! Lean heavily into that green layer. Use more kiwi and green grapes than you think you need, making that band the widest one on your platter. Also, use a dark green platter or line your white one with some festive green napkins underneath the fruit. It really elevates the look and gives those St Patrick’s Day For Kids Treats that extra holiday punch!
Understanding the Nutrition in Your Rainbow Fruit Platter
Now, I know what you’re thinking: what exactly are we putting in our bodies here? As a person who loves tradition, I also deeply respect what good, whole food can do for us. This Rainbow Fruit Platter is naturally packed with vitamins and fiber just by being fruit, but I always like to give folks a rough idea of what they’re digging into, especially with that lovely dip involved.
Remember, this is based on one serving—which is a generous scoop of fruit and a dollop of dip made exactly according to my recipe measurements. Since fruit sizes vary wildly, take these numbers as a good starting point, not gospel!
- Calories: Approximately 145 kcal
- Fat: Around 5g (most of this is from the cream cheese in the dip!)
- Protein: About 2g
- Carbohydrates: Roughly 25g (mostly natural sugars)
See? It’s a fantastic way to get sweetness without relying on processed sweets for your party time. It pairs beautifully if you’re looking for lighter appetizers that still feel special. If you can believe it, eating the fruit on its own significantly cuts down on the fat and calories, but honestly, that dip is what ties the whole experience together!
Rainbow Fruit Platter
Ingredients
Equipment
Method
- Place your hand mixer beaters and bowl in the fridge for 1 hour before making the dip.
- Make the dip: In a large mixing bowl, use an electric hand mixer to beat the cream cheese, sweetener, vanilla, and salt at medium speed until combined.
- While mixing on low speed, gradually add the heavy cream.
- Once incorporated, turn the speed to high and beat until stiff peaks form, about 3 to 5 minutes.
- Cover the dip and place it in the fridge until you are ready to serve. This makes about 1 cup plus 3 tablespoons of dip.
- Form the rainbow: Place your white bowls with the dip down at the bottom of where you plan to make the rainbow, and build the rainbow shape around them.
- Wash, rinse, and pat all fruit dry with paper towels.
- Cut the fruit as instructed.
- Starting with the strawberries, begin forming the rainbow. Arrange one row for each color of fruit listed.
- Cover the platter and refrigerate until you are ready to serve.
- Place a serving spoon near the platter and smaller spoons in the fruit dip.