Do you ever feel like Halloween is missing that perfect, show-stopping centerpiece dessert? Believe me, I do! Every year, I want something that smells sweet but looks totally wild. That’s why I developed this incredibly fun Trick or Treat Cake. Forget your basic sheet cake; this masterpiece is layered with vibrant colors and topped with a spooky black cocoa frosting, but the real magic happens when you slice it open.
It’s packed with a hidden hoard of your favorite Halloween candy, just waiting to tumble out! This is the kind of dessert my family always asks for now. It takes a little effort, sure, but seeing the kids’ faces when that candy spills out? Priceless. It’s the best kind of cozy, creative chaos for a holiday party.
Why You’ll Love This Trick or Treat Cake
This isn’t just some bland cake you frost and call it a day. This recipe is designed to be the star of your Halloween table. It’s got layers of wow factor! If you’re looking for great Halloween cake ideas that deliver on fun, this is it.
Festive Fun and Visual Impact
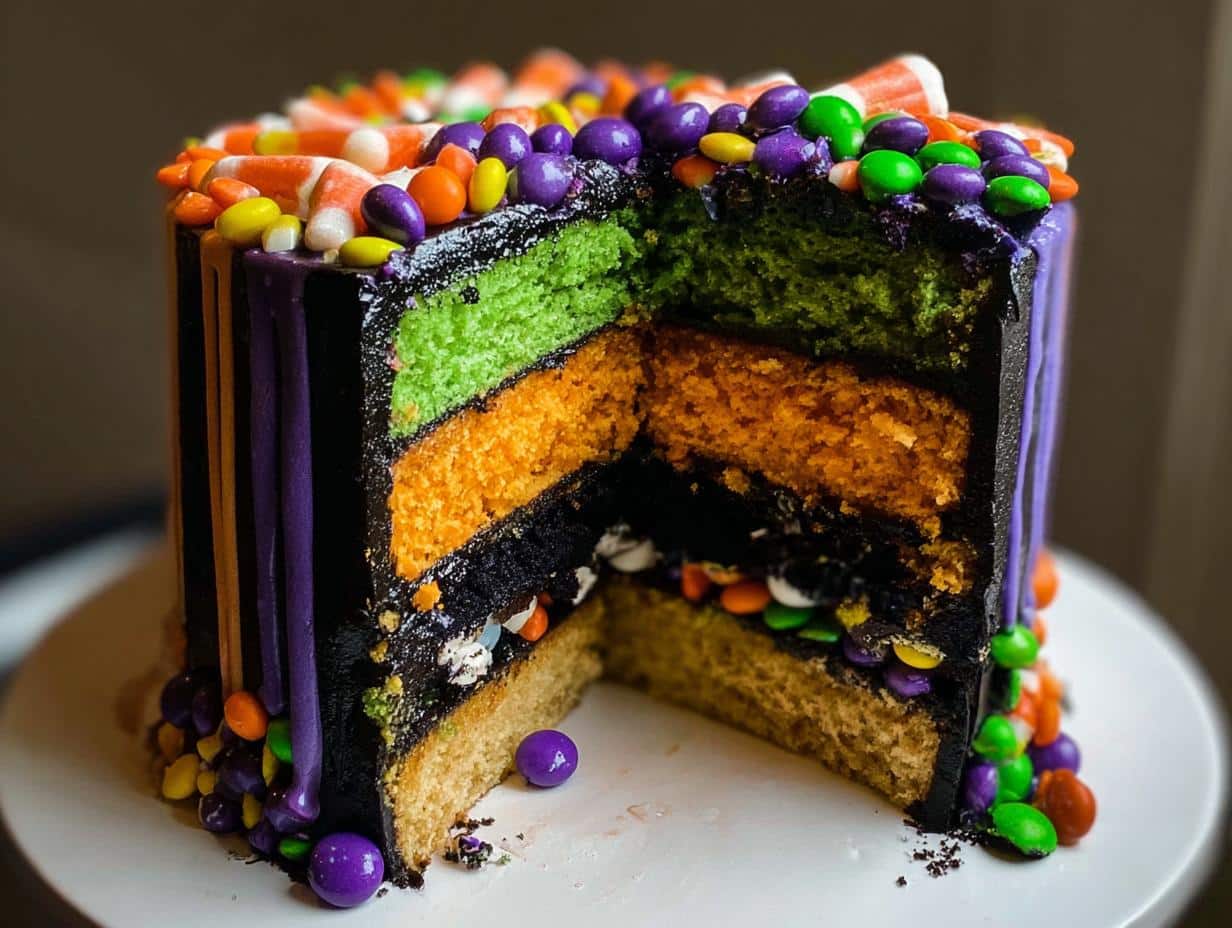
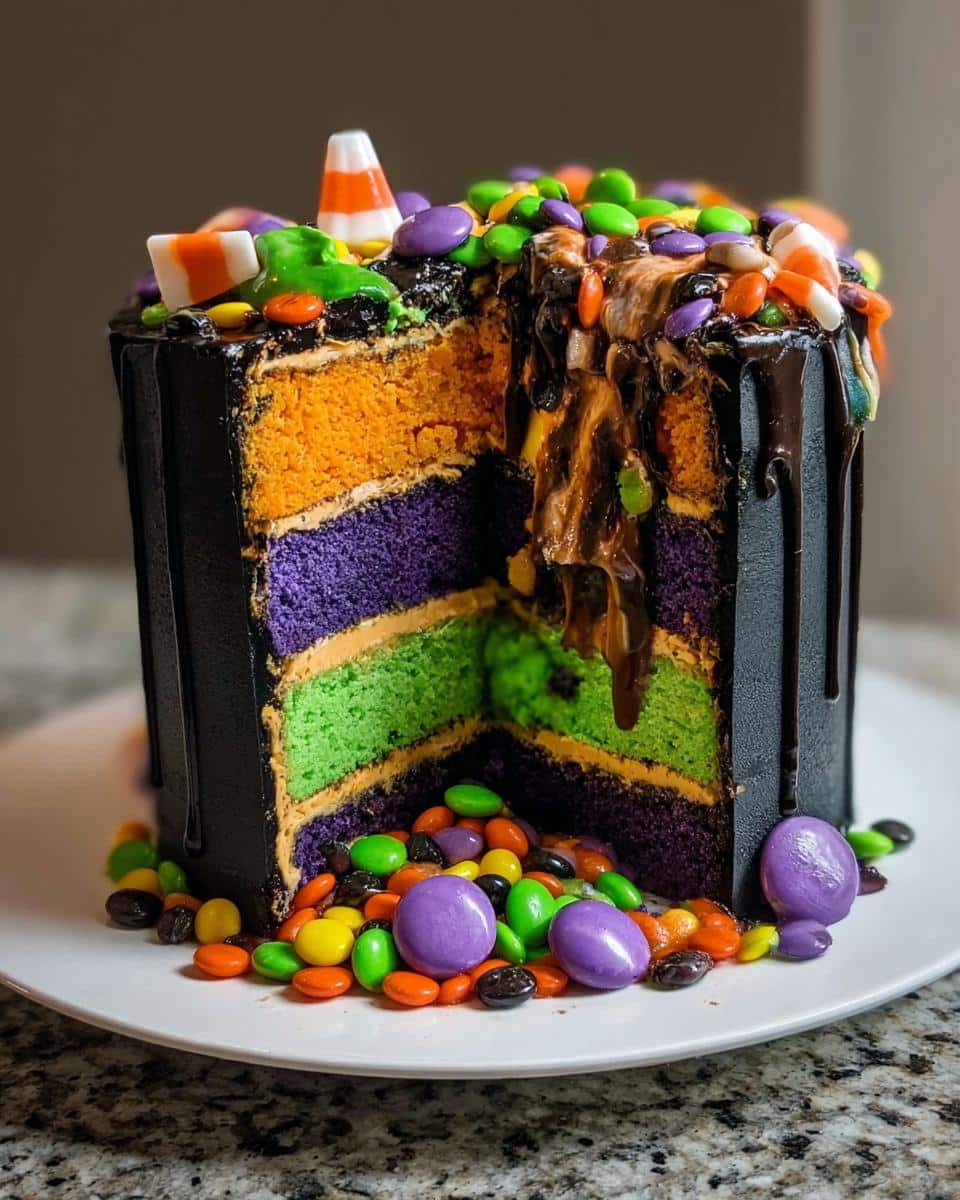
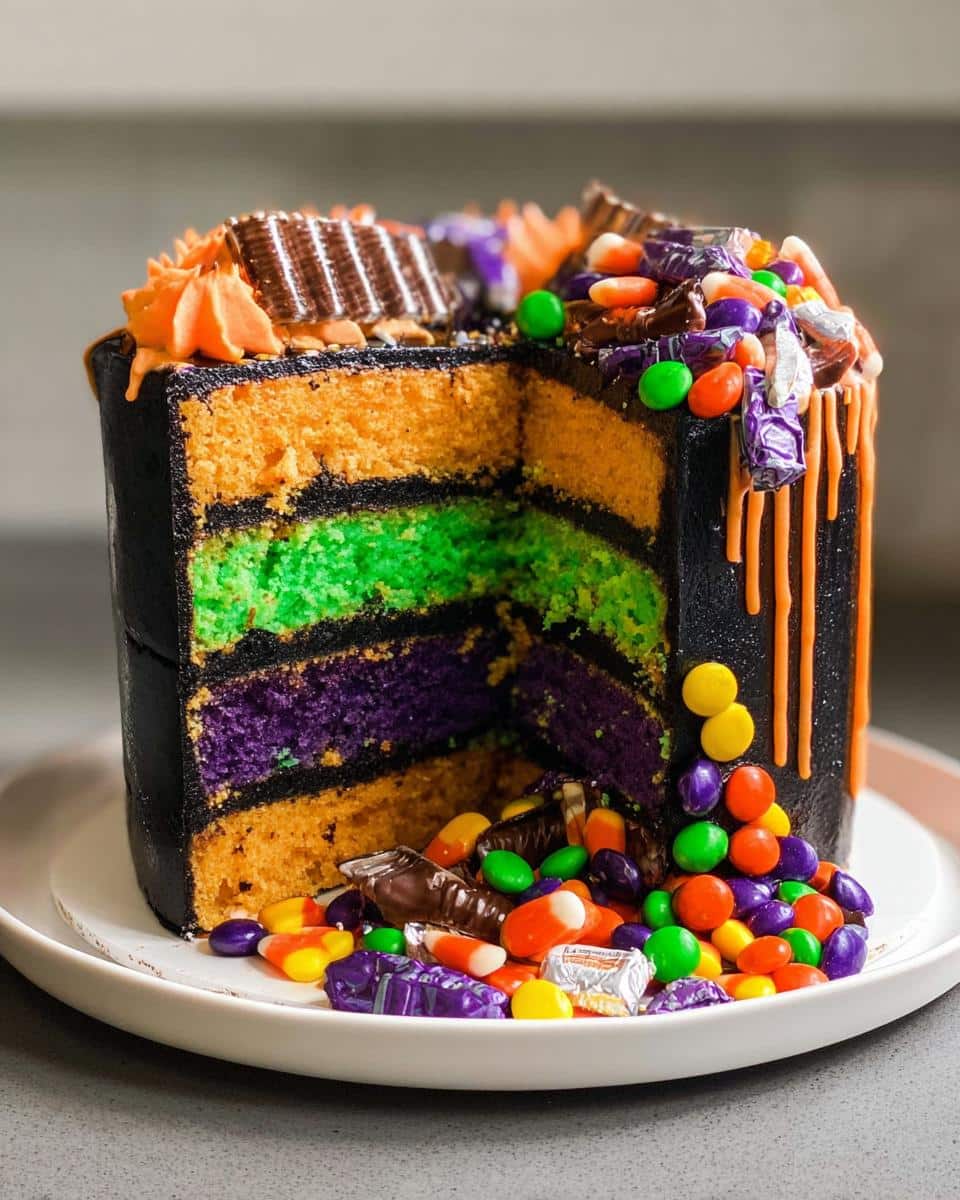
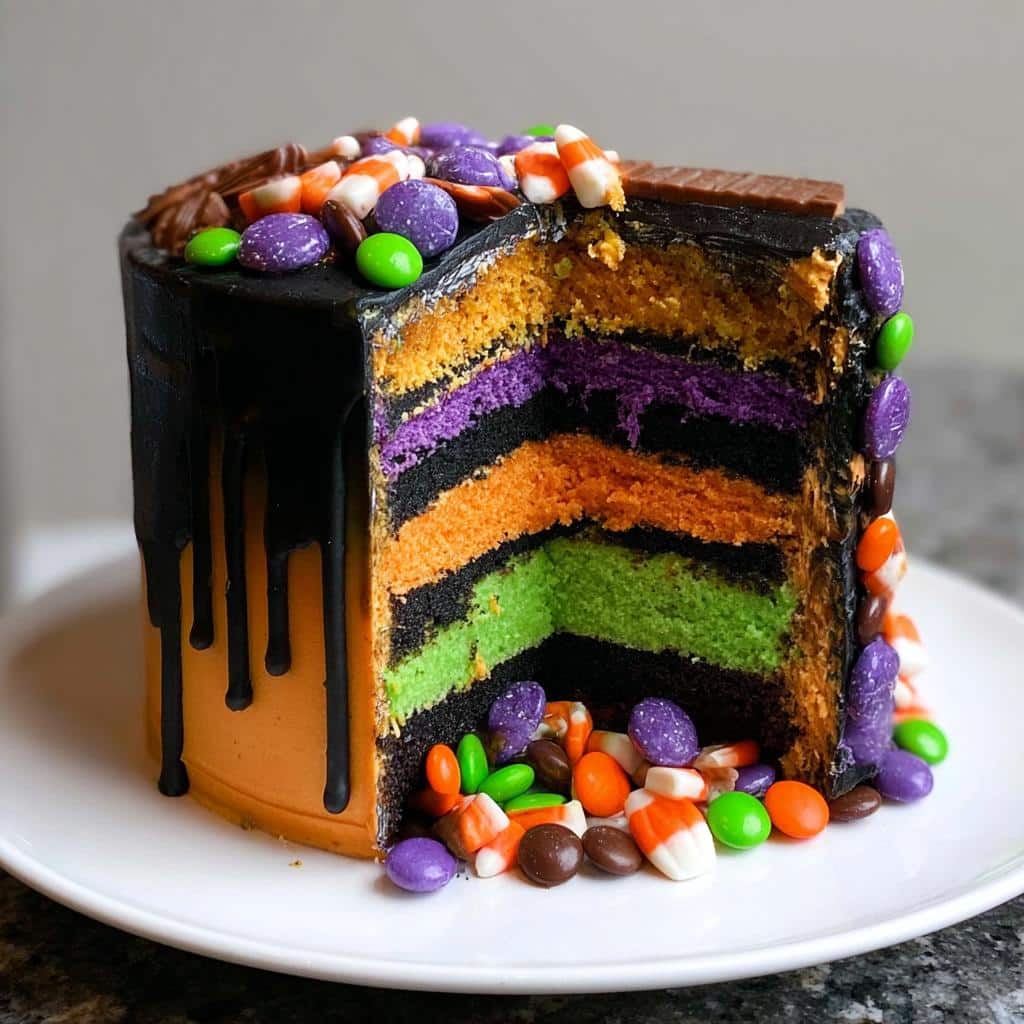
You get the drama of the colorful candy melt drips, but the real showstopper is the hidden center. Cutting into the cake reveals a bounty of candy—instant applause from the kids!

Flavor Profile
It’s delightfully moist, featuring those subtly colored vanilla layers. That deep black cocoa cream cheese frosting is rich and tangy; it cuts through the sweetness perfectly so it never tastes too heavy.
Essential Equipment for Your Trick or Treat Cake
Before you even think about turning on the oven, let’s get set up! Having the right gear makes this creative process so much easier, I promise. You don’t need a dozen fancy gadgets, but these few things really help manage the layers and the decorating.
- You’ll certainly need a stand mixer, and make sure you have that paddle attachment handy for creaming the frosting.
- We are baking three separate 8-inch round cake pans for those beautiful layers.
- Don’t forget your wire cooling rack—the cakes need space to breathe after they come out of the oven.
- For trimming and leveling the layers, grab a good serrated knife.
- To cut out that candy hole, a glass or a medium biscuit cutter works wonders.
- Finally, use an offset spatula and a bench scraper to get that frosting smooth. The squeeze bottles are key for that perfect drip effect!
Ingredients for the Perfect Trick or Treat Cake
Okay, getting the ingredients together is like prepping for a fun baking mission! For this cake, we need three specific groups of things. Seriously, for the frosting, make sure your cream cheese and butter have sat out—cold dairy just doesn’t whip up right, and we want this buttercream dreamy! Also, when it comes to the coloring, ditch the liquid stuff; only gel food coloring gives you that deep, spooky color we’re aiming for, especially for the black cocoa.
For the Trick or Treat Cake Layers
- 3 1/4 cups all-purpose flour
- 3 cups granulated sugar
- 2 1/2 teaspoons baking powder
- 1 teaspoon salt
- 1 cup unsalted butter (room temperature, 2 sticks)
- 1 cup egg whites (about 7 eggs, or carton equivalent)
- 1 1/2 cups buttermilk (room temperature)
- 2 teaspoons clear vanilla extract
- 2 Tablespoons vegetable oil
- 3-4 drops orange, green, and purple gel food coloring (Use gel colors!)
For the Black Cocoa Cream Cheese Buttercream
- 8 ounces cream cheese (softened, one package)
- 1 cup butter (softened, two sticks)
- 5.5 – 6 cups powdered sugar (Adjust to desired consistency)
- 1 cup black cocoa powder
- 2-3 Tablespoons milk (Adjust to desired consistency)
- 1 Tablespoon vanilla extract
- 1/4 teaspoon salt (only if using unsalted butter)
- 5-6 drops Black gel food color
For the Cake Drip & Decorations
- 6 ounces white candy melts (For cake drips)
- 3 3/4 Tablespoons heavy whipping cream (May need slightly less depending on thickness)
- 1-2 small drops orange, green, and purple gel food coloring (To color cake drips)
- 1 cup Halloween candy (10-15 pieces depending on size, for filling)
- 3-4 Tablespoons Halloween sprinkle mix (Of your choice)
Step-by-Step Instructions to Make the Trick or Treat Cake
Now for the wonderful part—putting it all together! Follow these steps exactly, especially around cooling and coating, and you’ll have a showstopper dessert. Don’t rush the cooling; warm cake and frosting just don’t mix well, trust me on that one. We’re going from raw ingredients to spooky centerpiece, and I can’t wait for you to see the results!
Baking the Colorful Cake Layers
First thing, crank that oven up to 350°F! Get your three 8-inch pans ready—spray them down well or use parchment rounds on the bottom. In your mixer with the paddle, whisk the dry stuff (flour, sugar, baking powder, salt) until they’re happy together. Then, mix in that room-temp butter until it looks crumbly. Slowly stream in the egg whites, then the buttermilk, oil, and vanilla. Mix low, scrape down the sides, and then beat it on medium speed for just about 30 seconds! Divide that batter evenly between your pans—using a kitchen scale helps here—and slide them in the oven for about 34 to 37 minutes. They’re done when a toothpick comes out clean.
Preparing the Layers for the Candy Surprise
Let those babies cool in the pans for a good 10 to 15 minutes before flipping them onto a wire rack—this is crucial so they don’t stick! Make absolutely sure they are totally cool, maybe even pop them in the fridge for a quick chill. Once they aren’t warm anymore, use a serrated knife to level the tops. Now for the fun prep: take two of those layers and use a glass or that biscuit cutter to punch a nice, deep hole right in the center. Leave the very bottom intact, so you create a little well ready to hold your loot!
Creating the Black Cocoa Cream Cheese Buttercream
This dark frosting is intense and amazing! Beat your softened cream cheese and butter together until they’re fluffy. Start adding in the powdered sugar and black cocoa powder alternately with the milk until it smooths out nicely. Once you hit that perfect texture—not too stiff, not too runny—toss in the vanilla, the salt if you’re using unsalted butter, and those 5 or 6 drops of black gel colors. Beat it until it’s uniformly dark and spooky looking. If you’re looking for other fun recipes for the little monsters running around, check out some of my easy recipes for kids!
Assembling and Filling the Trick or Treat Cake
Start with a dab of frosting on your cake board so the first layer doesn’t slide around! Frost that first layer, even out the edges, and place the second layer (the one with the hole) right on top. Now, carefully load up that center well with your cup of Halloween candy. Place the final, uncut cake layer right on top to seal the deal. Time for the crumb coat! Brush on a thin layer of that black frosting all over the outside to trap any loose crumbs. Don’t worry about neatness; just get it covered! Stick the whole thing in the fridge or freezer for 5 to 10 minutes until that coat sets up hard.
Making and Applying the Candy Drip
We’re using candy melts for that awesome drip effect! Microwave your white candy melts and heavy cream at 50% power in 30-second bursts, stirring well each time until it’s totally smooth—take your time so you don’t scorch them. Divide that smooth ganache into three little bowls and mix in just tiny drops of your orange, green, and purple gels. Once the colored mixture cools down a bit so it’s warm but not hot, load it into squeeze bottles or piping bags. Drizzle it slowly around the top edge of the cake, pausing every inch or so to let more naturally fall down the sides in a lovely drip. Pop it back into the cold to set those colors firmly before decorating the top!
Tips for Decorating Your Trick or Treat Cake
This is where the cake goes from being delicious to being absolutely legendary! Since this is a Trick or Treat Cake, we want maximum visual punch without stressing ourselves out. When you’re applying those colored drips, if you want a cool, marbled effect instead of three separate stripes, let the colored ganaches cool just a *tiny* bit longer than normal. That slight thickness helps them swirl together when they drip.
My personal trick is to pipe a generous ring of that black cocoa frosting swirls around the top edge first. This gives you a beautiful, textured border to finish everything off. Then, sprinkle your remaining Halloween sprinkles right into the center of those piped swirls. It uses up any extra bits and makes the top look professionally finished, even if you just sprinkled them on!
If you love rustic yet beautiful baking, you might also enjoy looking at some of my ideas for brownie bites with extra sprinkles. Creativity in decoration is what makes holidays fun!
Storage and Serving Suggestions for Your Trick or Treat Cake
This cake is best enjoyed the day you assemble it, mainly because that hidden candy center is spectacular when fresh!
Since the frosting is cream cheese-based, cover the cake loosely with plastic wrap and keep it in the refrigerator. It should be good for about three days, though it rarely lasts that long in my house!
Here’s my biggest serving tip: Make sure the cake is slightly tempered before cutting. Taking it out of the fridge about 30 minutes early softens the frosting just enough. Then, use a big, sharp knife to slice down through those layers, and watch that candy spill right onto the plate for everyone to grab!
Frequently Asked Questions About the Trick or Treat Cake
Can I make this Trick or Treat Cake ahead of time?
Oh yes, you absolutely can! Making things ahead of time eases the stress on Halloween night, which is always busy. I always bake the cake layers a day or two beforehand and wrap them up tight in plastic wrap once they are completely cool onto a plate. Keep them on the counter, or wrap them and freeze them for up to a month! You can also make the black cocoa frosting a day early and keep it covered tightly in the fridge.
But listen, don’t assemble it with the candy inside until the day you plan to serve it. You want that candy to be perfectly contained! If you assemble the whole Trick or Treat Cake more than 8 hours ahead of time, the moisture from the frosting might start melting your candy filling—and we don’t want soggy surprises!
What are good low calorie snacks to serve alongside this rich dessert?
That is such a good question! Since this cake is definitely rich—hello, black cocoa buttercream!—you might want something lighter on the table so folks have options. It’s always smart to have some Low Cal Snacks available, especially if you have a crowd that mixes sweets lovers and health-conscious folks. I love putting out a big platter of bright, crisp green apple slices or some chilled grapes. They look fantastic next to the orange and purple cake, and the freshness really cleanses the palate after a bite of that dense, sweet frosting!
Can I use different cake flavors instead of the colored vanilla base?
You sure can experiment! That colored vanilla base is just a great neutral canvas that lets your black frosting and candy colors pop visually. If vanilla isn’t your favorite, try substituting the clear vanilla for almond extract for a stronger flavor punch. You could even make the layers chocolate or marble flavor instead! Just make sure you keep the wet and dry ratios similar so you don’t mess up the structure. You want those layers sturdy enough to hold the candy!
Author Insight: Lilya Lawson on Making a Great Trick or Treat Cake
When I think about holidays, I think about the feeling you get when you pull something totally unique out of the oven for the people you love. Making these kinds of fun Halloween Cake Ideas takes me right back to my childhood kitchen, trying to sneak extra sprinkles into everything. Don’t chase perfection when baking something this playful!
The goal isn’t just a perfect crumb; it’s the shared laughs when the candy spills out! Baking is just my way of wrapping my family up in a giant hug, and this cake is just about the biggest, gooiest hug I can give them for Halloween.
Sharing Your Delicious Trick or Treat Cake Creation
Now that you’ve got this magnificent, candy-stuffed creation cooling down, I would absolutely love to see what you came up with! Baking is so much more fun when we share the spooky results, right?
Please, if you make this spectacular Trick or Treat Cake, leave me a rating down below. Tell me how many stars you’re giving it! More importantly, I need the juicy details: what kind of candy did you manage to cram into that secret center? Did you stick with the classic assortment, or did you get wild with gummy worms and chocolate bars?
If you managed to snap any pictures of the epic candy spill—which I truly hope you did—tag me on Instagram! Seeing your kitchen creativity brightens my whole week. And hey, if you have any pressing questions I missed in the FAQ section, don’t hesitate to reach out via the contact page. Happy haunting, and happy eating!
Trick or Treat Cake
Ingredients
Equipment
Method
- Preheat your oven to 350°F. Prepare three 8-inch round pans by spraying them with baker’s floured spray, or by greasing and lining them with parchment rounds.
- Mix all dry ingredients (flour, sugar, baking powder, and salt) together in a stand mixer with a paddle attachment until fully combined. Slowly mix the room-temperature butter into the dry mix on a low speed. Continue mixing until no large chunks of butter remain and the mixture becomes crumbly.
- Pour in the egg whites and mix on low until just incorporated. Mix in the buttermilk on a low speed. Add the vanilla and oil, and mix at a low speed until fully incorporated. Scrape down the sides of the bowl with a spatula, then beat on medium speed for about 30 seconds.
- Divide the batter evenly between the prepared cake pans. Use a kitchen scale for accuracy to ensure your layers bake to the same height.
- Bake for 34 to 37 minutes, or until a toothpick inserted into the center comes out clean. Allow the cake layers to cool for 10 to 15 minutes on a wire cooling rack before removing them from the pans. Cool them completely before frosting. You can place them in the fridge or freezer to speed up the cooling process if you wish.
- Once the layers are fully cooled, level them if needed. Trim any caramelized bits from the sides or top of the cake using a serrated knife. Make sure the layers are completely cooled or chilled before trimming so they do not crumble.
- To prepare for the candy filling, use a glass or medium-sized biscuit cutter to remove the centers from two of the three cake layers.
- Beat together the softened cream cheese and butter. Slowly add in the powdered sugar alternating with the cocoa powder and milk until the frosting reaches your desired consistency. Add the vanilla, black gel color, and salt (if needed) and beat until well combined.
- Place a small amount of frosting on your cake circle to keep the cake from sliding, and center your first cake layer. Spread that layer with frosting. Repeat this process with the second layer.
- Fill the empty centers of the second cake layer with candy, and place the final, uncut cake layer on top.
- Apply a crumb coat to the entire outside of the cake. This is a thin layer of frosting meant to keep crumbs out of your final layer. Place the cake in the fridge or freezer for about 5 to 10 minutes to set the crumb coat.
- After the crumb coat sets, add your final layer of frosting and smooth it. Use an offset spatula and bench scraper for this step. Once the cake is covered, return it to the fridge or freezer to set the frosting. This is a good time to prepare your colored ganache drip(s).
- Place the heavy cream and candy melts in a microwave-safe bowl. Microwave on 50% power in 30-second intervals until smooth, stirring between each interval. Divide the ganache into three bowls and color them green, orange, and purple.
- When the candy melt mixtures have cooled to a moderate temperature—slightly warm but still fairly liquid—transfer them to squeeze bottles or piping bags. Slowly drizzle alternating colors of ganache around the upper edge of the cake, pausing every inch or so to let more fall down the side of the cake in a drip. Return the cake to the fridge or freezer to set the drips.
- Pipe a ring of frosting swirls around the edge of the cake top, and decorate with sprinkles. You can pour any leftover colored ganache over the top of the cake and smooth it with an offset spatula before adding more sprinkles on top, or swirl the three colors together.
- Cut into the cake and watch the candy spill out. Enjoy your creation.