Listen, I know Valentine’s Day can get complicated with reservations and gifts, but sometimes the very best celebrations are the ones we make ourselves, right here in the kitchen. That’s why I’m absolutely obsessed with this bright, creamy, over-the-top Valentine Milkshake recipe. Seriously, it takes less than ten minutes, and the aesthetic payoff is huge! I’ve always believed that festive drinks should feel special without needing a whole bar setup. This shake delivers that perfect, gorgeous pink hue and the dreamiest thick texture. Whether you’re planning a cozy date night in or just need a little self-love indulgence, this sweet treat is waiting for you. You won’t believe how easy it is to ditch the complicated mocktails for this simple joy. If you’re looking for more ways to make your day special, check out some of my other favorite Valentine’s Day recipes!
Why You Will Love This Valentine Milkshake
I mean, what’s not to love? When I designed this recipe, I kept saying, “It needs to be fast, it needs to be pink, and it needs to taste like a holiday hug.” And honestly, this delivers on all counts:
- It’s incredibly fast! You’re looking at maybe five minutes of action before it goes into the glass.
- The presentation is stunning—that thick, pink color and all those beautiful toppings make it so photogenic.
- It’s rich and creamy but uses simple ingredients you probably already have hiding in the freezer.
- It’s the perfect creamy dessert drink that feels way more indulgent than it actually is!
Essential Equipment for Your Valentine Milkshake
You don’t need a ton of fancy gadgets for this, thank goodness! Because we want that perfectly smooth, thick shake texture, your blender is the MVP here. You need a strong one that can handle frozen strawberries and ice cream without giving up!
Here’s the short list of what you’ll need to pull this off:
- A reliable Blender
- Your prettiest Milkshake glass
- A Rubber spatula or small wooden spoon (trust me, it helps with the rim!)
My little tip? Don’t skimp on the blender power. A weak machine leaves you with chunky bits instead of that velvety smooth finish. We’re going for liquid velvet here, not chunky ice!
Gathering Ingredients for the Perfect Valentine Milkshake
Okay, let’s talk supplies! This is where we pull together the creamy foundation and all the gorgeous, festive flair that screams ‘Valentine!’ Remember how I said presentation matters? Every ingredient here plays a role in making this the prettiest dessert drink you’ll make all year. Don’t worry, even if you’re trying one of my easy dessert recipes, showing off a bit never hurts!
For the Milkshake Base
This is the heart of our creamy creation. For three things: vanilla flavor, coldness, and the perfect pink color.
- 2 scoops Vanilla ice cream: Try to get about one whole cup’s worth.
- 1 cup Milk of choice: Whatever you usually keep on hand works fine.
- 1/2 cup Frozen strawberries: These keep it cold and boost that lovely fruit flavor.
- 6 drops Red or pink food coloring: This is non-negotiable for getting that signature Valentine Milkshake pop! Add slowly, you can always add more color, but you can’t take it out!
For the Rim and Garnish
If the base is the heart, these toppings are the sparkle! This is how we go from a simple shake to a stunning showstopper.
- 1/4 cup Vanilla frosting: This is your adhesive for the rim.
- 1/4 cup Valentine sprinkles: Make sure they are colorful and cheerful!
- 1/2 cup Whipped cream: Gotta have that cloud on top!
- 1 Heart shaped lollipop: Go big on the sticks!
- 1 Holiday sugar cookie: A little something extra to dunk.
Ingredient Notes and Flavor Variations for Your Valentine Milkshake
I always tell folks that recipes are just starting points, especially for fun things like this! If you don’t like vanilla ice cream, don’t sweat it. Strawberry or even a cherry flavor works beautifully and amps up that pink vibe. You can easily swap out the frozen strawberries for fresh ones if you have them, but you might need an extra splash of milk.
Now, for my grown-up friends—if this is a date night dessert and you want to skip the valentine non alcoholic drinks route for a moment, I suggest sneaking in a shot of vanilla vodka. It mixes right in while you blend!
And for my friends keeping it dairy-free, this is super adaptable. Just grab some non-dairy milk, use a good quality non-dairy ice cream, and look for a plant-based whipped topping. Easy peasy, and just as festive!
Step-by-Step Instructions to Make the Valentine Milkshake
This is the fun part where we turn ingredients into magic! Since presentation is everything with this shake, we have to prep our glass first so it’s ready when the cold shake comes out of the blender. Don’t rush the chilling step—it’s what keeps that frosting rim tidy!
Preparing the Festive Glass Rim
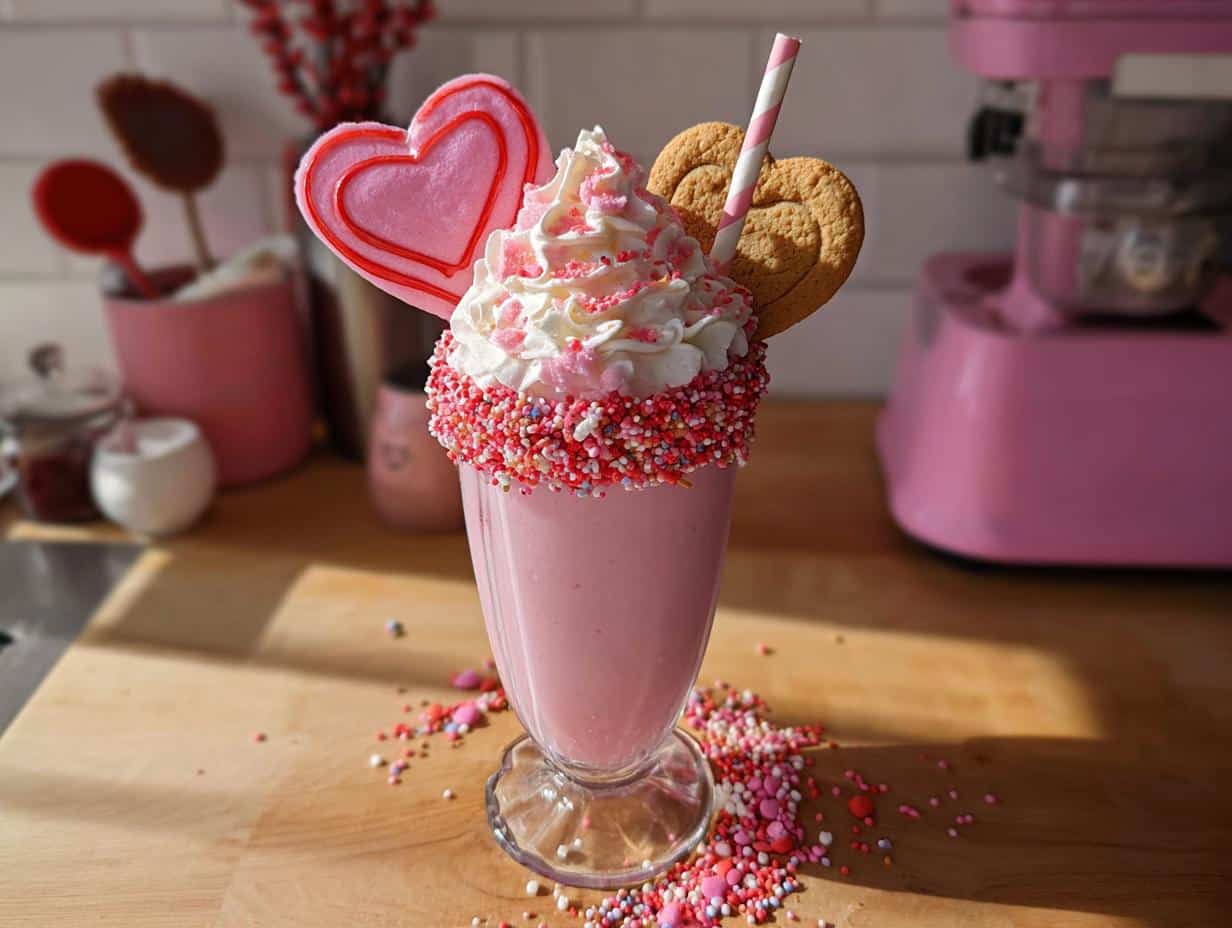
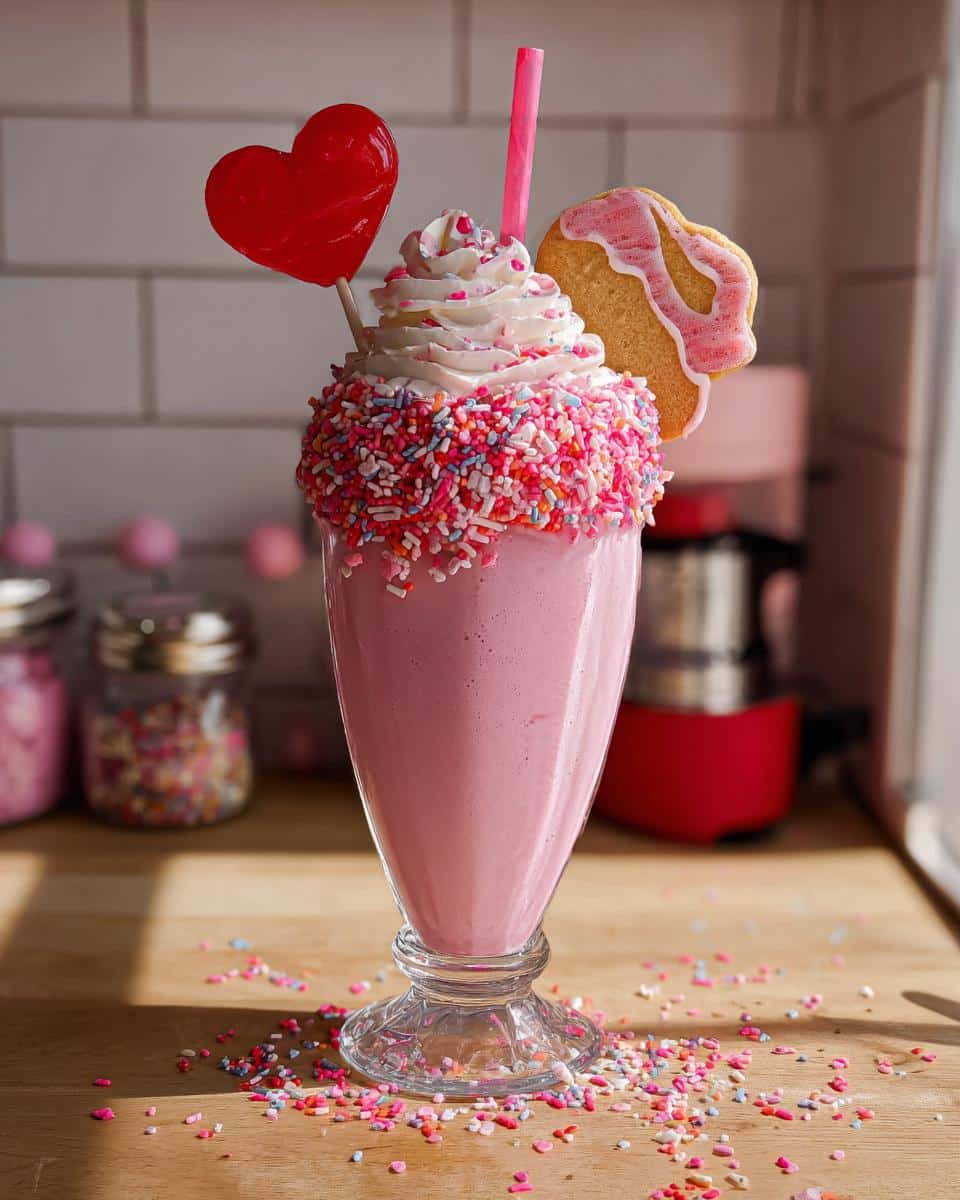
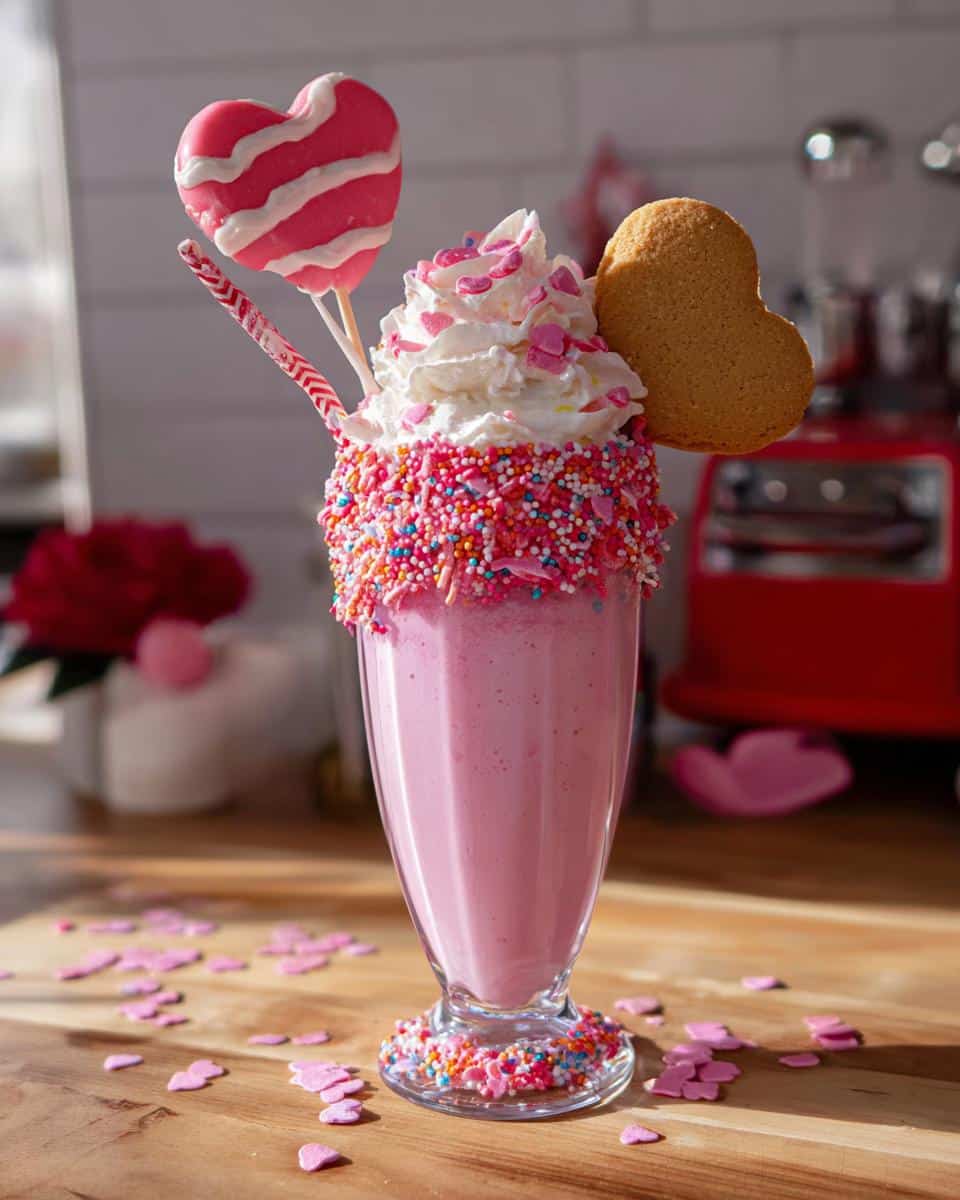
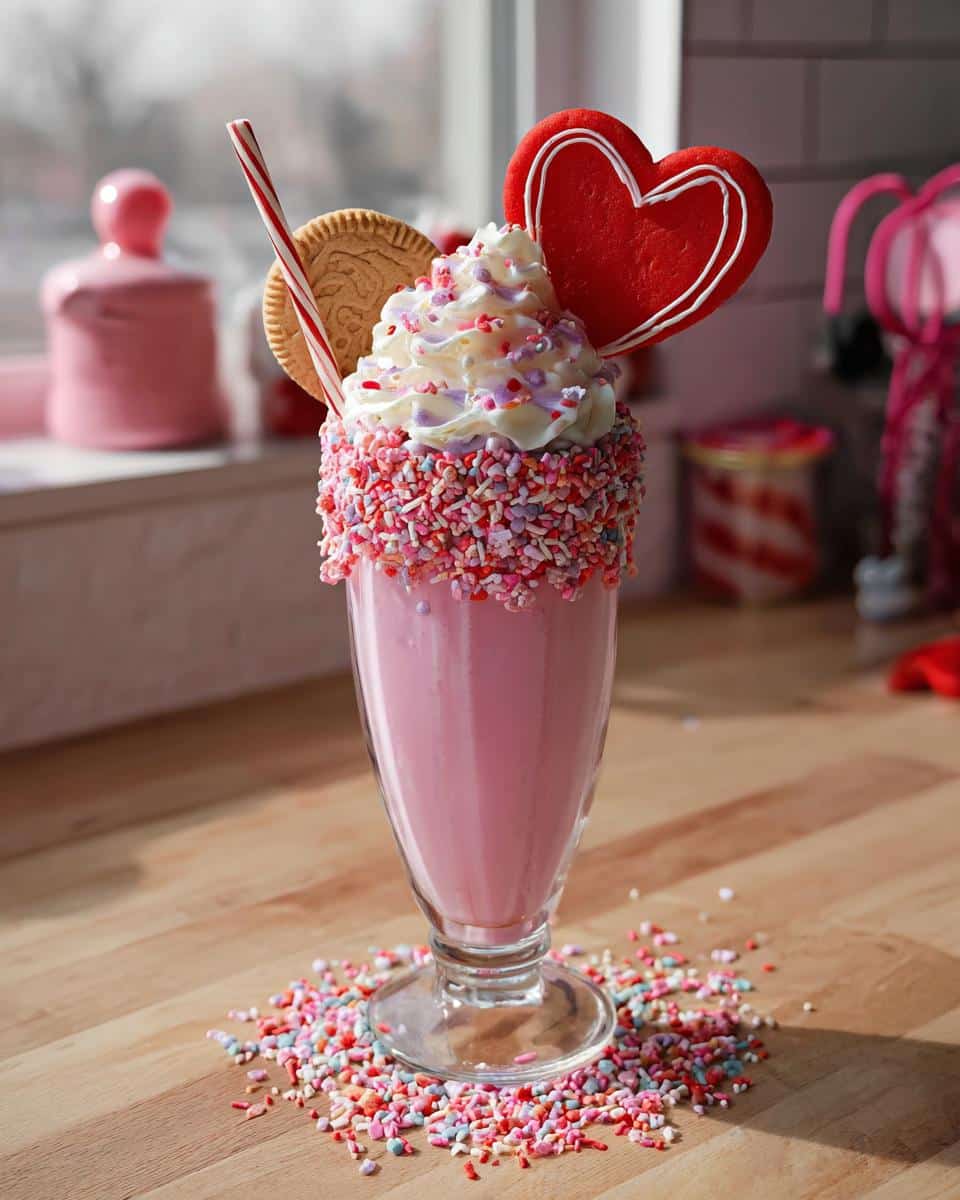
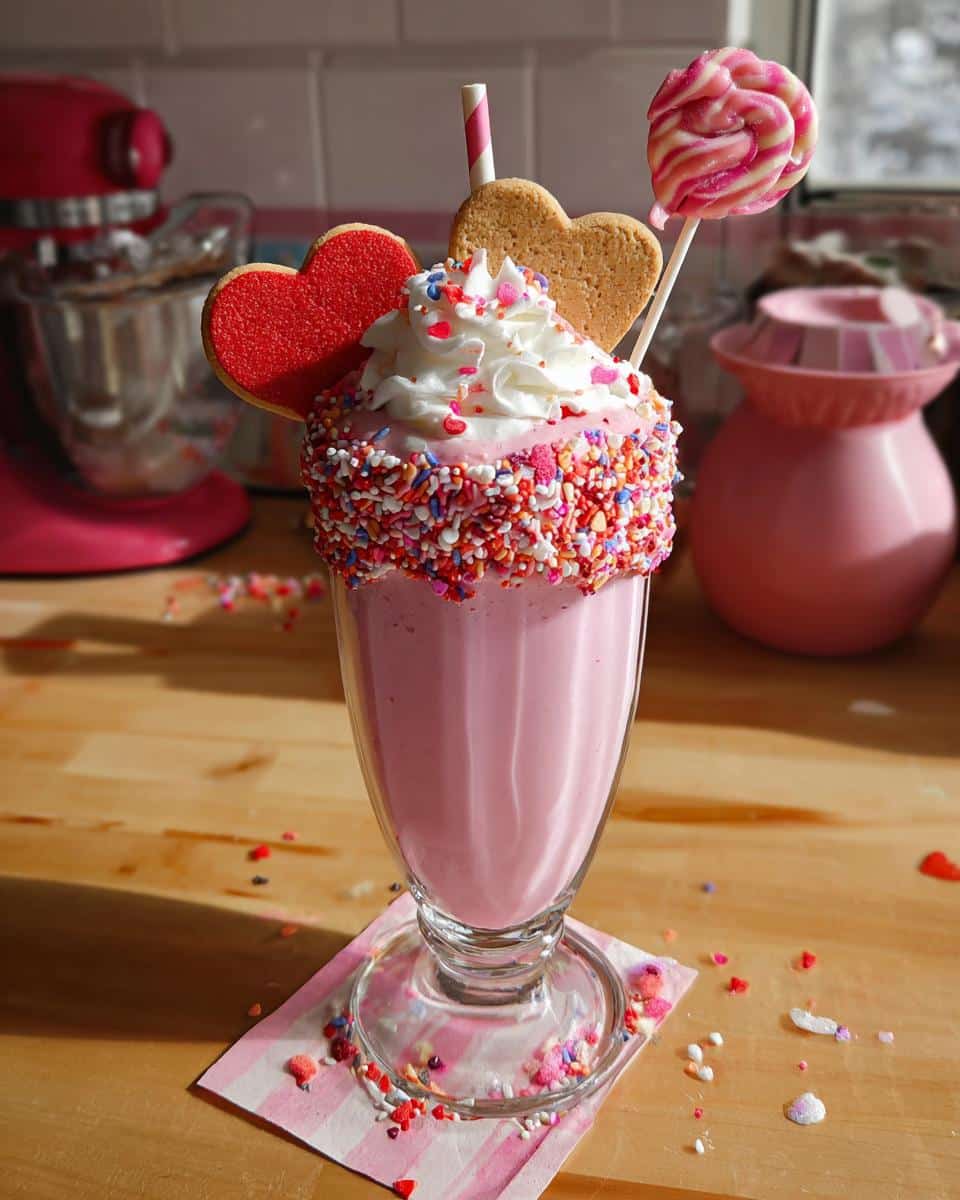
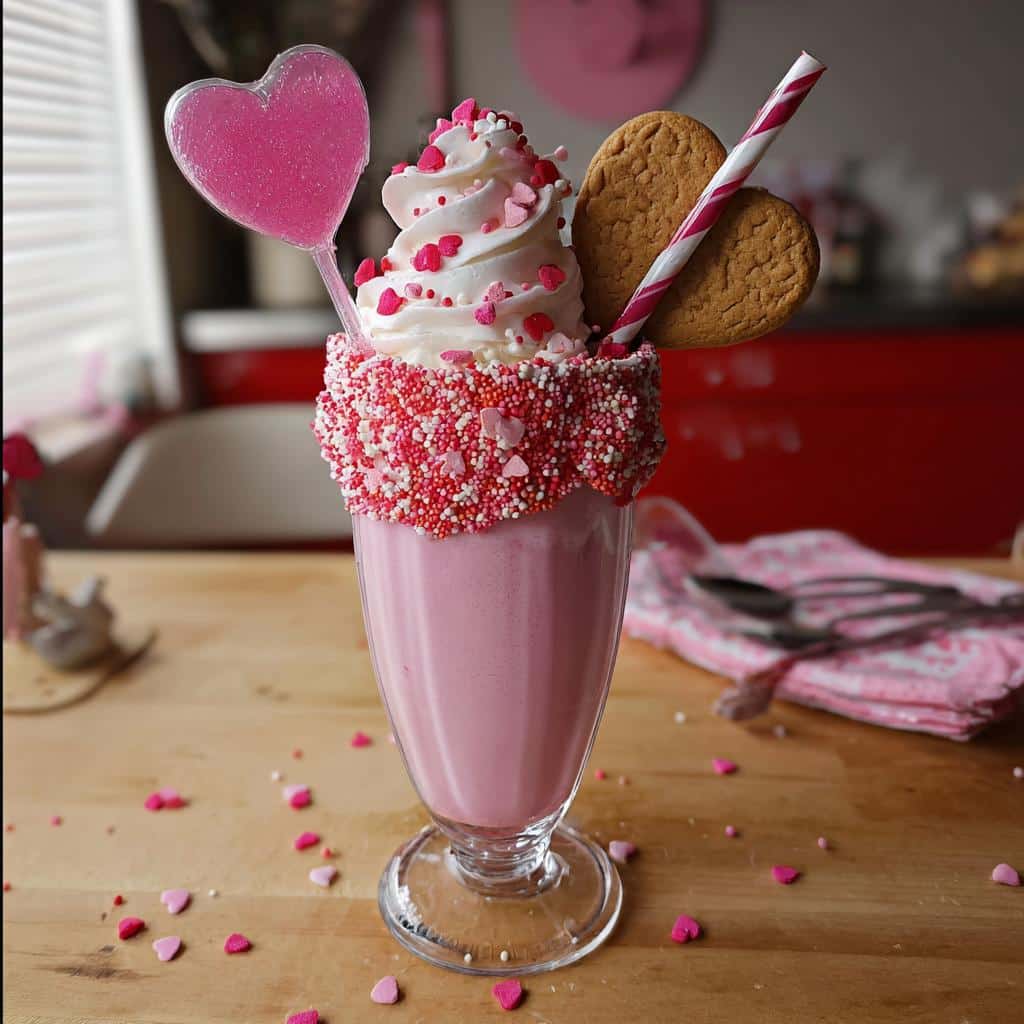
First things first: grab that vanilla frosting and your spatula. Gently coat the outer edge of your milkshake glass rim with a thin, even layer of frosting. You only need it sticky enough to hold sprinkles! Immediately after frosting, dip that rim straight into your Valentine sprinkles. Swirl it around until it’s coated nicely. Now, pop that glass into the freezer. It needs a good chill while we whip up the actual drink; this helps everything set up perfectly.
Blending the Creamy Valentine Milkshake Base
Time for the blender! I always start with the liquids first just to help my blender move things along smoothly. Pour in your milk, then scoop in the ice cream and the frozen strawberries. Now, drop in those six little drops of red or pink food coloring. Blend it all up until it looks perfectly creamy. If it’s looking a little pale for Valentine’s Day—and honestly, sometimes it is—just add one more drop of coloring at a time until you hit that gorgeous pink shade you’re after. Remember to check out these easy recipes for kids if you have little helpers who want to try this part!
Assembling and Garnishing Your Valentine Milkshake
Grab that chilled, sparkly glass from the freezer! Pour your thick shake into the glass, being careful not to mess up that amazing rim you worked so hard on. You want to leave a little space at the top for the crowning glory. Next, pile on that beautiful whipped cream. Don’t be shy!
Finally, make it truly special. Stick your heart lollipop in the side, perch that sugar cookie right on top, and maybe throw a few extra sprinkles over the whipped cream cloud. Isn’t she a stunner? You did that!
Tips for the Most Beautiful Valentine Milkshake Presentation
Okay, we nailed the flavor, now let’s talk showmanship! Since I love being a visual storyteller, even with a simple dessert drink, presentation is key. Forget just spooning that whipped cream on—try loading it into a piping bag with a star tip if you have one. It makes the topping look instantly professional and restaurant-quality.
When you place your cookie and lollipop, think about height and balance. Use the cookie as a small base poking out one side, and anchor the lollipop vertically on the other. A drizzle of melted white chocolate *after* the whipped cream makes it look extra decadent!
Serving Suggestions for Your Pink Drinks for Valentine
Honestly, this Valentine Milkshake is so rich and decorative, it totally stands up on its own! It’s the perfect single-serve indulgence for date night. But if you’re hosting, I love pairing it with something salty or crunchy to balance the sweetness. A small side of my Sweet Marshmallow Popcorn Mix is divine!
If you’ve made a batch of these as **valentine non alcoholic drinks** for a bigger group, serve them in smaller glasses so people can try them without committing to a huge dessert. They look just as cute in a tiny coupe glass!
Storage and Reheating Instructions for Your Valentine Milkshake
Now, I have to give you the tough love here: milkshakes really hate sitting around! They are definitely an immediate consumption situation, especially once you add all those beautiful toppings. You want to enjoy that perfect thick, cold texture right away.
If you are making these ahead of time, please don’t blend everything! Keep your ice cream and strawberries frozen separately. You can prep your fun garnishes—the frosting rim and the sprinkles—and keep those in the fridge. When you’re ready to serve, just blend the base ingredients fresh and top immediately. That’s the trick to keeping them photo-ready!
Frequently Asked Questions About This Festive Valentine Milkshake
I’ve gathered some of the questions I get most often when people try to make this shake for the first time. Don’t worry if you’re tweaking things; that’s what I love about home cooking! For general information on my recipe standards, please refer to my recipe notes and usage guidelines.
Can I make this a romantic drinks without alcohol option for kids?
Absolutely! This is one of my favorite valentine drinks for kids because it’s already naturally zero-proof! We don’t add *any* spirits to the main recipe, so you don’t have to worry about making any substitutions. Just follow the instructions for the base, and you’ve got a gorgeous, safe, and incredibly **sweet drink for Valentine** that everyone can share!
How can I make this a truly aesthetic valentine drinks aesthetic without using alcohol?
Oh, that **valentine drinks aesthetic** comes down to layering! If you want that high-impact look without any alcohol, focus on three things: color, height, and texture. Make sure your base is that perfect deep pink shade from the food coloring. When you add the whipped cream, use a piping bag instead of a spray can to get defined swirls. Finally, stack your toppings—lollipop, cookie, sprinkles—so they give the shake some height. It’s all about that visual drama!
I only have fresh strawberries, not frozen. Can I still make this easy valentine drink recipe?
Yes, you certainly can! If you only have fresh **strawberry valentine drinks** ingredients, you should definitely use them, but you’ll need to compensate for the lack of chill factor. I recommend freezing your fresh strawberries on a baking sheet for about an hour before blending. If you skip that, you might need to pre-chill your milk or even throw in a couple of ice cubes, though too much ice can dilute that lovely creamy flavor. Stick to the **easy valentine drink recipes** approach by freezing them first if you can!
Share Your Homemade Valentine Milkshake Creation
That’s it! You’ve created pure, festive magic in a glass! But honestly, the best part for me is seeing what you all come up with. I want to know what creative spin you put on this!
Did you stick with the cookie, or did you try a different dunking situation? Tell me everything in the comments below—especially what your favorite topping combination was. And please, if you snap a picture of your gorgeous **pink milkshake**, tag me on social media! I love to share your successes because they show everyone else how achievable these fun, festive treats are.
Don’t forget to click those stars right above the comments to leave a quick rating. It really helps other cooks find this **creamy dessert drink**! And hey, if you’re ever looking to send me feedback or just say hi, you can always pop over to my contact page. Happy celebrating!
Valentine Milkshake
Ingredients
Equipment
Method
- Cover the rim of the milkshake glass with vanilla frosting using a rubber spatula or wooden spoon.
- Sprinkle the valentine sprinkles over the vanilla frosting on the rim of the glass.
- Place the prepared glass in the freezer while you make your milkshake.
- Add your ice cream, pink food coloring, and milk to a blender.
- Blend until creamy. Add more food coloring if you want a deeper color.
- Pour the shake into your prepared glass, leaving about half an inch of room from the top.
- Top the milkshake with whipped cream.
- Add additional sprinkles, the heart shaped lollipop, and the sugar cookie for decoration.