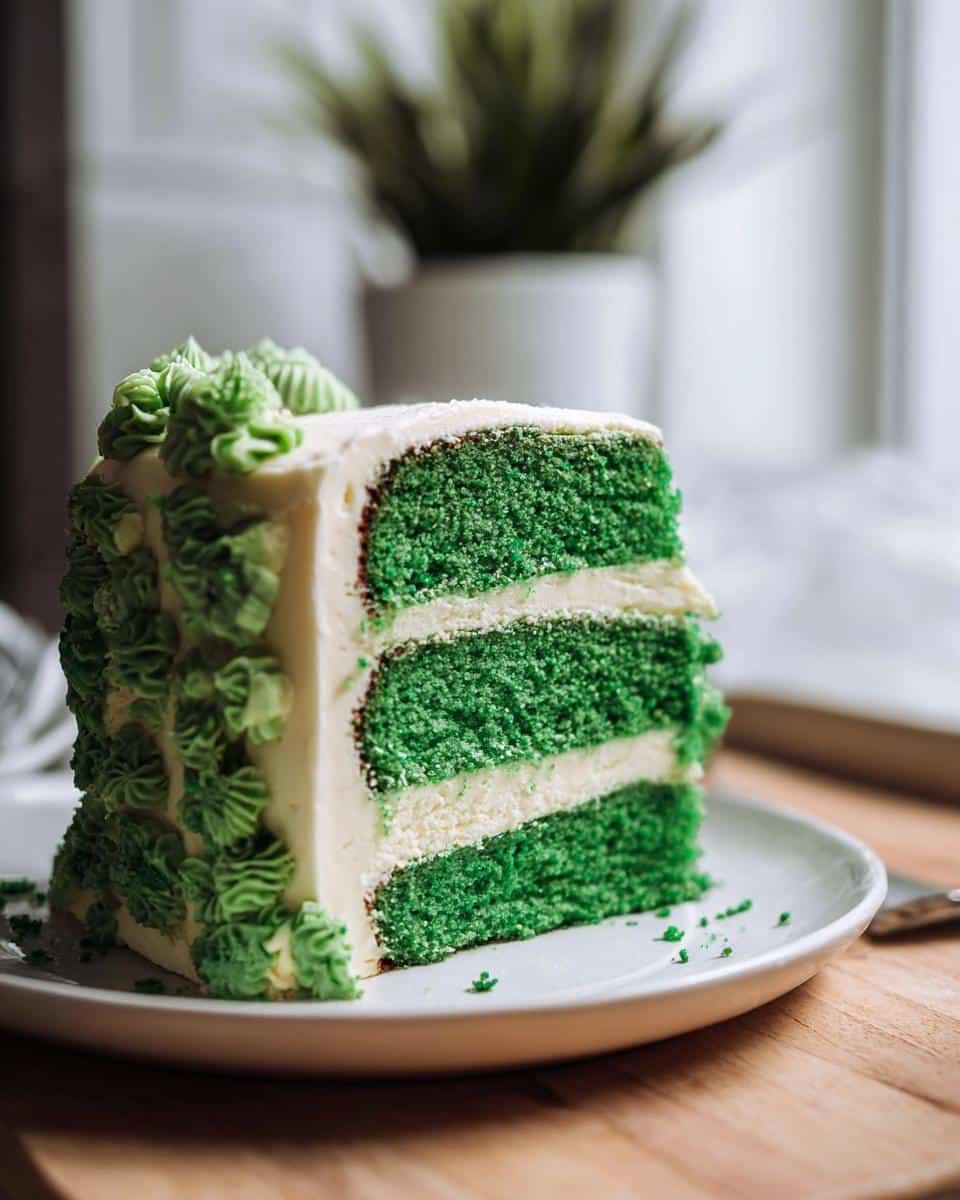
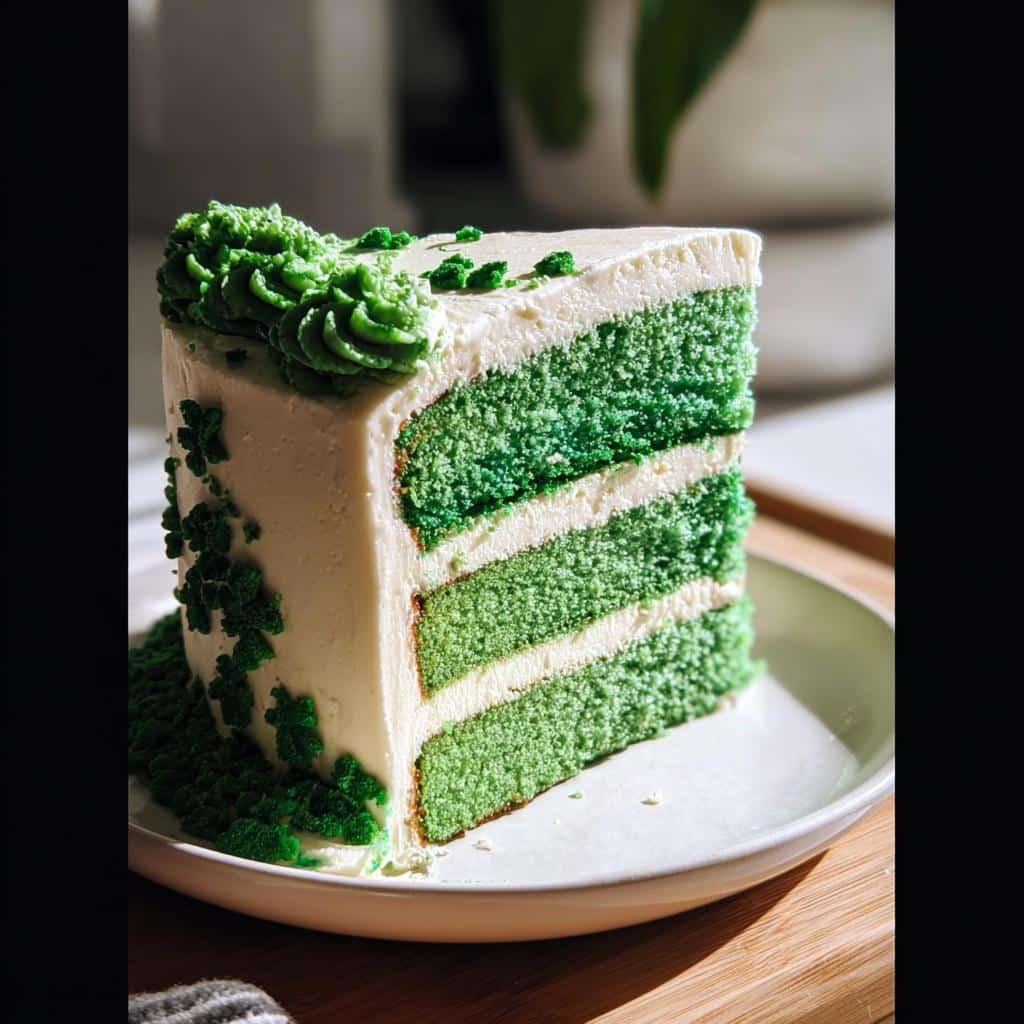
St. Patrick’s Day is right around the corner, and while corned beef is great, we need something sweet and bright, right? I know it feels like every recipe that pops up now is loaded with weird ingredients just to hit that perfect shade of emerald, but I promised you balance—and this Vanilla Shamrock Cake delivers! This really is my most approachable recipe for the holiday. It takes that perfect, trustworthy vanilla layer cake flavor we all adore and gives it a super festive, yet totally manageable, green makeover. You get all the fun of holiday baking without sacrificing that classic, reliable taste. See all the delicious St. Patrick’s Day recipes here!
Why This Vanilla Shamrock Cake is Your New Holiday Favorite
When you’re baking for a crowd, you need something that tastes incredible but doesn’t require a pastry degree, right? This cake hits that sweet spot. It’s rich in flavor but gentle on the stress level, which is honestly my goal for every holiday dessert.
Classic Flavor, Festive Look for Irish Party Food
We’re sneaking in the green color, but the flavor is pure, delicious vanilla. That means it tastes like a classic celebration cake! Everyone loves vanilla, so this takes the guesswork out of pleasing picky eaters at your table. It’s the perfect addition to any menu of Irish Party Food.
Approachable Baking for Every Skill Level
I specifically designed the batter for level layers—no massive domes to wrestle with! By keeping the technique straightforward, like using the paddle attachment for a long cream time, you get a structurally sound cake that’s ready for frosting without needing tons of trimming. It truly is an Easy celebration cake.
Essential Ingredients for Your Vanilla Shamrock Cake
Okay, this is where we start building trust! As a dietitian, I want you to know exactly what’s going into your celebration cake, and why we need things like room temperature items. Getting these ratios right, especially for the cake base, is what guarantees that beautiful, soft crumb instead of a dense brick. Don’t panic about the list; we just need precision here!
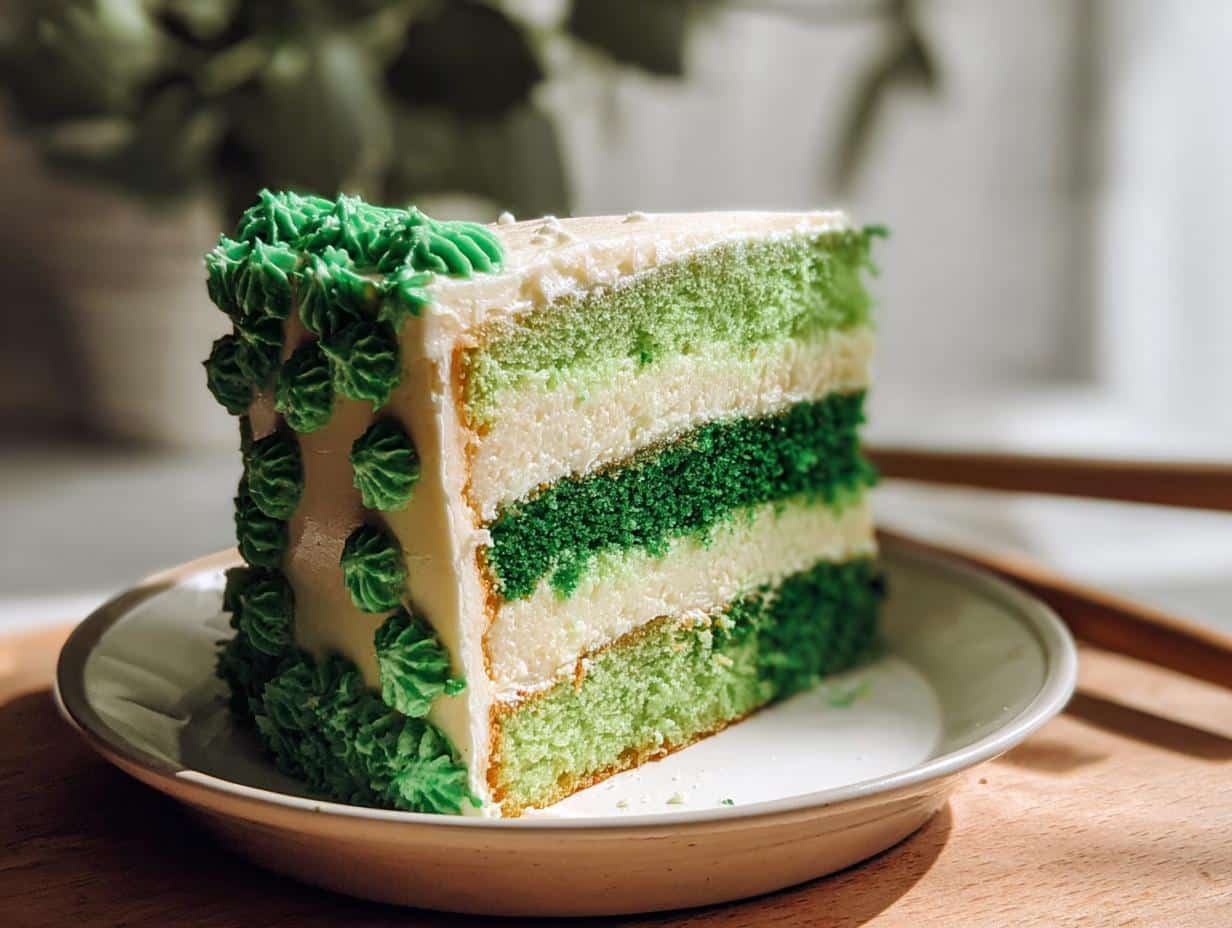
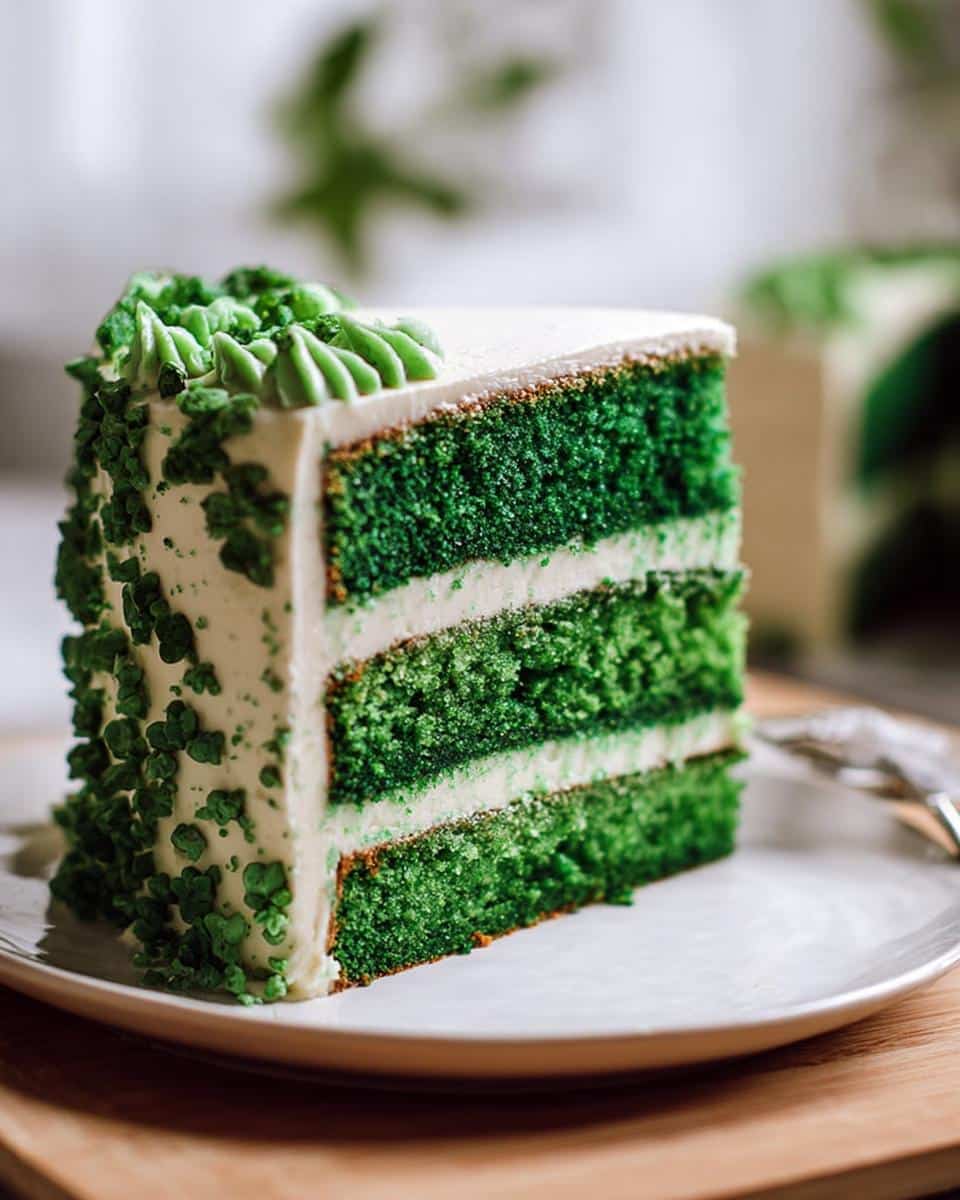
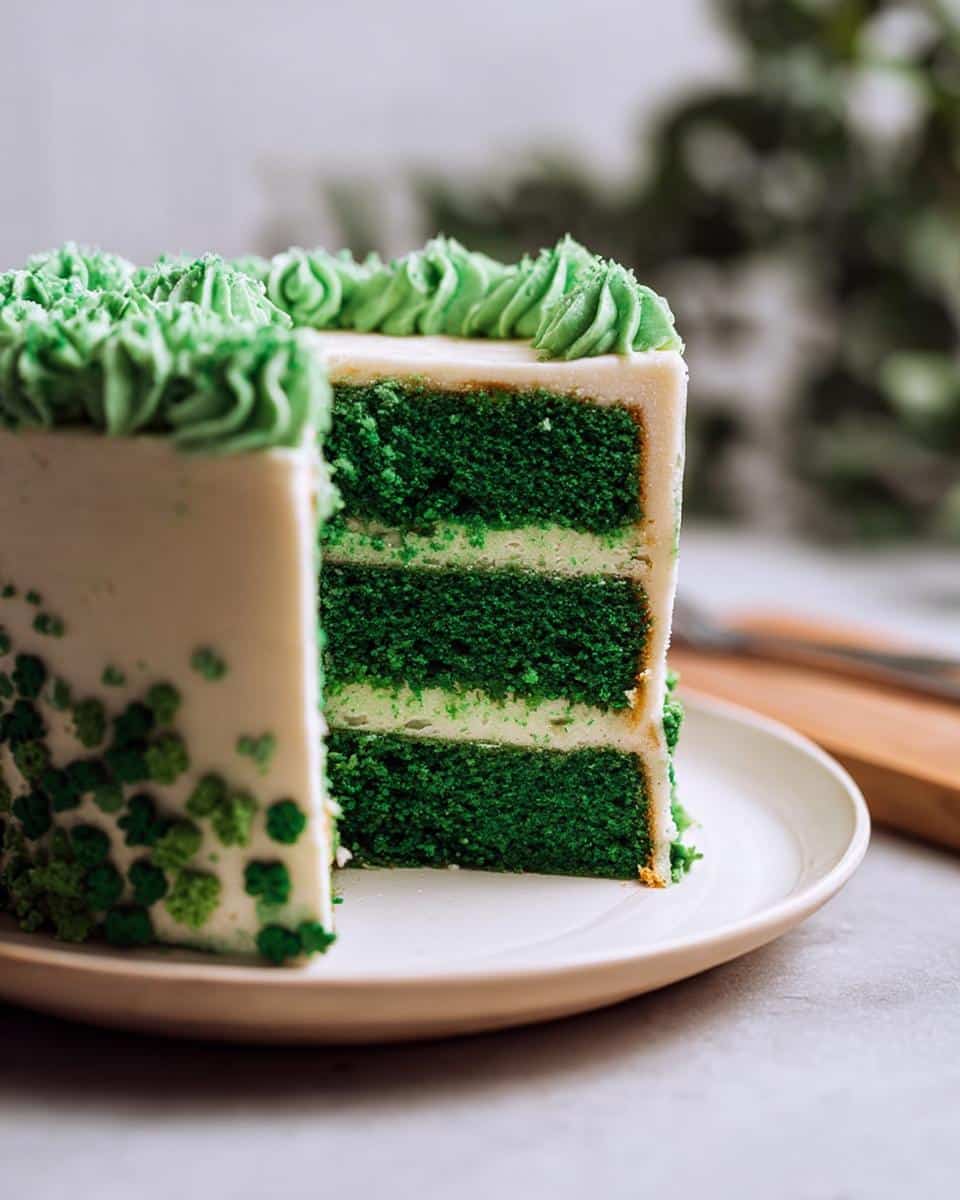
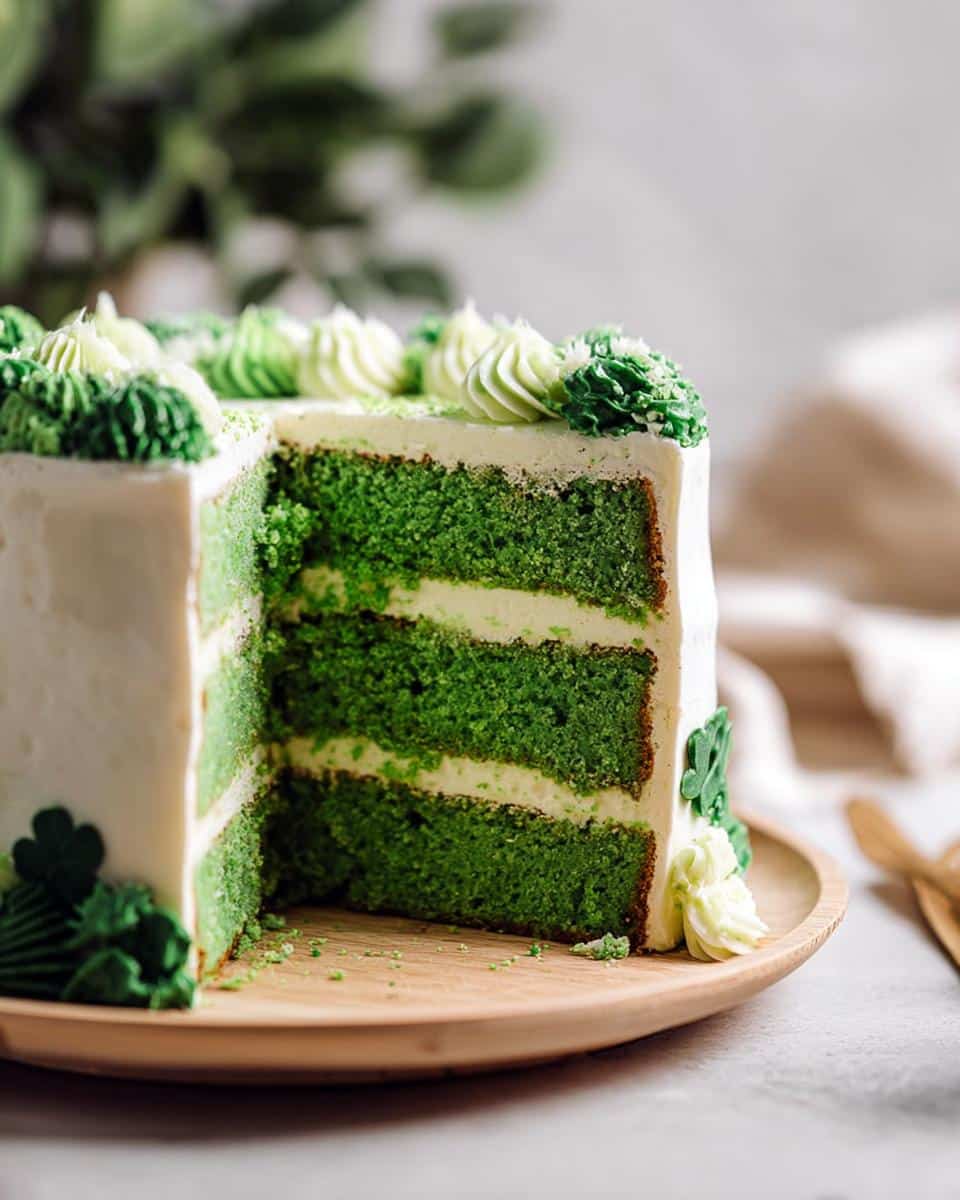
For the Green Vanilla Cake Batter
For the best emulsion, everything needs to be the right temperature. Trust me on bringing out that butter, eggs, and buttermilk ahead of time!
- Salted Butter, at room temperature (1 Cup / 227g)
- Granulated Sugar (1 3/4 Cups / 375g)
- Vegetable Oil (1/3 Cup / 65g)
- Large Eggs, at room temperature (3), plus 3 Extra Egg Whites (100g total eggs/whites)
- All Purpose Flour (2 1/2 Cups + 2 TBSP / 345 G)
- Cornstarch (6 TBSP / 55 g)
- Baking Powder (2 1/2 tsp)
- Salt (1/2 tsp)
- Pure Vanilla Extract (2 tsp)
- Buttermilk, at room temperature (1 Cup / 250 g)
- Dark Green Gel Food Coloring (1 TBSP) – we need gel here so it doesn’t water down the batter!
For the Vanilla Buttercream Frosting
This frosting is simple, fluffy, and fantastic for piping those little shamrocks. The butter needs to be soft—you should be able to press a finger into it easily, but absolutely no signs of melting or greasiness.
- Salted Butter (1 1/2 Cups, or 3 Sticks / 339g) – Must be soft!
- Pure Vanilla Extract (2 tsp)
- Powdered Sugar (6 Cups)
- Heavy Cream (Start with 4 TBSP, using up to 6 TBSP as needed) – We measure this in tablespoons only to keep the frosting stiff enough!
- Green Gel Food Coloring (1/2 tsp, optional)
Step-by-Step Instructions: Crafting the Vanilla Shamrock Cake
Alright, let’s get this show on the road! Since we have three important stages—baking, frosting, and assembling—I’ve broken it down so nothing gets missed. My biggest tip here is patience with the creaming step; that’s where the fine crumb comes from!
Preparing and Baking the Green Vanilla Cake Layers
First thing first: get your oven warmed up to 350°F and line those three 8” pans with parchment paper. While that heats, tackle the dry ingredients—just whisk the flour, cornstarch, baking powder, and salt in a bowl and set it aside. For the wet side, mix your vanilla and that dark green gel coloring right into the room-temperature buttermilk; give it a good stir.
Now for the mixer! Cream the butter, sugar, and oil for a full 7 minutes until it looks pale and fluffy. I always stop and scrape the bottom of the bowl once or twice just to make sure everything incorporates evenly. Next, slowly stream in those room-temperature eggs and whites. Once those are mixed in smoothly, alternate adding the dry mixture and the buttermilk mixture in about five additions, making sure you start and finish with the flour. Gently fold everything together with a spatula—we don’t want to deflate all that gorgeous air we just whipped in! Divide it up and bake for 25 to 27 minutes. Let them cool in the pan for just 5 minutes before flipping them onto a rack to cool completely. Wrap ’em tight and pop them in the fridge; chilled cake is much easier to frost, trust me!
Making the Perfectly Smooth Vanilla Buttercream
While the cakes chill, let’s make that amazing frosting. Remember, the butter needs to be properly soft—not melty! Beat that butter alone for a solid 10 minutes! This extended creaming time is crucial for aeration. Then, add the vanilla. Now, you add that cloud of powdered sugar one half-cup at a time, mixing on medium-low. Once it’s mostly incorporated, start adding the heavy cream, 2 tablespoons at a time, until you hit that smooth, spreadable consistency. This frosting is so dreamy. If you plan on piping details later, take out about 1 ½ cups now and color it green with gel coloring.
Assembling and Decorating Your Vanilla Shamrock Cake
Time to stack! Smear a couple of teaspoons of plain buttercream on your cake stand base to anchor the first, chilled layer. Stack the three layers, using a thin, even layer of white frosting between each one. Once stacked, apply a thin outer layer—this is your all-important crumb coat! Pop the whole thing back in the fridge for 30 minutes to let that coat set up firm.
After chilling, cover it with your final layer of smooth, white frosting. If you’re adding those fun shamrocks, pipe them randomly onto the surface using the green frosting and a small round tip. It’s a super fun activity, especially if you’re including the kids—think of it as a delightful treat for St Patrick’s Day For Kids Treats! Then, slice and enjoy!
Expert Baking Tips for a Flawless Vanilla Shamrock Cake
When we talk about reliability in baking, it really comes down to mastering a few critical steps. I want you to feel completely confident creating this beautiful cake, so here are my absolute must-know secrets that move you from a good baker to a confident recipe developer. These little hacks are what make my bakes consistent every single time, making fantastic desserts!
My first tip revolves around the buttermilk. Don’t skip using room temperature buttermilk! Whole milk would work in a pinch if you mixed 1 tablespoon of white vinegar into 1 cup of milk and let it sit for five minutes, but the slight acidity in buttermilk really helps tenderize the gluten in the flour. This keeps that otherwise straightforward vanilla cake feeling incredibly soft.
Secondly, pay attention to the creaming time for the butter and sugar—I said 10 minutes for the frosting, but for the cake itself, you need a solid 7 minutes before adding eggs. This step is what traps the air that creates those lovely little pockets in your crumb. It’s the foundation for a level cake, which means fewer lopsided layers you have to aggressively trim!
Lastly, on doneness: the toothpick test isn’t the end of the story for a moist cake. Once your 25-27 minutes are up, gently touch the top center of the cake layer. If it springs back immediately and cleanly, it’s done. If your finger leaves a noticeable dent that doesn’t recover, it needs two more minutes. We want moist crumbs attached, not wet batter, which is how we guarantee it stays perfect even after chilling.
Ingredient Notes and Substitutions for Your Green Foods For Party
Let’s chat specifics because when you are aiming for beautiful Green Foods For Party, the ingredients matter way more than you think! We aren’t just making a vanilla cake; we’re making a *vibrant* vanilla cake, and that brings up a few key points about coloring and liquid backups.
First and most importantly: food coloring! You absolutely must use a gel food coloring here, like the Dark Green Gel Coloring listed. If you try to substitute liquid drops, even just a few teaspoons, you’re adding too much water to a delicately balanced cake batter. Too much liquid equals a gummy, dense texture, and we worked too long creaming that butter to lose the height now! Gel colors are concentrated pigments suspended in a base that doesn’t impact the cake’s structure at all. It lets you get that deep, festive color without ruining the bake.
Now, about the buttermilk. It’s essential for that slight tang and tender texture, but I know not everyone keeps it stocked! If you run out, don’t worry; we can fake it! Just take your standard whole milk—about one cup, since the recipe calls for one cup—and stir in one tablespoon of white vinegar or fresh lemon juice. Let that sit on the counter for about five minutes. You’ll see it start to curdle slightly? That’s what you want! It mimics buttermilk perfectly, ensuring your layers stay tender and moist. This is a life-saver when throwing together last-minute St Patrick Party Food!
Also, a quick note on vanilla: use the pure extract, not the imitation stuff if you can manage it. Pure vanilla extract provides a much warmer, more complex background note that complements the sweetness of the cake beautifully. It’s a small upgrade that makes a huge difference in the overall flavor profile.
Storage and Reheating Instructions for Your Vanilla Shamrock Cake
Once you’ve created this masterpiece, we definitely want to make sure it lasts! Since this cake has a buttercream frosting, storage is pretty straightforward, but there are a few rules I follow to keep that beautiful vanilla flavor bright and the layers perfectly moist. Remember, we worked hard to get those layers tender!
For best results, especially if you’re making this ahead for your celebration, the cake should be stored covered at cool room temperature. If your kitchen is very warm (say, above 72°F) or if you’ve added any fillings that aren’t just the standard vanilla buttercream, then the fridge is the safer bet. Always cover the cake tightly with plastic wrap or place it under a cake dome once it has cooled completely. This stops it from drying out!
If you refrigerate it, you must let it sit out before serving. Cold ruins that lovely buttercream texture and makes the cake layers firm. Pull it out about 1 to 2 hours before you plan to slice it. That time on the counter lets the butter soften slightly, bringing the cake back to that perfect, creamy consistency we aimed for.
The Chilled Cake Dilemma
I mentioned chilling the layers before frosting, and that’s one trick that helps keep the cake level, but if you are storing the *finished*, frosted cake in the fridge, you might notice condensation when you bring it out. To combat that, after it’s chilled for 30 minutes during the crumb coat, I like to lightly cover the entire cake with plastic wrap before putting it in the main fridge. This acts like a barrier against absorbing fridge odors and keeps the moisture locked in, which is crucial for keeping this as part of your leftover St Patrick Day Food selection!
Reheating Individual Slices
What if you just want one slice warmed up with your coffee the next day? Definitely don’t microwave the whole slice, that will just steam it unevenly and make the cake rubbery. Instead, wrap an individual slice tightly in a small piece of aluminum foil—this traps any residual steam. Microwave it on 50% power for just 10 to 15 seconds. Just enough time to slightly soften the frosting and bring a little warmth back to the vanilla flavor. It’s a lovely way to enjoy leftovers!
How Long Does the Vanilla Shamrock Cake Last?
Honestly, with this recipe, it tastes best within the first 3 days. If it’s properly covered and kept cool, it should be perfectly fine for up to 5 days. The buttermilk helps keep it moist longer than a standard recipe, but I encourage you to make it no more than two days before your big Irish celebration!
Serving Suggestions: Pairing with St Patrick Day Food
This Vanilla Shamrock Cake is a fantastic centerpiece for your St. Patrick’s Day spread, but what plays well alongside that perfect vanilla and green color? Since we want the cake to shine, we keep the accompaniments light, bright, and easy. We definitely don’t want anything competing with that beautiful frosting. Think refreshing drinks and simple sides that complement the holiday without adding more heavy starch to the table. Plus, if you’re looking for great drink pairing ideas, check out some cozy suggestions here!
When I serve this, I usually treat it as the grand finale, making sure all the savory St Patrick Day Food is done before we bring it out. A little balance goes a long way, even on a holiday!
Beverage Pairings to Complete the Celebration
For drinks, skip the heavy stouts right alongside dessert, as that can overwhelm the subtle vanilla notes. Instead, think about lighter, brighter options:
- Hot Coffee or Tea: A simple, well-brewed black coffee or Earl Grey tea cuts through the sweetness of the buttercream perfectly. It’s simple, elegant, and everyone usually has one ready after dinner anyway.
- Sparkling Water with Mint: If you want something purely refreshing, grab some plain sparkling water and add a squeeze of lime and a few fresh mint leaves. It gives you that little hint of green theme without adding sugar.
- Light Lemonade: Especially if you’re serving this to kids, a tart, fresh homemade lemonade is a wonderful contrast to the rich, buttery frosting. The acidity really cleanses the palate between bites of cake.
Simple Sides That Let the Cake Shine
Since this cake is substantial, you don’t need much else, but if you’re looking for something to serve alongside it, keep the focus on fresh fruit. Anything too heavy will just make people feel sluggish after all that celebrating!
- Fresh Berry Medley: Keep it simple—strawberries, blueberries, and maybe some raspberries. Their natural tartness contrasts beautifully with the vanilla.
- Melon Skewers: Cantaloupe and honeydew cubes on a stick are easy for guests to grab and offer a cooling counterpoint to the cake. Plus, they look naturally festive next to the green slices!
- Plain Greek Yogurt Parfait: If you want a slightly healthier option, serve small bowls of plain or vanilla Greek yogurt topped with a tiny sprinkle of brown sugar. It offers a creamy texture without adding more frosting!
Frequently Asked Questions About This Vanilla Shamrock Cake
It makes total sense that you might have a few questions when baking for a big gathering! We want this to be stress-free, so let’s dive into the common concerns I hear about this Vanilla Shamrock Cake. If it helps you feed a crowd or avoid the dreaded sinkhole in the middle, I’m happy to explain!
Can I make this cake ahead of time for my St Patrick’s Day Food Ideas Party?
Yes, you absolutely can, and I often recommend it! Making cakes ahead is key to surviving the holiday rush. Remember when we talked about the crumb coat? That sets you up perfectly. You can bake and completely cool your layers one day ahead. Wrap them well and keep them chilled. You can even frost the entire cake the day before your party, provided your house isn’t too warm. Allowing it to set up with that final crumb coat and final layer of frosting overnight helps the cake stay super moist and makes settling in for the party much easier! It’s one of the best tips for any big event featuring St Patrick’s Day Food Ideas Party.
What is the best way to get a very deep green color for my Green Snacks?
Coloring is an art, thankfully one that’s easy to master here because we are using gel coloring! If you want that deep, true shamrock green for your decorations—like for those simple piped clovers—always stick to gel colors. If you are aiming for a more sophisticated, muted, or perhaps muddy emerald tone—sometimes the super bright green can feel a little jarring—try this trick: use your dark green gel, but add the tiniest little speck of black gel coloring. I mean seriously, just touch the toothpick to the black bottle and then mix that little bit into your green frosting. It sounds strange, but it mutes the primary green beautifully, giving you a rich, elegant color that looks fantastic on your Green Snacks.
Are there ways to make this recipe lighter or lower in sugar?
This is a great question that hits right at the core of finding that balance! Because this is a structural cake recipe relying on specific ratios of fat and sugar for its texture (we need that creaming action!), I wouldn’t recommend cutting the main sugar amount in the cake layer significantly, maybe 1/4 cup maximum reduction if you must. However, you can definitely lighten things up in the frosting phase. For the buttercream, you can substitute half of the butter with a high-quality, full-fat cream cheese. It changes the flavor slightly toward a cream cheese frosting, but it cuts down on some of the overall fat content quite nicely. Also, if you are making little treats, use less of the frosting overall to control the sugar ratio for the day!
Share Your Festive Vanilla Shamrock Cake Creations
I truly hope this recipe brings so much joy and brilliant color to your St. Patrick’s Day celebrations! Honestly, seeing my recipes come to life in your kitchens is the absolute best part of my job. Whether you kept it classic or went wild with extra shamrocks, I want to see what you created!
Please leave a rating and tell me how the layers baked up for you in the comments below—did the 7-minute cream time make a difference? Your feedback helps other bakers feel confident trying this Vanilla Shamrock Cake. If you snap a photo of your gorgeous green dessert, tag me over on Instagram so I can cheer you on! If you need to reach out with specific baking questions, you can always contact us right here.
Vanilla Shamrock Cake
Ingredients
Equipment
Method
- Preheat the oven to 350°F. Line three 8” round cake pans with parchment paper.
- In a stand mixer with the paddle attachment, cream the butter, sugar, and oil for 7 minutes. Scrape the bottom and sides of the bowl as needed.
- In a separate medium bowl, whisk the flour, cornstarch, baking powder, and salt. Set this dry mixture aside.
- Stir the vanilla extract and dark green food coloring into the buttermilk. Set this wet mixture aside.
- Whisk the eggs and egg whites in a small bowl. With the mixer on low speed, slowly add the eggs to the batter. After adding all the eggs, mix for 1-2 minutes until the batter is smooth and glossy. Scrape the bottom of the bowl to check for unmixed egg.
- Alternate adding the dry ingredients and the buttermilk mixture in 5 total additions, beginning and ending with the dry ingredients.
- After the ingredients are incorporated, mix briefly with a rubber spatula. Divide the batter evenly into the prepared pans.
- Bake at 350°F for 25 to 27 minutes, or until a toothpick inserted into the center comes out with a few moist crumbs attached.
- Let the cakes cool in the pans for 5 minutes. Then, flip the cakes onto a cooling rack to cool completely. Wrap the cooled cakes in plastic wrap and chill them in the refrigerator.
- Allow the butter for the frosting to sit out for 30 to 45 minutes before starting; it should be soft but not fully room temperature.
- Cream the butter in a stand mixer bowl with the paddle attachment for 10 minutes, scraping down the bowl every 2-3 minutes.
- Add the vanilla extract and mix to combine.
- Add the powdered sugar one half cup at a time, mixing on medium-low speed for 3 minutes after each addition.
- Add the heavy cream 2 tablespoons at a time until the buttercream reaches your desired consistency.
- Mix briefly with a rubber spatula to release any trapped air bubbles.
- If you plan to pipe green shamrocks or vintage details, remove about 1 ½ cups of the frosting and color it green with gel food coloring. You can add a small amount of black food coloring for a deeper or more muted green tone.
- Spread 2 teaspoons of plain buttercream onto your cake board or stand.
- Place the first cake layer in the center of the board. This cake bakes flat when instructions are followed. Level the cake if it domes before stacking.
- Spread an even, thin layer of buttercream, then stack the second layer.
- Repeat the process until all three layers are stacked.
- Apply a crumb coat of frosting and smooth the surface.
- Chill the cake for 30 minutes to set the crumb coat.
- Apply the final layer of buttercream and smooth it out.
- For vintage piping, use Wilton tips #32 and #16, or any two open star tips. For ruffles, use Wilton #67 or any leaf or ruffle tip.
- For the 4-leaf clovers, fit a piping bag with a small round tip and about ¼ cup of the green frosting. Pipe shamrocks randomly over the cake surface.
- Slice the cake and serve.