When life gets just a little too noisy, sometimes the best answer is something quiet, familiar, and wonderfully sweet. That’s where my love for classic comfort desserts comes in, and boy, do I have a winner for you today—the timeless Vanilla Wafer Icebox Cake. Forget turning on the oven; this is one of those truly magical no-bake cake options where the refrigerator does all the heavy lifting!
It’s simple, it’s creamy, and it comes together faster than you can say, “I need a snack.” As a Registered Dietitian and Flavor Strategist, I focus on approachable comfort food that fits real life, and this recipe certainly checks that box. I’m Emma Brooks, and I promise that this refrigerator cake will bring instant joy to your table, no matter how busy your week has been. You can always find out more about my approach to flavor and nutrition over on my About Page.
Why This Vanilla Wafer Icebox Cake is a Go-To Recipe
I stash this recipe away for when I need a guaranteed crowd-pleaser without the fuss. Honestly, it’s one of the best dessert recipes because it’s so darn forgiving!
The refrigerator truly is your friend here, working its magic overnight. You’ll find this fits perfectly into my philosophy of approachable comfort food.
- No Oven Required: Seriously, put your oven mitts away! This makes it ideal for hot summer nights or when you’re already cooking dinner and don’t want extra heat in the kitchen.
- Quick Assembly: We’re talking minutes to layer everything up. You just need about 15 minutes of active time, and then the chilling does the rest.
- Simple Ingredients: You probably have most of what you need right now. If you grab your wafers and some pudding mix, you’re halfway there to one of the easiest dessert ideas around.
If you love simple layered desserts, be sure to check out my favorite no-bake cookie recipes—they follow a similar principle of easy assembly!
Gathering Ingredients for Your Vanilla Wafer Icebox Cake
See? This is exactly what I mean when I talk about recipes that fit real life. Getting everything ready for this Vanilla Wafer Icebox Cake is almost the whole recipe itself! We aren’t using a million things, which keeps it firmly in the easy dessert ideas category.
The key here is making sure everything is ready to go before you start building those layers. Especially that cream cheese—it has to be perfectly softened, or you’re going to have lumps, and nobody wants a lumpy icebox cake. Trust me on that.
Components for the Vanilla Wafer Icebox Cake
Go ahead and pull all this out now. I promise that having your ingredients measured and ready to go makes the assembly feel like a breeze. We need a little bit for the bottom base, the main filling mixture, and, of course, those wonderful wafers!
- For the Cake Base: You’ll need 1/2 cup of whipped topping.
- For the Filling: Gather 8 ounces of cream cheese that you’ve made sure is softened, 1 package of dry vanilla pudding mix, 1 cup of milk, and the remainder of that container of whipped topping.
- The Star: Don’t forget one full box of those classic vanilla wafers!
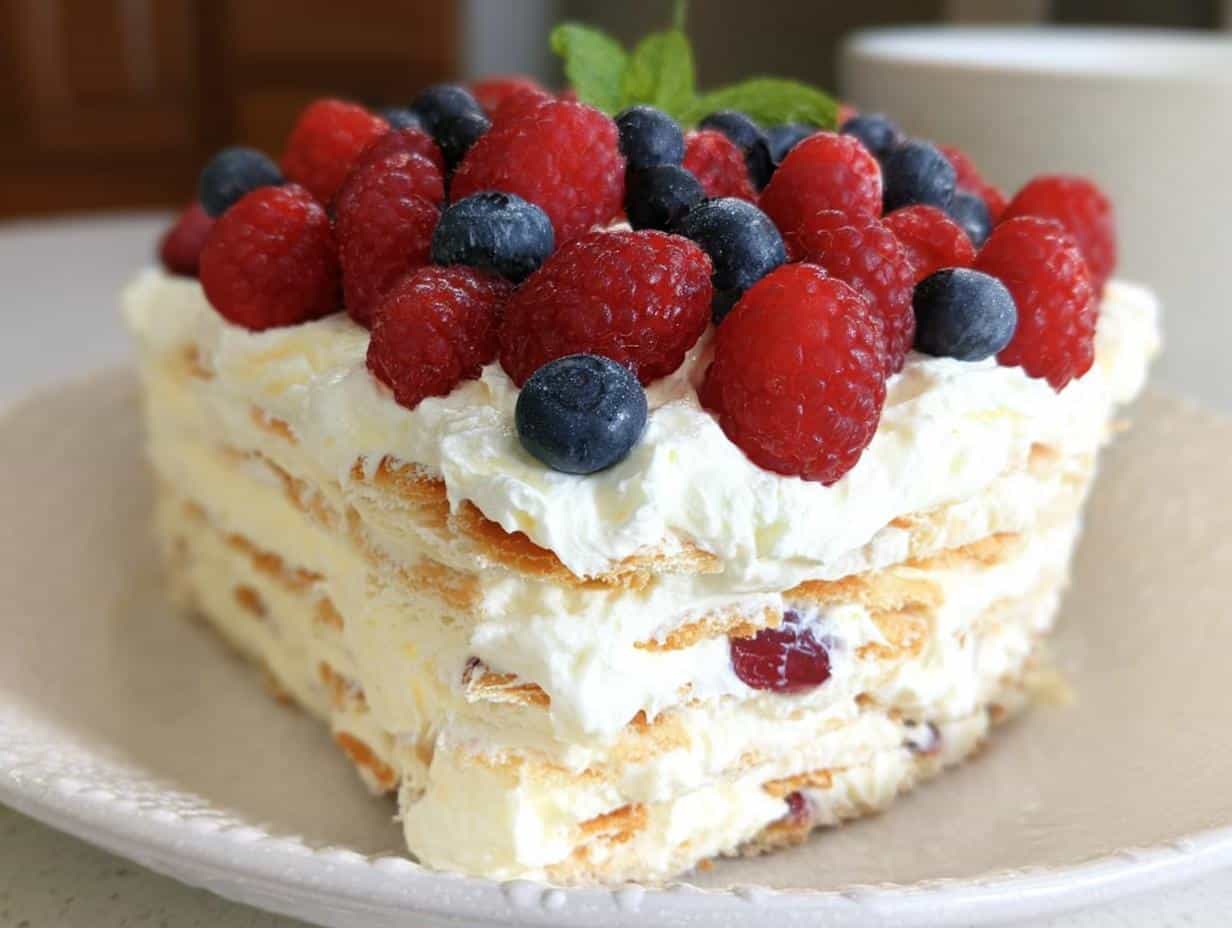
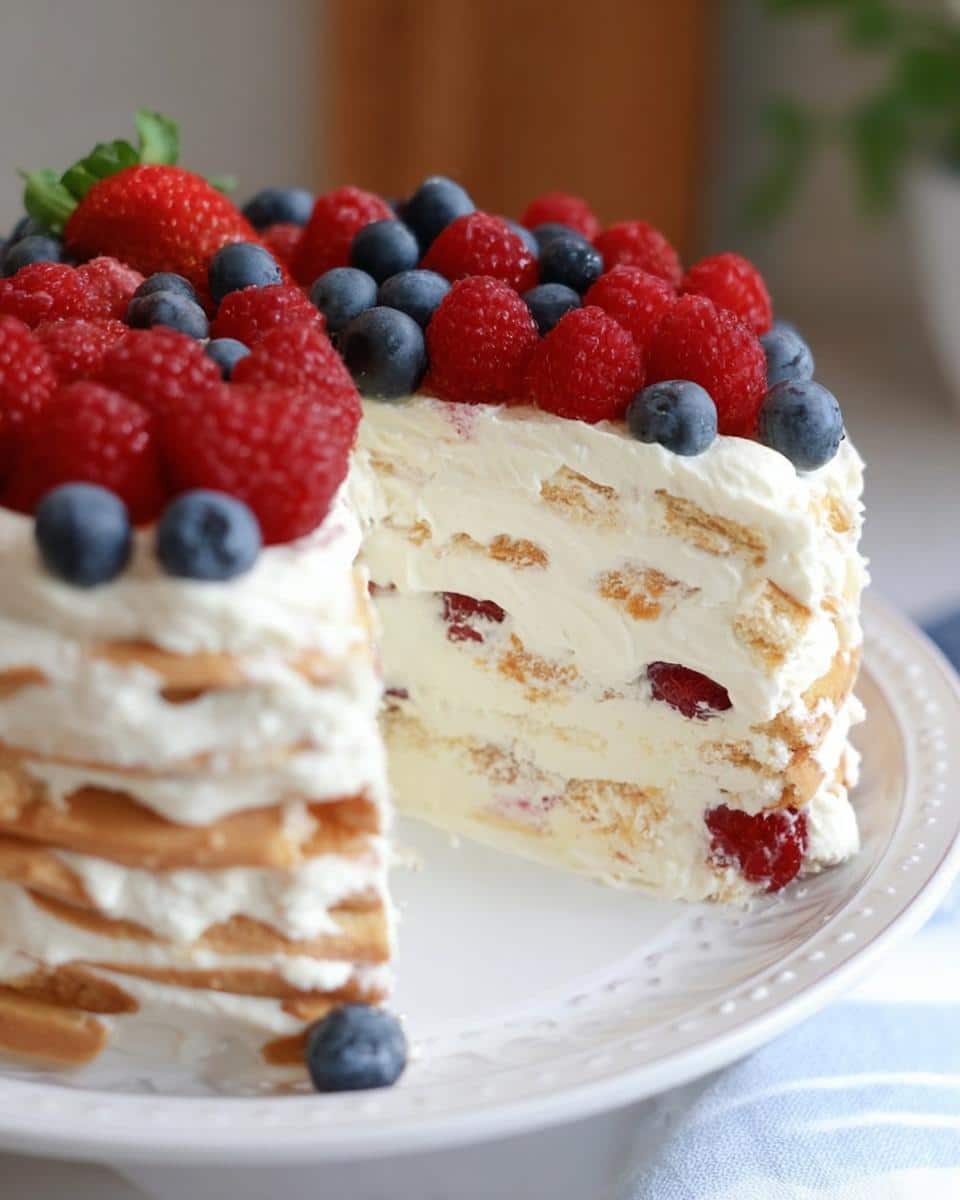
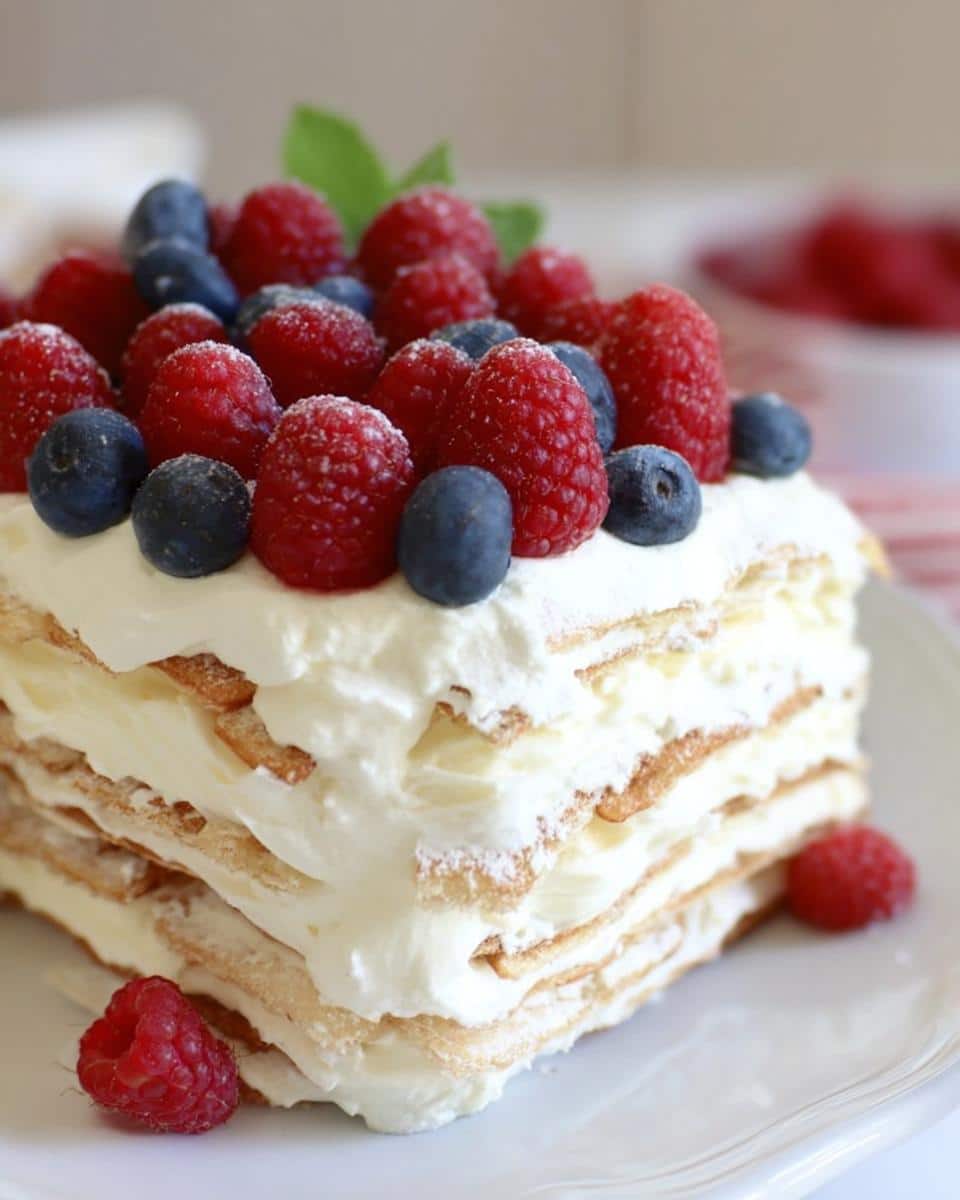
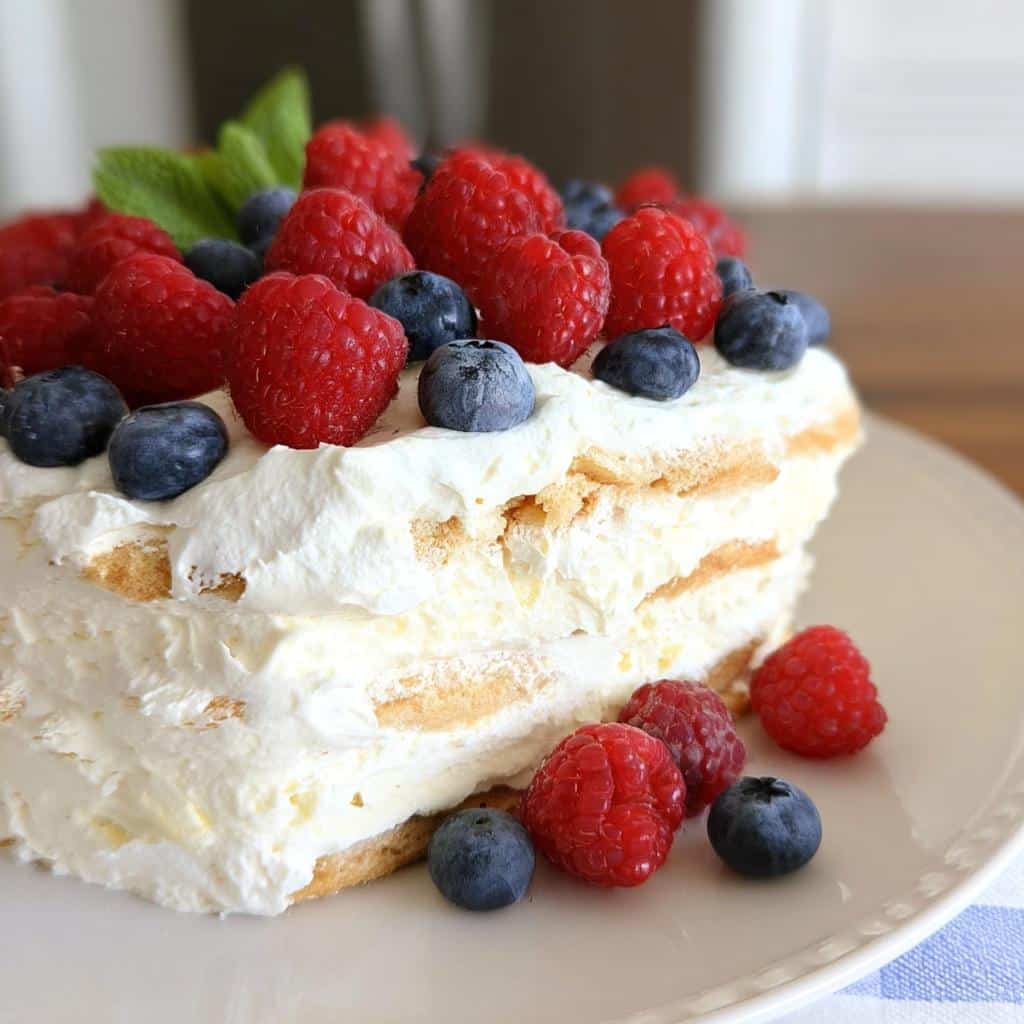
- For Garnish (If you’re feeling fancy): Grab some fresh strawberries, blueberries, raspberries, and maybe a few mint leaves.
Assembling the Perfect Vanilla Wafer Icebox Cake Layers
Okay, this is where the fun starts! Since we aren’t actually baking anything, the assembly needs to be smooth because we want that ultimate creamy texture we talked about. I always have my springform pan ready to go. If you’re making this for the kiddos, this is a fantastic recipe to let older children help with since there’s no hot stove involved!
Before we start stacking, you absolutely must check out this link for some easy recipes for kids—this icebox cake usually ends up on that list!
Preparing the Creamy Filling
Grab your large mixing bowl! We’re going to start by getting that softened cream cheese completely smooth before anything else. Beat the cream cheese until it’s soft, then toss in your dry vanilla pudding mix. It’ll look crumbly at first, but don’t panic!
Next, you need to slowly drizzle in that cup of milk while the mixer is running. Keep beating it for about two full minutes. You’ll notice the whole mixture changes texture—it gets noticeably thicker and starts holding soft peaks. That’s the signal that it’s ready to become decadent.
Once it’s thick enough, gently fold in the rest of your whipped topping. And I mean *gently*. If you beat it too hard now, you’ll deflate all those lovely air bubbles we just worked to create. We want fluffy, not flat!
Layering the Vanilla Wafer Icebox Cake
First things first: spreading that initial 1/2 cup of whipped topping right onto the bottom of your pan. This acts like a little non-stick foundation. Then, lay down your first layer of vanilla wafers. They need to cover the whole base.
My personal tip is to make sure you overlap your wafers just slightly if you have any gaps. We want that creamy filling to soak fully into the cookies without leaving dry pockets. Next, dollop about 3/4 cup of your beautiful filling mixture right on top of those wafers and spread it around carefully.
Repeat this—wafers, then filling—until you run out of both ingredients. Make sure the very top layer that people will see is that luxurious filling mixture. Seal that pan up tight, because the next crucial step is the chilling time. We need at least four hours for the magic to happen and for those wafers to soften into cake!
Tips for Success with Your Vanilla Wafer Icebox Cake
Achieving that signature texture—where the wafers are soft like tender cake, not mushy—is entirely in the chilling time. You really must let this sit for at least four hours. If you’re impatient, I understand, but rushing it means you get crunchy cookies swimming in pudding, and that just isn’t the goal here!
When you fold in that final bit of whipped topping into your cream cheese mixture, be exceptionally gentle. Don’t use the mixer for this part; grab a spatula. Over-mixing right at the end knocks out all the air we worked so hard to incorporate, leaving you with a dense layer instead of something light and fluffy.
If you don’t have a springform pan, don’t sweat it! You can absolutely use a 9×13 inch dish; it just makes for a slightly thinner, easier-to-serve version. It’s an incredibly versatile, simple dessert recipe that always pleases a crowd. Check out my thoughts on easy snacks for more timesaving wins!
Making Variations of the Classic Vanilla Wafer Icebox Cake
While the classic vanilla wafer version is perfection in my book, I know some of y’all like to tinker! The beauty of this simple dessert recipe is how easily you can customize the filling. This is where you can make this recipe your own without adding any baking time at all.
Think about swapping out that dry vanilla pudding for a chocolate mix, or maybe even butterscotch. Wow, those would be amazing for a quick dessert recipe!
If you love texture, take a tip from my notes: toss in some crushed pecans or little bits of crushed candy bars when you fold in the final whipped topping. It gives you an extra little surprise crunch when you bite down. Or, for a brighter twist, try adding a splash of lemon extract right into the cream cheese base—it really brightens everything up. You can see more of my tips for easy lunch ideas where I talk about adding zest to otherwise simple bases!
Serving and Storing Your Vanilla Wafer Icebox Cake
We finally hit our four-hour chilling mark! Before you even think about cutting into this amazing treat, take a moment to load up those optional garnishes while the cake is still in the springform pan. A vibrant scatter of fresh berries on top makes this simple dessert look like you spent hours on it.

When you serve it, run a thin, hot knife around the edge before you release the springform, which helps keep those layers neat. This cake absolutely must be served chilled—that satisfying cold temperature is what makes it feel like an ‘icebox’ cake!
Store any leftovers covered tightly in the refrigerator. Honestly, leftovers are fantastic because the wafers soften just a bit more overnight, making the cake even softer. It stays good in the fridge for about three days. Don’t try to freeze it, though; the texture of the whipped cream filling won’t come back right.

Frequently Asked Questions About the Vanilla Wafer Icebox Cake
I get so many questions whenever I post this recipe! It’s just such a reliable option when you need quick dessert recipes that don’t require any fuss. Here are the things I hear most often about making this classic no-bake treat.
How long can I prepare the Vanilla Wafer Icebox Cake ahead of time?
For the best possible texture where the cookies truly turn into cake, you need at least four solid hours of chilling time. That’s the minimum magic window! If you’re looking for the absolute best flavor, I recommend making it the day before, up to 24 hours out, and keeping it covered in the fridge. It holds up beautifully, but I wouldn’t push much past a full day if you want those layers to stay distinct.
Can I use a different type of cookie instead of vanilla wafers?
You definitely can, but you’re changing the core recipe, so the result will be different! Vanilla wafers are perfect because they are relatively thin and absorb moisture evenly. If you use something thicker or crunchy, like shortbread, it might need more chilling time to soften correctly. Graham crackers work okay, but they taste a bit molasses-y, so it shifts the flavor profile entirely away from that classic sweet profile.
Is this recipe suitable for making Easy Desserts For A Crowd?
Absolutely! This is one of my favorite easy desserts for a crowd because it scales up so well. If I’m making it for a big potluck, I skip the springform pan and use a 9×13 inch baking dish instead. You still layer it the same way, and it serves way more people with just a little extra time in the fridge. See my disclaimer on consistency if you’re doubling the recipe, just to be safe!
Nutritional Estimates for This Simple Dessert Recipe
Now, I know what you’re thinking! This Vanilla Wafer Icebox Cake tastes so unbelievably good, there’s no way it fits into a balanced day, right? Well, I’m a Registered Dietitian, so I always like to give you a little something to work with so you know what you’re enjoying. This is one of those simple dessert recipes that tastes indulgent but uses totally familiar ingredients.
Keep in mind that these numbers are just estimates based on the main components—the wafers, cream cheese, pudding mix, and whipped topping—cut into eight nice, generous slices. Since we aren’t using any processed flour or baking soda, the ratios are quite nice, honestly!
- Estimated Calories per serving: 310-350 kcal
- Total Fat: Around 18g
- Protein: Approximately 5g
- Carbohydrates: Roughly 35g
I always have to throw in a quick note here, just as a matter of honesty and trust, because I want you to feel confident about what you’re eating. These figures aren’t lab-tested! They will change depending on whether you use a light whipped topping versus full-fat, or if your dry pudding mix has added sugars. Use these numbers as a general guide for enjoying this homemade dessert without stress. Knowing what’s on your plate is the first step!
Share Your Homemade Desserts Experience
Making this Vanilla Wafer Icebox Cake always brings me back to my childhood kitchen—it’s just pure, unadulterated comfort. Now that you’ve got the recipe and you’ve seen just how easy these homemade desserts can be, I’d absolutely love to hear how it turned out for you!
Did you stick to the classic look, or did you go wild with those berry garnishes I suggested? Did the wafers soften up exactly how you hoped they would? Please let me know in the comments below! Ratings are super helpful for other busy home cooks looking for reliable, quick dessert recipes.
If you snap a picture of your final, perfectly chilled creation, tag me on social media! It truly makes my day to see you enjoying these reliable, easy cookie recipes. If you have any burning questions that weren’t covered in the FAQ, or if you just want to say hi, feel free to send a message through my contact form. Happy layering!
Vanilla Wafer Icebox Cake
Ingredients
Equipment
Method
- Spread 1/2 cup of whipped topping on the bottom of your springform pan.
- In a large mixing bowl, beat the cream cheese and the dry pudding mix together.
- Slowly add the milk while you continue to mix. Beat for about 2 minutes, or until the mixture begins to thicken.
- Fold in the remaining whipped topping to create the filling.
- Place one layer of vanilla wafers in the pan on top of the initial layer of whipped topping.
- Spread about 3/4 cup of the filling mixture on top of the wafers.
- Repeat the process of alternating wafers and filling until you use all the filling.
- Make sure the final layer on top is filling.
- Refrigerate the cake for 4 hours before you plan to serve it.
- Top the cake with fresh strawberries, blueberries, raspberries, and mint leaves for garnish before serving.