You know, there’s something incredibly comforting about a dessert that looks like it’s been lovingly pulled straight from my grandmother’s old recipe box. We don’t always need fancy layers or perfect frosting, right? Sometimes, we just need rich, deep flavor and a little bit of character. That’s exactly what we get with this Chocolate Crinkle Cake.
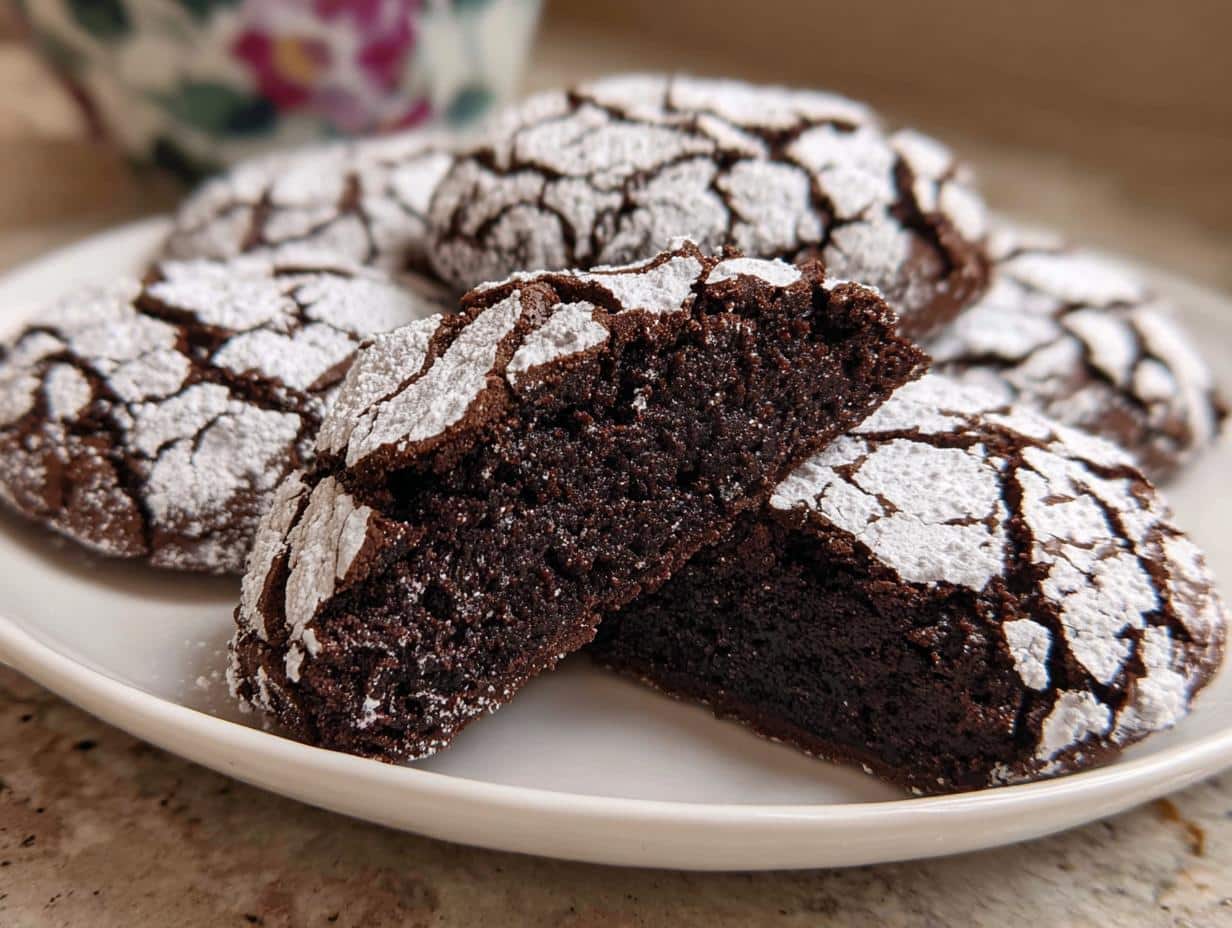
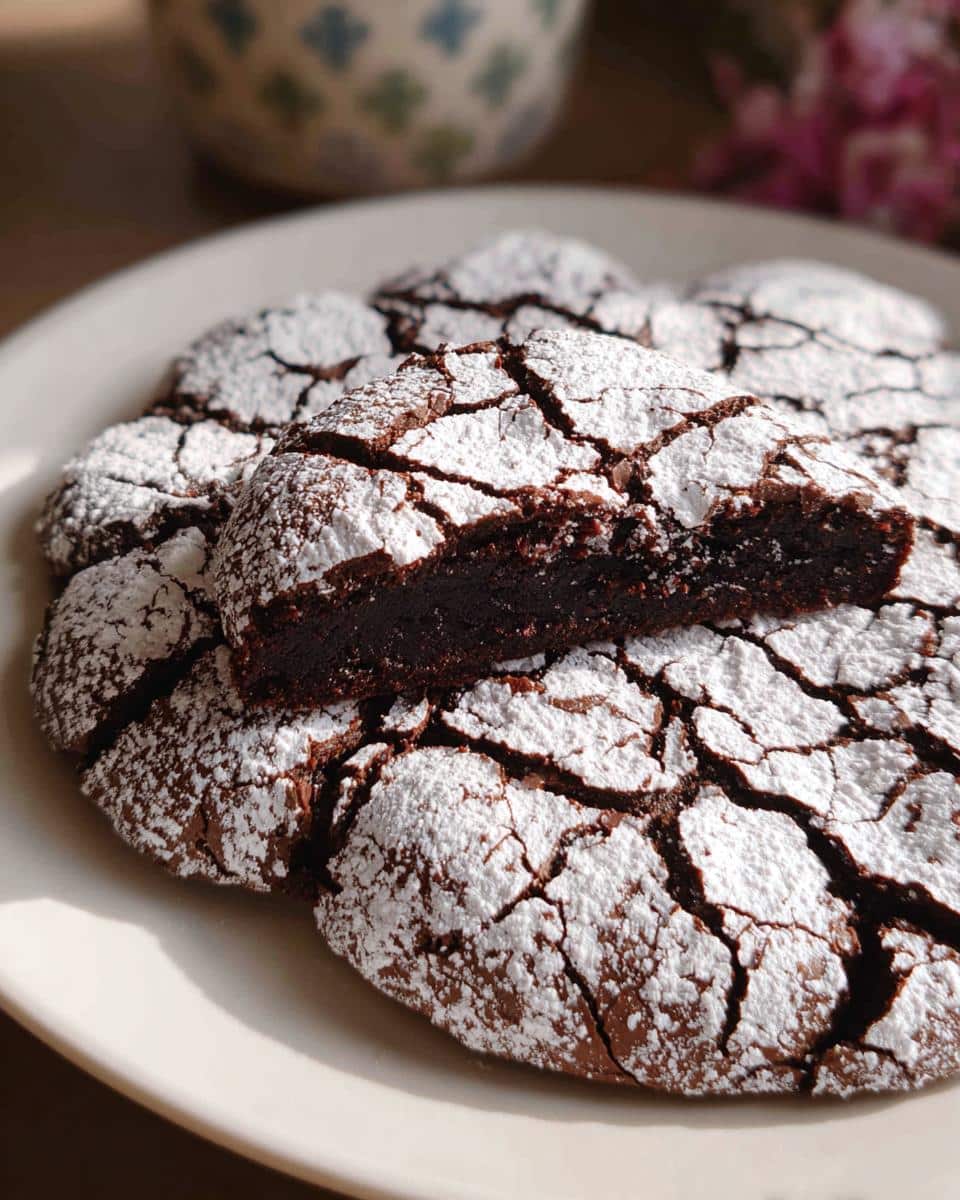
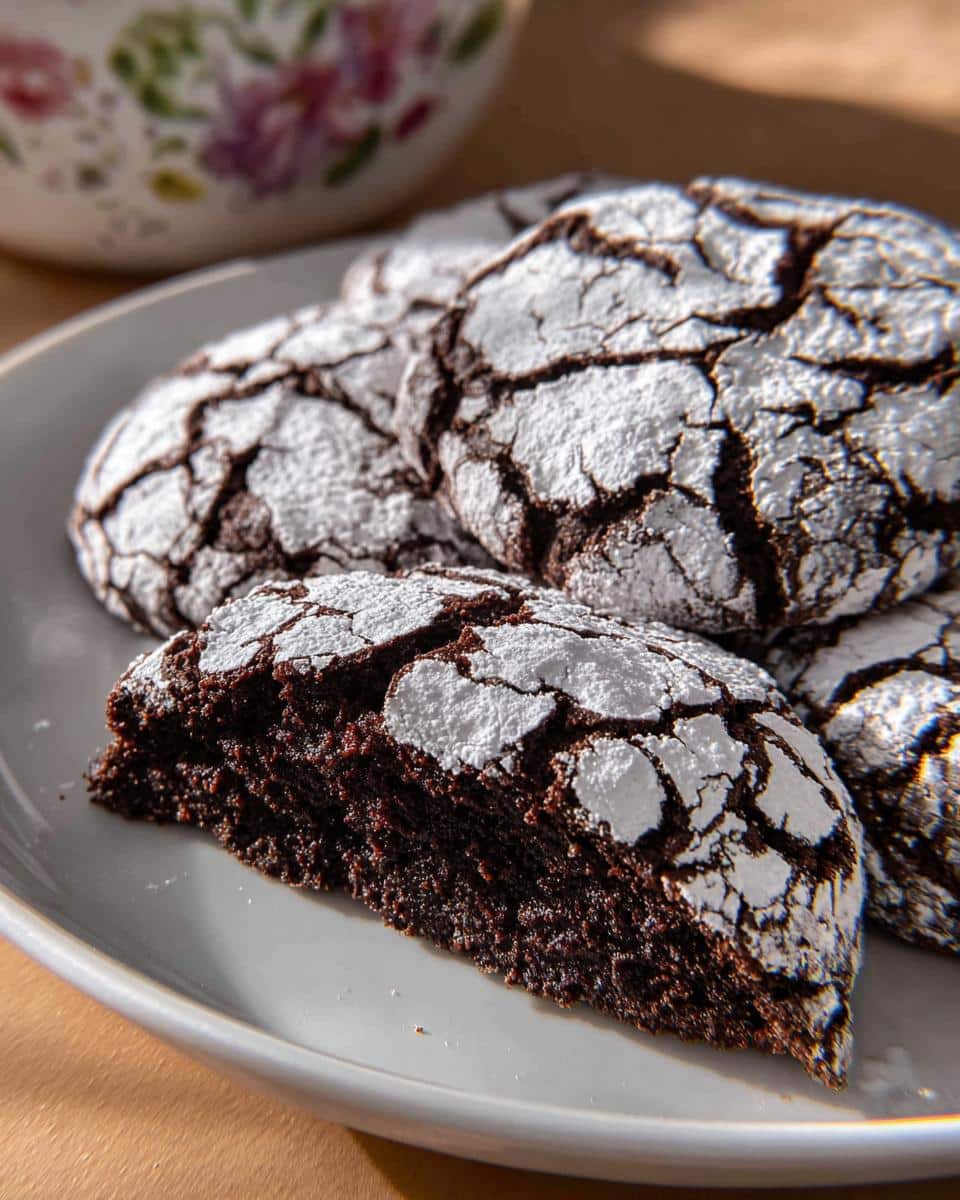
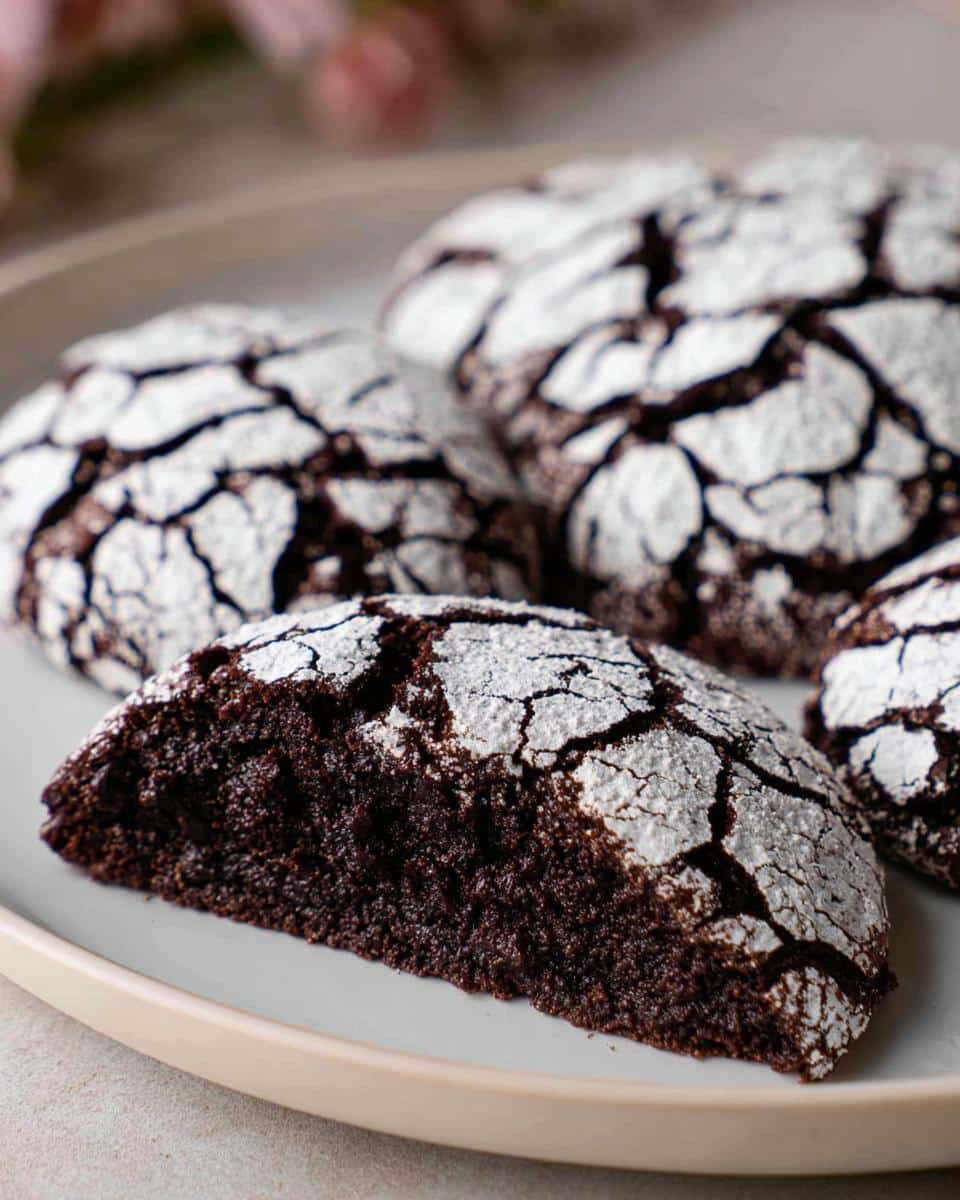
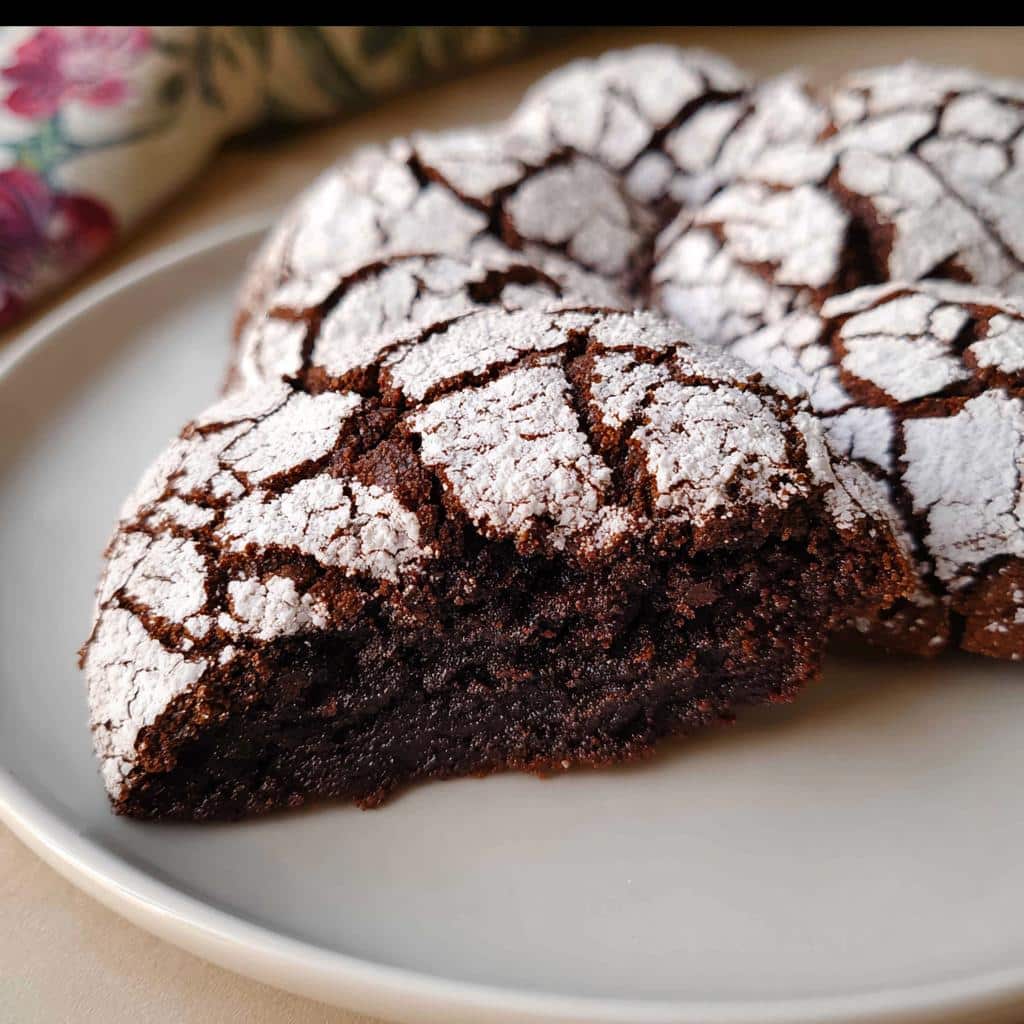
This cake is all about that beautiful, dramatic cracked top covered in powdered sugar, which just screams old-fashioned baking. But don’t let the rustic look fool you; inside, it’s pure fudgy magic. It’s intensely chocolatey and unbelievably moist, almost like a brownie in cake form. I spent ages getting the ratio just right so it felt both nostalgic and utterly delicious. If you’re hunting for simple dessert recipes that look impressive, you’ve definitely landed in the right spot. As someone who loves digging into the history of comfort food, I can tell you this style of baking truly connects us to the past. You can read more about my culinary philosophy over at the About page!
Trust me, hiding this stunning cake under a blanket of white sugar is my favorite secret weapon when I need an *easy dessert idea* that impresses everyone.
The Story Behind the Chocolate Crinkle Cake: Heritage Baking
Desserts that aren’t trying too hard are often the best ones, don’t you think? Crinkle-style sweets really took off back in the middle of the last century. People were baking with what they had, and that signature cracked sugar surface on the batter wasn’t some fancy trick—it just happened naturally as the cake baked up! Isn’t that wonderful?
That natural, rustic look is exactly why I love this Chocolate Crinkle Cake so much. It carries that spirit of home baking, where perfection means depth of flavor, not flawless frosting. We’re celebrating texture here—that contrast between the dry, dusty sugar shell and the incredibly soft, fudgy center. It’s honest baking, and honestly, it’s beautiful.
Ingredients for the Perfect Chocolate Crinkle Cake
Okay, let’s talk staples. This is one of those recipes that proves you don’t need a specialty store run to make something amazing. Seriously, this list is full of easy desserts with few ingredients that you probably already have waiting in your pantry. We’re aiming for that deep, gorgeous chocolate flavor that only happens when you keep things straightforward. Remember, the quality of your cocoa powder makes a huge difference here, so grab your favorite!
For the Chocolate Crinkle Cake Batter
Here are the players for the main stage, folks. Make sure those eggs are room temperature; it really helps them mix in smoothly later on. We need:
- 1 cup unsweetened cocoa powder (that’s about 100g)
- 1.75 cups granulated sugar (approximately 350g)
- 0.5 cup vegetable oil (or 120mL)
- 4 large eggs, and yes, they have to be room temperature
- 2 teaspoons vanilla extract
- 2 cups all-purpose flour (or 240g)
- 2 teaspoons baking powder
- 0.75 teaspoon salt
For Coating the Chocolate Crinkle Cake Dough
This part is the signature look, so don’t skimp! It’s simple, but you need enough to fully bury those dough balls. You will need a nice, generous **1 cup of powdered sugar** (about 120g).
Essential Equipment for Making Your Chocolate Crinkle Cake
Before we get the dough chilling, we need to make sure our kitchen is ready. Having the right tools makes any baking project smoother, especially when we are working with dough that needs that crucial chill time. Trust me, you don’t want to realize halfway through mixing that you don’t have a decent scoop!
Here’s what you’ll want pulled out and ready to go. It’s fun because almost all of this is stuff you probably already have—no fancy gadgets required for this rustic bake:
- A large mixing bowl—you need room to work when you combine those dry ingredients with the oil and sugar.
- You should have a hand mixer or maybe a sturdy stand mixer with the paddle attachment ready for creaming things up properly.
- A medium bowl is necessary for whisking together your flour, baking powder, and salt before adding them in.
- Two large baking sheets—this is important! We need space when they bake so they can expand and set correctly.
- Parchment paper is a must for easy cleanup and ensuring nothing sticks once they start to cool down.
- A small ice cream scoop or even just a regular tablespoon. This helps us keep those rounds uniform so they bake evenly. If you use a scoop, it makes that first coating in sugar much neater!
- A wire rack for letting those beauties cool down so the bottoms don’t get soggy.
Gathering this stuff first makes the whole process feel less chaotic, and we want this to be fun, right?
Step-by-Step Instructions for Your Chocolate Crinkle Cake
Now for the fun part! While this is one of those quick dessert recipes once you get to the baking stage, the real secret to a perfect Chocolate Crinkle Cake lies in preparation, especially that chilling period. Don’t rush the dough; patience here means a fudgier reward later. Follow these steps closely, and you’ll have those lovely cracks forming beautifully!
Mixing the Rich Chocolate Crinkle Cake Batter
First things first, grab that big bowl. We start by combining the sugar, that deep cocoa powder, and the oil together. Use your mixer—medium speed works great—until everything looks shiny and smooth. Then, we introduce the eggs, one by one. You want each egg to be completely mixed in before you add the next one; this keeps the emulsion happy. Finish this step by beating in the vanilla extract. In a separate little bowl, whisk your flour, baking powder, and salt together quickly. Now, add the dry stuff to the wet stuff, but stop the mixer the second you see it come together. Seriously, just barely combined is perfect. Overmixing this batter guarantees a tough cake, and we want tender!
Chilling the Chocolate Crinkle Cake Dough: A Crucial Step
This step feels like waiting for water to boil, but I promise it is non-negotiable for the crinkle effect! You absolutely have to cover that dough and pop it into the fridge. I know the recipe says a minimum of 4 hours, but honestly, letting it chill overnight—that full 240 minutes, or longer—is far superior. Chilling firms up the sticky batter so we can handle it, and it ensures that signature crack happens in the oven when the outside sets faster than the inside puffs up.
Coating and Baking the Chocolate Crinkle Cake
Okay, time to wake up the oven to 350°F (175°C) while you prep your sheets with parchment. Get your powdered sugar ready. Scooping the chilled dough is so much easier, use a small scoop or measure about a tablespoon. Roll that cold dough ball completely until it’s totally coated in sugar—no chocolate showing! Place them about 2 inches apart on your prepared sheets. Don’t overload them! Bake them for about 10 to 12 minutes exactly. You’re looking for the edges to look firm, but the middle should still look a touch puffy and slightly wet. They will deflate a little as they cool, which is normal. Let them sit on the hot sheet for just a few minutes to get their structure before moving them over to the cooling rack.
Tips for Success with Your Homemade Chocolate Crinkle Cake
Getting those perfect, dramatic cracks on your Chocolate Crinkle Cake sometimes feels like guesswork, but I promise you, it’s all down to handling and temperature! If you follow these few tidbits I’ve picked up over the years, you’ll nail that gorgeous rustic look every time.
First up: If your dough is too sticky before chilling—and dark chocolate dough can be gooey—don’t panic! Try chilling it for an extra hour or even running the mixer bowl under cold water for a minute or two before scooping. Cold solids are happier solids, and happier solids scoop neatly!
Now, about the cracking. If you aren’t getting enough cracks, you might be baking them too long, or maybe you didn’t roll them large enough. The goal is a slightly larger ball that has room to expand in the heat. If they come out looking more like smooth domes, it often means the center stayed too soft when it went in, or the powdered sugar coating wasn’t thick enough to ‘grab hold’ as the cake rose.
Speaking of the sugar coating—and this is a big one for appearance—make sure you apply that second or third dusting right before they go into the oven! That fresh, dry coating captures the heat expansion best. If you coat them all in the morning and bake them in the afternoon, the moisture from the dough soaks into the sugar, and you end up with a dull, faded look rather than a crisp white crackle. I sometimes like to peek at great techniques for managing dough texture using different tools, you can check out some interesting approaches over near the Thermomix baking section if you’re curious!
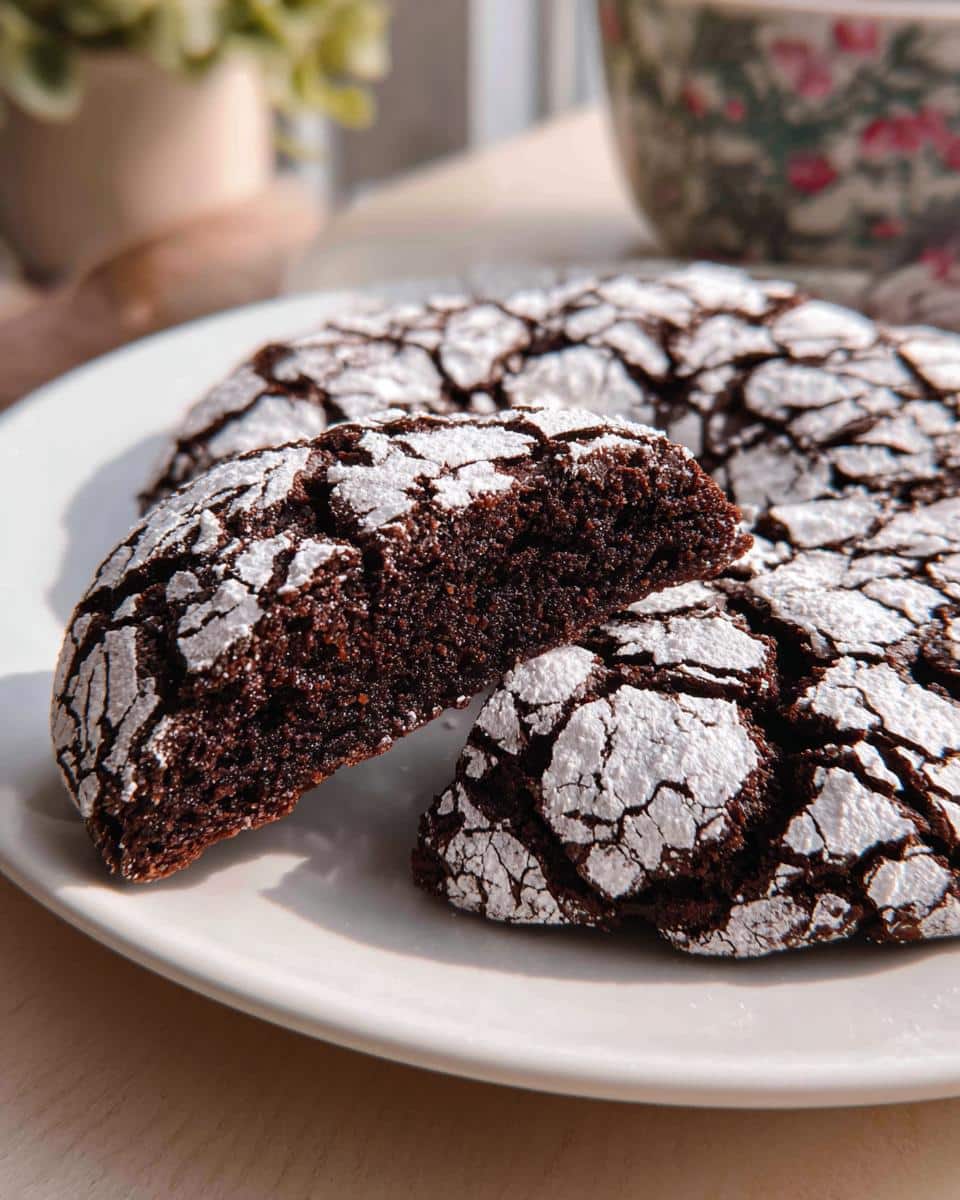
Remember, this cake is supposed to look imperfect. It’s a sign of a deeply flavorful, fudgy interior hidden beneath that sugary blanket. Don’t stress if they aren’t absolutely identical; that’s the charm of a **Homemade Dessert**!
Ingredient Notes and Substitutions for Chocolate Crinkle Cake
Because this is based on older baking traditions, it’s worth talking a little about the choices I made here, since they really impact that fudgy texture we’re after. If you’re looking at your pantry and wondering if you can swap things out, let’s chat about the big players in this recipe.
The use of oil instead of butter is a very deliberate choice for this particular cake. Butter adds flavor, absolutely, but oil contributes superior moisture retention. Since these are baked more like large cookies than traditional layer cakes, the oil keeps the interior softer and more decadent for days. If you must use butter—and I get it, butter is heavenly—make sure it’s melted and cooled slightly, and know that your finished cake might be a little firmer when chilled.
When it comes to the cocoa powder, please, please use unsweetened, high-quality cocoa. I prefer a Dutch-processed cocoa here because those darker powders tend to give you a richer, deeper chocolate color without that slight reddish tinge you sometimes get from natural cocoa. Since there aren’t many other strong flavors—no spices or coffee notes—let that cocoa shine.
You’ll notice we use baking powder, not baking soda. That’s because we aren’t using any acidic ingredients like buttermilk here. The baking powder gives us that gentle lift needed to create those tall puffs that eventually crack spectacularly when they hit the cool powdered sugar coating. Changing that would drastically change the final appearance, so I’d stick to the powder if you can.
As for the eggs, room temperature is key! You don’t want cold eggs causing the sugar and oil mixture to seize up when you add them in. A cold egg can break the emulsion, leading to a greasy texture instead of that beautiful fudginess we’re aiming for. If you forget to take them out, just place them in a bowl of warm tap water for about five minutes before you start mixing.
Serving Suggestions for This Simple Dessert Recipe
So the Chocolate Crinkle Cake is baked and cooled—now what? You’ve already got an incredible homemade dessert here, so keep things easy! Because the flavor is so intensely chocolatey and rich, it pairs beautifully with something cool and creamy. If you’re serving this up as one of your go-to easy dessert ideas, a scoop of high-quality vanilla bean ice cream is absolute perfection. A little melt from the warm cake trickles down into the ice cream—heavenly!
For an afternoon treat, I love making a big batch of strong, hot black coffee to cut through the richness. It makes this feel like a grown-up, yet still super accessible, snack. If you’re looking for ways to serve a few smaller treats alongside, check out some great ideas in my section on easy snacks and small bites!
Storage and Reheating Instructions for Chocolate Crinkle Cake
The biggest challenge with any crinkle-style treat is keeping that sugary mantle looking fresh! Since the Chocolate Crinkle Cake has such a high moisture content inside, if you store it incorrectly, the powdered sugar will start to weep and dissolve right into the fudgy surface. We absolutely have to prevent that; it ruins the whole visual impact!
Here is my golden rule for storage: Do not put these straight into an airtight container while they are still slightly warm. Wait until they are completely cooled, and I mean *completely*.
Once cool, I store them in a single layer in a container that isn’t perfectly sealed—think loosely covered cookie tin or even a large plate covered loosely with foil. We need a little air circulation to keep the outside dry, but not so much that they dry out. They are best eaten within two or three days, as the oil keeps them remarkably fudgy.
If you’re baking these for a party the next day, here is my secret for the freshest presentation: bake them the day before, store them loosely covered at room temperature, and only apply that beautiful final dusting of powdered sugar right before you serve them. A fresh coat makes them look like they just came out of the oven, even if they were baked 12 hours ago!
Reheating isn’t usually necessary since they are fantastic at room temp, but if your kitchen got cold and they firmed up a bit, you can microwave a piece for just 8 to 10 seconds. That’s enough time to bring the fudgy center right back to life without melting that lovely crackled shell.
Frequently Asked Questions About Chocolate Crinkle Cake
Can I skip the chilling time for this Chocolate Crinkle Cake?
Oh, I really, really advise against skipping the chill time! If you try to roll that batter when it’s warm, it’s going to feel like sludge—sticky, messy, and impossible to handle neatly. More importantly, chilling is what sets up the structure so the edges firm up quickly in the oven while the center expands. If you skip it, you risk getting a dense blob instead of a beautifully cracked cake. It’s part of what makes this recipe work as one of the easy dessert ideas!
How do I keep the powdered sugar coating from melting?
This is where humidity becomes your arch-nemesis! If you live somewhere sticky, or if you coat the balls too early, that powdered sugar soaks up moisture before the oven even has a chance to bake it. My best trick is what I mentioned before: only coat what you can bake immediately. If you absolutely have to pre-roll them, store them uncovered in the coldest, driest part of your fridge—not the freezer! Then, right before they go into the hot oven, give every single ball an extra quick roll in fresh, fresh powdered sugar. That fresh coat makes all the difference in getting those crisp edges.
Is this considered one of the best dessert recipes for a crowd?
Absolutely! This Chocolate Crinkle Cake is fantastic for a crowd! The recipe makes about 12 good-sized servings, and they keep really well at room temperature for a couple of days, which is a huge bonus when you’re hosting. Because they look so dramatic but use such simple ingredients, they always get rave reviews without demanding hours of your day. If you end up freezing the baked cakes (without sugar), just thaw them completely and dust before serving. They truly belong on any list of easy desserts for a crowd.
Estimated Nutritional Data for This Homemade Dessert
Now, nobody bakes this cake because they are worried about the calorie count, right? We bake it for the pure, nostalgic joy of that fudgy chocolate punch! But for those of you keeping track, I’ve put together some ballpark figures for a single serving based on the ingredients listed here, assuming this recipe yields 12 servings.
Keep in mind that these numbers are just estimates, and they can swing a little bit depending on the exact brand of cocoa powder or oil you choose to use. Think of this as a handy guideline, not a strict medical fact sheet. For the nitty-gritty details on how I approach recipe sourcing and general disclaimers about this kind of thing, always check out the official notes over at the disclaimer page.
Here’s what you might expect per serving size:
- Calories: Approximately 320-350 kcal
- Total Fat: Around 15g
- Protein: Roughly 4g
- Total Carbohydrates: Around 45g
- Dietary Fiber: About 2g
- Total Sugars: Approximately 28g (This includes the sugar in the batter plus the heavy powdered sugar coating!)
See? Rich, satisfying, and totally worth it for a simple dessert! Enjoy every fudgy bite.
Share Your Experience with This Chocolate Crinkle Cake
Well, that’s it! We’ve made a stunningly rustic, richly fudgy Chocolate Crinkle Cake, and all you needed were a few simple tools and ingredients. Now, the best part of home baking is sharing the joy, isn’t it?
I truly hope you give this recipe a go the next time you are craving that deep, honest chocolate flavor. When you do, I want to hear all about it! Did the cracks look dramatic? Was the center as fudgy as you hoped? Drop a star rating right down below so everyone knows how much you enjoyed this simple dessert recipe.
If you have memories of similar old-fashioned treats or have any questions about technique, please don’t hesitate to get in touch with me. You can always reach out directly via my contact page. Happy baking, friends, and thank you for joining me on this journey through heritage chocolate!
Chocolate Crinkle Cake
Ingredients
Equipment
Method
- In a large mixing bowl, combine the sugar, cocoa powder, and oil using a hand mixer or a stand mixer fitted with the paddle attachment. Beat on medium speed until the mixture is well combined and shiny.
- Add the eggs one at a time, beating until each is fully incorporated. Beat in the vanilla extract.
- In a medium bowl, combine the flour, baking powder, and salt, stirring them together. Add this dry mixture to the cocoa mixture and mix on low speed just until combined.
- Cover the dough with plastic wrap and refrigerate for a minimum of 4 hours, or up to overnight.
- When the dough is chilled, preheat your oven to 350°F (175°C). Line two large baking sheets with parchment paper. Place the powdered sugar in a small bowl.
- Use a small ice cream scoop or tablespoon to portion the chilled dough into roughly one-inch balls. Roll each dough ball in powdered sugar until it is completely coated. Place the coated balls on the prepared baking sheets, spacing them about 2 inches apart.
- Coat only the dough balls you can fit on the baking sheets at one time. Refrigerate the remaining dough balls and roll them in powdered sugar just before you bake them.
- Bake for 10 to 12 minutes, or until the edges of the cakes are firm and the center appears slightly wet but puffed. Let them cool on the baking sheets for a few minutes before transferring them to a wire rack to cool completely.