When you need a dessert that looks like it took all day but actually took hardly any time at all, I’m your girl! Trust me, I love a good oven-baked masterpiece, but sometimes we need something lighter, fresher, and totally fuss-free. That’s where these gorgeous Strawberry Cheesecake Cups come in, and they are officially one of my go-to easy dessert recipes.
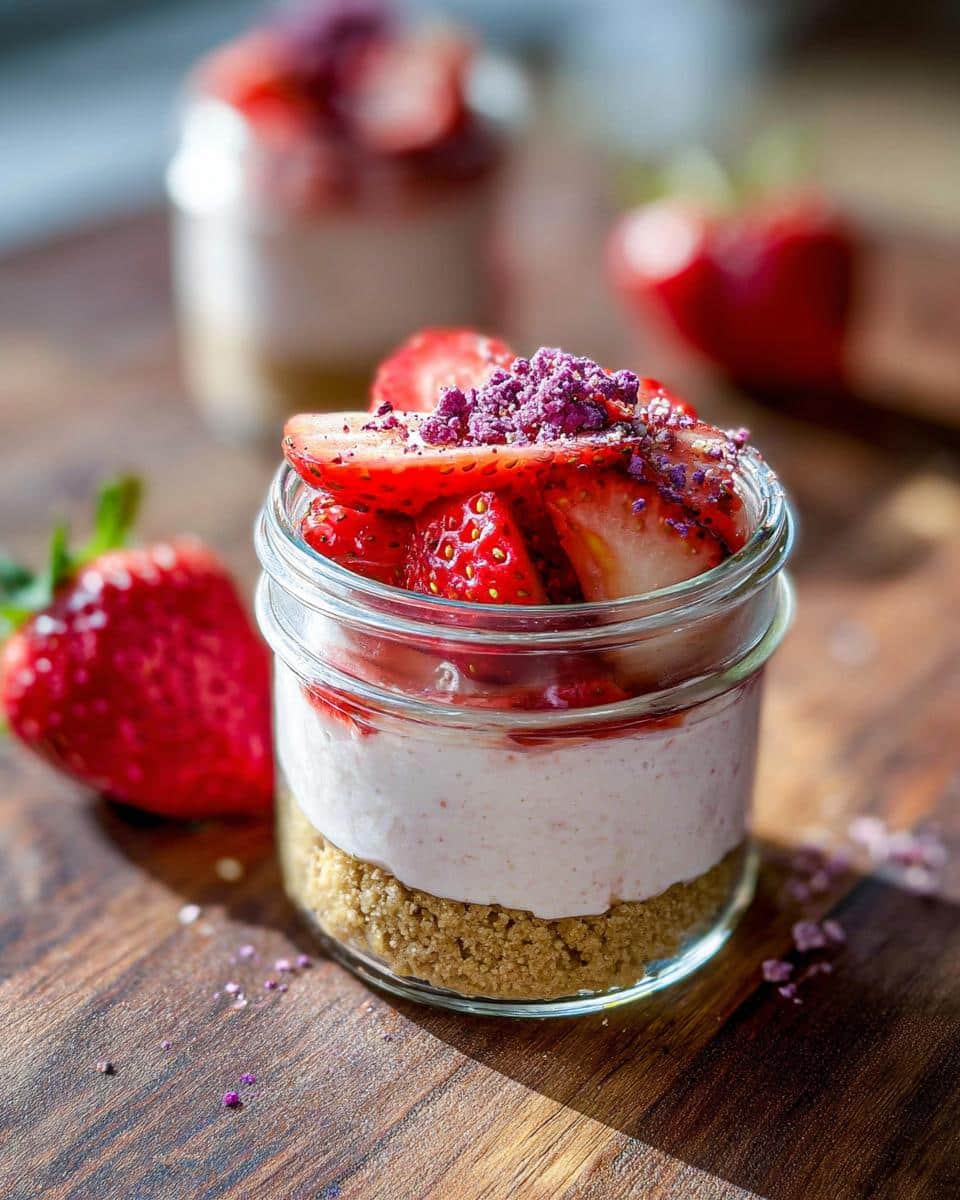
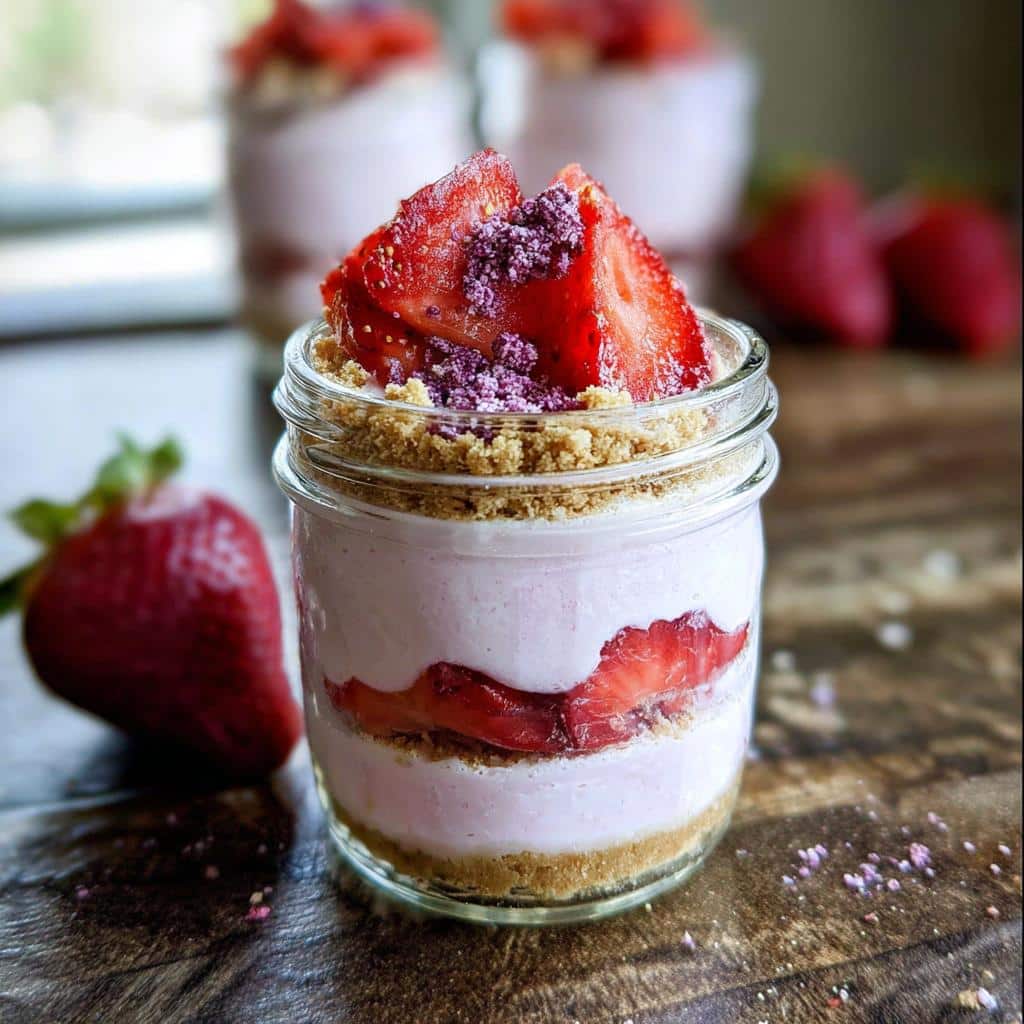
What I love most about making these individual cups is the texture layering. You get that satisfying, slightly crunchy crust, followed by the cool, silky smooth cheesecake filling, and then a burst of bright strawberry flavor on top. They’re naturally portioned out, which is great for entertaining, and the no-bake magic means no turning on the oven, even in the summer!
As a visual storyteller, presentation matters to me, but getting too fussy scares people off. These cups are proof that simple, clear instructions lead to stunning results. You’re going to feel so proud when you pull these out—they absolutely scream elegance, but they’re so easy I can whip them up while helping my kids with homework. Seriously, you won’t believe how quick these Strawberry Cheesecake Cups come together!
Why You Will Love These Strawberry Cheesecake Cups (Valentine Day Desserts)
I know you’re going to adore these! They hit that sweet spot where elegant presentation meets zero kitchen stress. They’re fantastic for impressing guests, or just making a regular Tuesday night feel a little bit special. If you’re planning anything for February, these instantly become one of the best Valentine Day Desserts on your list.
- No baking required! That’s right, you mix, layer, and chill. Easy peasy.
- Serving them individually in jars means everyone gets the perfect ratio of crust to filling every single time. No messy slicing involved!
- They look absolutely stunning. The pink from the strawberries against the white filling is just beautiful—perfect for a Galentines Aesthetic gathering.
- They are light! If you want a sweet treat that won’t weigh you down after a big meal, these individual cups are spot on.
Essential Ingredients for Perfect Strawberry Cheesecake Cups
Gathering your ingredients before starting is the key to making these Strawberry Cheesecake Cups feel stress-free. Since we aren’t baking, the quality of what goes in really shines through, especially with the fresh fruit!
For the best E-E-A-T experience—that means amazing results for you—please make sure your cream cheese is truly room temperature. You know, soft enough to press your finger into without resistance. That one tip is crucial for getting that beautifully smooth filling we talked about. Don’t skip that step!
For the Crust
We are keeping the classic crunch but making it super simple. You’ll need:
- 8 oz graham cracker crumbs: This is usually about half of one of those big boxes. Make sure they are finely crushed!
- 1/4 cup sliced nuts: I love almonds here; they give a nice subtle flavor that doesn’t overwhelm the strawberry.
For the Filling and Topping
This is where the creamy magic happens, and the freeze-dried berries are our little secret for intense strawberry flavor without watering down the filling. You must measure these out carefully!
- 16 oz cream cheese: Remember, this has to be totally soft—no excuses here!
- 3/4 cup Greek yogurt: This thins the heavy cream cheese just enough to keep things light.
- 1/2 cup powdered sugar: Sift this if you can; nobody likes a rogue lump of sugar.
- 1/2 tsp salt: Yep, salt! It balances all that sweetness, I promise.
- 1.25 oz freeze dried berries: Listen carefully! You need to reserve 2 tablespoons of these crushed bits for the final topping. The rest go into the filling for flavor.
- 2 cups fresh berries: These get chopped up for that lovely fresh fruit layer you see in the pictures.
Step-by-Step Guide to Making Strawberry Cheesecake Cups
Alright, this is the fun part! Making Strawberry Cheesecake Cups is all about layering, and honestly, if you can work a rolling pin, you’ve basically mastered this recipe. Since we aren’t using the oven, the only real timing we need to worry about is that essential chill time at the very end. Let’s get these beautiful layers built, step by step!
Preparing the Graham Cracker Crust Base
First up, the crunch! Take your graham crackers and chuck them right into a sturdy plastic bag. Gotta press out all that air—I usually seal it halfway and then mush the air out before sealing it completely. Then, grab your rolling pin or even the bottom of a heavy mug and just go to town! You want nice, consistent crumbs. Once it looks good, dump those crumbs into a bowl, toss in your sliced nuts, and give them a quick stir to combine. That’s the base sorted!
Creating the Creamy Cheesecake Filling
Now for the silky smooth part. Get your room-temperature cream cheese into a mixing bowl. Beat it with an electric mixer—or a whisk and some elbow grease—for a good three minutes until it’s totally soft and fluffy. You can’t rush this; we want zero lumps! Next, beat in the Greek yogurt until that’s incorporated (about two more minutes). Finally, add in your powdered sugar, salt, and the bulk of your crushed freeze-dried berries. Beat it one last time until everything is perfectly smooth and tastes like heaven.
Processing the Fresh Strawberry Topping
This layer is all about hitting that perfect fresh-and-intense strawberry vibe. Take your two cups of fresh berries and pulse them quickly in your blender or food processor. I don’t want a smoothie here; I like mine a little chunky, so pulse it just a few times until the fruit is roughly chopped. Don’t forget to mix in the 2 tablespoons of reserved crushed freeze-dried berries right here with the fresh fruit. That little boost of tartness is amazing!
Assembling Your Individual Strawberry Cheesecake Cups
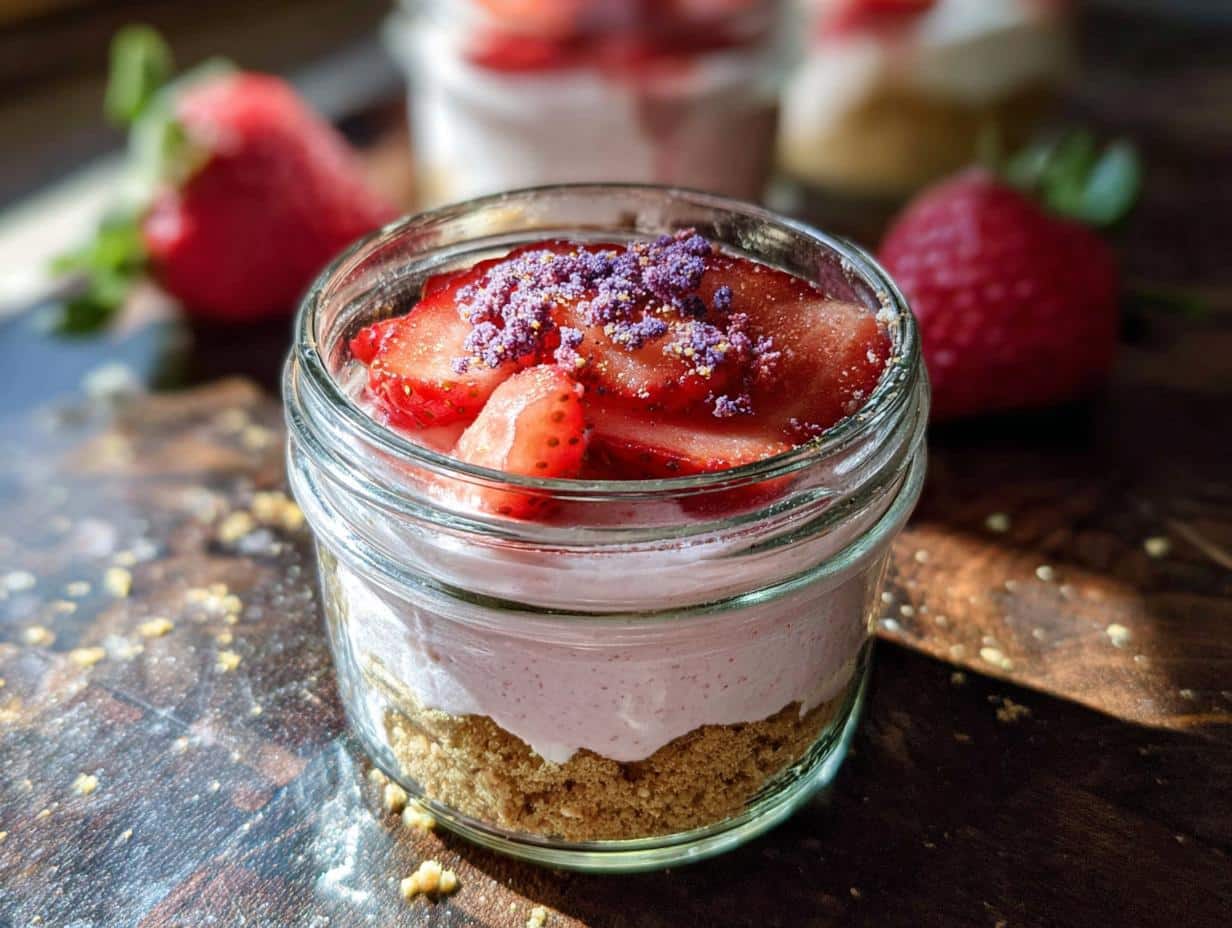
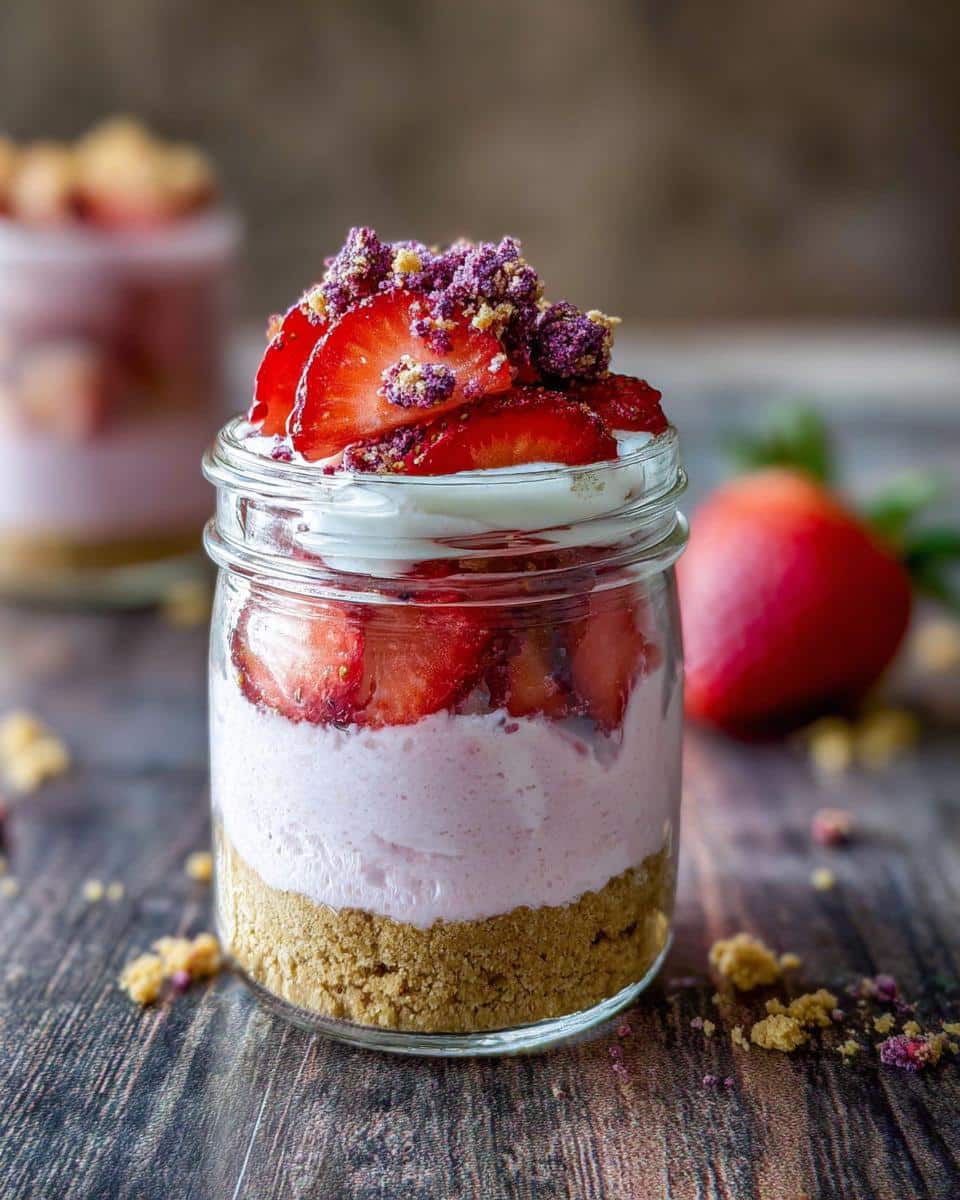
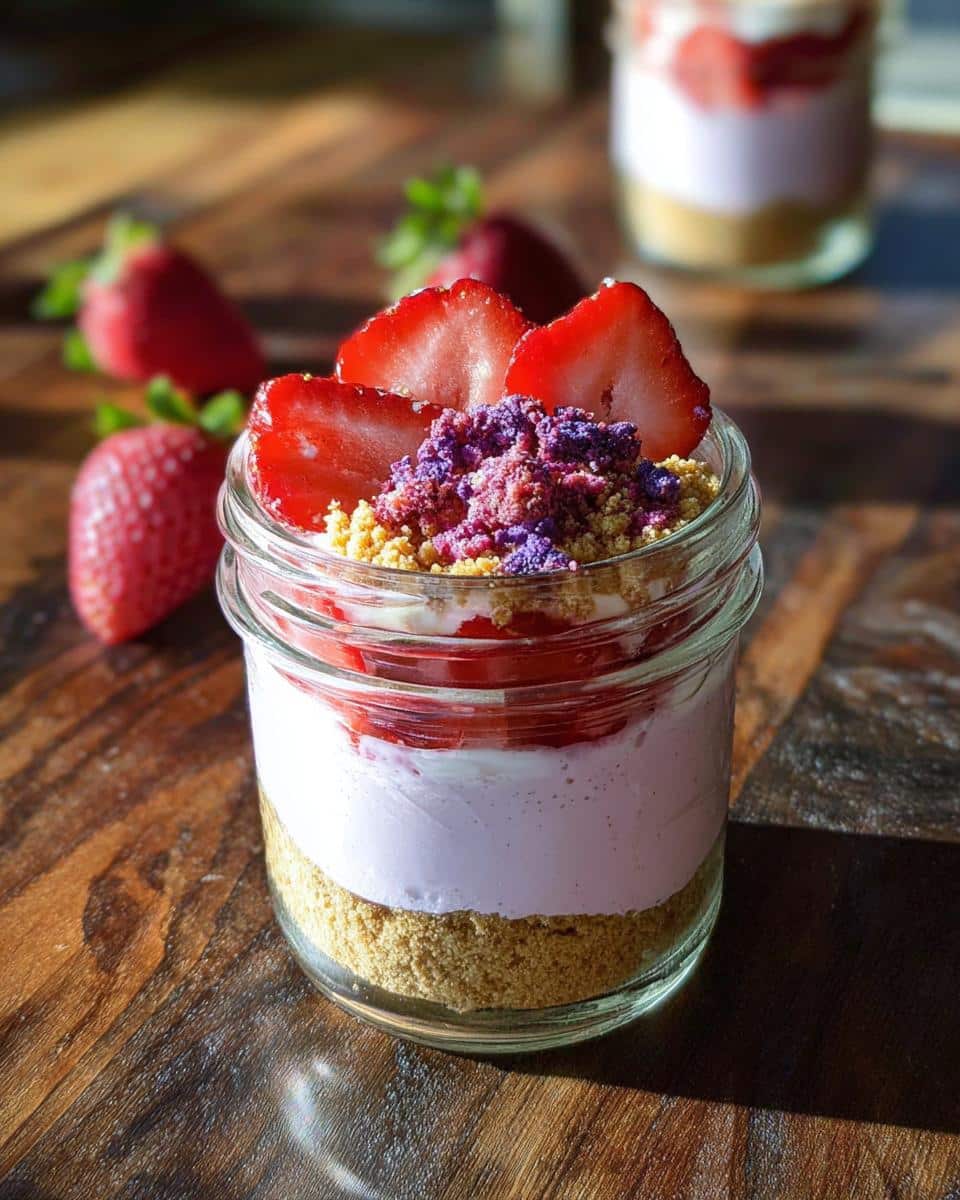
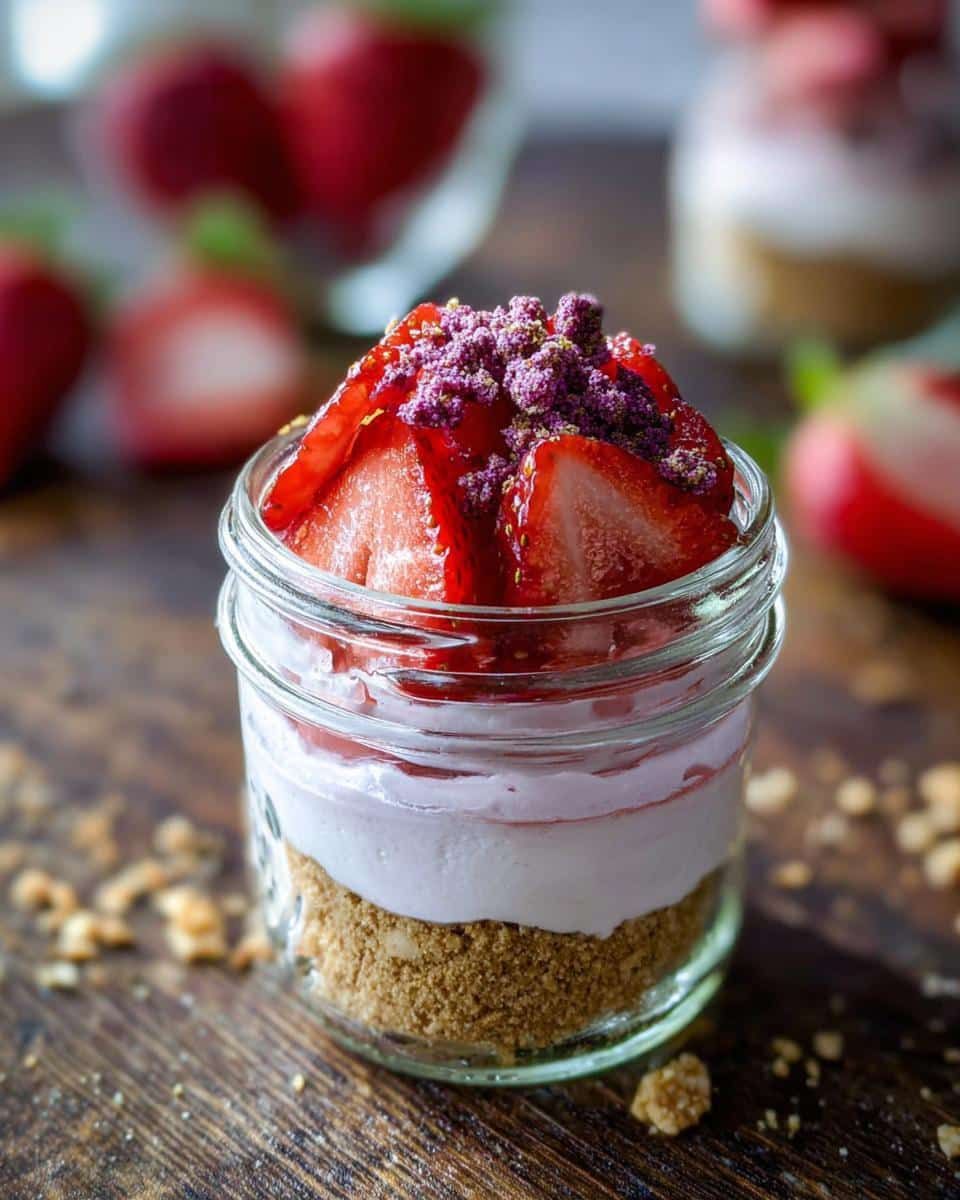
Time to build these beauties! Grab your 4 oz jars or cups. Divide *half* of your graham cracker/nut mixture evenly between the bottoms. Press it down gently—you don’t need to compact it too much since it’s no bake. Next, carefully spoon the cream cheese mixture over the crusts. Finally, top each one with a generous spoonful of your fresh strawberry/freeze-dried topping. Pop one fresh slice of strawberry on top for flair. Seriously, try to get these into the fridge right away! They need at least 60 minutes of chilling time so everything sets up nicely. If you skip that, you’ll just have a lovely strawberry soup, and we want crispier layered dessert cups!
Tips for Perfect Strawberry Cheesecake Cups Presentation (Valentines Day Baking Ideas)
Since I spend so much time making food look good, let me give you a quick lesson on styling these Strawberry Cheesecake Cups! The beauty of these is that they do most of the heavy lifting because of the clear layers. For Valentine’s Day, lean into the pinks and reds. Don’t just plop the topping on; make sure that final, reserved sprinkle of crushed freeze-dried berry powder is dramatic, maybe dusted over one side like snow. These look fantastic when you check out my other baking tips over at my holiday cookie recipe section, too!
If you are serving them for a special event, presentation is everything. Set them out on a pretty platter—maybe something white or marble to make the colors pop. I always suggest shooting photos of them in natural light (near a sunny window!) because the light catches the texture of the cream cheese filling beautifully. Don’t forget that final slice of fresh strawberry on top; it’s your little signature garnish that says, “I hand-made this elegant dessert!”
These are definitely one of those showstoppers for Valentines Day Baking Ideas that truly look better than they taste, which is saying something because they taste incredible!
Ingredient Notes and Substitutions for Strawberry Cheesecake Cups
I get so many questions about adapting recipes, and that’s great! That’s how we make recipes our own. When it comes to these Strawberry Cheesecake Cups, sticking close to the original ingredients gives you the best results, especially for the filling structure.
If you absolutely cannot find freeze-dried berries—which is a shame because they concentrate the flavor so well—you can substitute them with a very small amount of strawberry extract mixed into the cream cheese filling. Just a drop or two, okay? The color won’t be as vibrant, but the flavor will still be there.
For the Greek yogurt, sometimes people worry about that ingredient specifically. If you don’t have it, plain sour cream is a wonderful 1:1 backup. It might make the filling just a touch richer, but it absolutely works beautifully in these no bake cheesecake dessert recipes!
Storage and Make-Ahead Instructions for Layered Dessert Cups
Because these Layered Dessert Cups are no-bake, storage is super straightforward, which is part of why I love them for batch cooking ahead of time. You can definitely make these a day ahead of your party! Just assemble them completely, top them with the fresh fruit, and pop them straight into the fridge. They need that minimum 60 minutes chilling time anyway to set up firm.
They keep beautifully in the refrigerator for about three to four days sealed tight. If you plan to keep them longer, I actually suggest leaving the very top layer of fresh strawberry and dust off until the day you serve them. That keeps everything looking its freshest!
Freezing is possible, but I generally don’t recommend it for these. The texture of the cream cheese filling can change slightly when thawed, and the graham cracker crust might get a little damp. Stick to making them a day or two before, and everything will be perfect! For any detailed questions about ingredients, please see the disclaimer over at my policy page, just in case!
Frequently Asked Questions About These Valentines Day Treats
I always get the best questions after posting a fun, colorful recipe like this! Since these are such great Valentines Day Baking Ideas and perfect for getting everyone involved, let’s tackle some things you might be wondering about before you grab your cups.
Can I make Strawberry Cheesecake Cups without Greek Yogurt?
Oh, absolutely! If you’re in a pinch or just don’t keep Greek yogurt in the house, you can easily swap it out. I’ve tested this with regular sour cream (full-fat is best here, trust me!), and it works like a charm. It might make your filling just a tiny bit denser and maybe a touch tangier, but the texture will still be wonderfully creamy—it’s a great substitute for making Valentines Day Treats!
What are the best serving suggestions for these Valentine Day Desserts?
Presentation is just as important as taste, right? For these gorgeous Valentine Day Desserts, I love keeping the drinks light so they don’t overshadow the dessert. A simple, strong cup of coffee or a really nice, slightly sweet prosecco or sparkling rosé is perfect. If you’re making these for a brunch or a Galentine’s Day get-together, a nice iced tea with mint also plays really well with the strawberry flavor. Keep the focus on that beautiful pink color!
How far in advance can I assemble the cups?
This is key for keeping that crust crunchy! Since these are no-bake, the time is spent chilling, not baking. You can fully assemble everything, including the fresh strawberry garnish, about 6 to 8 hours before serving. If you need to make them further ahead—say, the day before—I would definitely assemble the crust and the filling, but leave the fresh strawberry topping and the final sprinkle of crushed freeze-dried berries off until about an hour before you plan to serve them. This keeps the crust from getting soggy, which is the enemy of any good no-bake dessert recipe! If you’re interested in learning more about my teaching style, check out the About Page!
Estimated Nutritional Data for Strawberry Cheesecake Cups
Okay, I know we don’t bake these for health reasons, but I know you’re curious! Since these Strawberry Cheesecake Cups are portioned out into 8 servings, the numbers look pretty reasonable for a fantastic treat. Just remember that these are estimates based on standard measurements, so yours might shift a tiny bit depending on your exact ingredients!
- Calories: approximately 407 per cup
- Fat: about 24g
- Carbohydrates: roughly 39g
- Protein: around 8g
That amount of Vitamin C is fantastic, though, coming from all those strawberries!
Share Your Beautiful Strawberry Cheesecake Cups
I had so much fun walking you through making these simple, elegant layered cups! As a visual storyteller, seeing how you all bring these recipes to life is truly the best part of my job here at Top Chicken Eats. I’m always fascinated by the little tweaks people make.
So, once these have chilled for that crucial hour and are set perfectly, please, snap a picture! Tag me on social media. I want to see how you served them—did you use fancy glass jars? Did you use raspberries instead? Let me know!
If you made any changes at all—maybe you swapped the nuts or tried a different kind of shortbread for the base—I’d love to hear about it in the comments section below. Your feedback and visual proof help me improve all my recipes, and it helps other readers feel confident giving it a try!
If you’re feeling inspired and want to send photos directly, don’t hesitate to reach out through my contact form at the contact page. Happy baking (or, well, happy *no-baking*!)
Strawberry Cheesecake Cups
Ingredients
Equipment
Method
- Place the graham crackers in a plastic bag, press the air out, seal it, and crush them into crumbs using a rolling pin. Add the sliced nuts and mix them with the crumbs. Set this mixture aside.
- Place the freeze dried berries in a plastic bag, press the air out, seal it, and crush them into crumbs using a rolling pin. Reserve 2 tablespoons of the crushed berries for topping, and set the rest aside.
- In a bowl, beat the cream cheese for 3 minutes. Add the Greek yogurt and beat again for 2 minutes to combine. Add the salt, powdered sugar, and the majority of the crushed freeze dried berries. Beat until incorporated and set the mixture aside.
- Add the fresh berries and the reserved 2 tablespoons of crushed freeze dried berries to a blender or food processor. Pulse several times to chop and combine. You can leave the mixture slightly chunky if you prefer.
- To assemble, divide half of the graham cracker mixture among the bottom of eight 4 oz jars or four 8 oz cups. Next, divide the berry cream cheese mixture on top of the crust layer. Top each cup with a portion of the remaining crushed berry mixture. Place one sliced fresh berry on top of each cup and refrigerate until ready to serve.