Sometimes, the most thoughtful recipes are the ones that take the least amount of fuss, don’t they? I’ve spent years studying culinary history, tracing flavors from grand feasts down to simple, handmade sweets. And honestly, nothing beats the ease and sheer visual delight of a fantastic chocolate bark.
This Pink Chocolate Bark is just that—pure confectionary magic disguised as a five-minute effort. Since we aren’t breaking out the oven, this is the perfect recipe for those quick, beautiful gifts or just when you need a little festive lift. It’s truly the ultimate no-bake dessert, especially when we’re talking about those perfect Valentine Day Desserts or adding a beautiful pop to your Galentines Aesthetic spread.
We’ll be layering rich dark chocolate with creamy white and vibrant pink—it’s simple elegance, and you’ll have the whole sheet ready for the fridge in under an hour. Trust me, this technique is one I always come back to.
If you’re looking for more simple, beautiful ideas to make your celebrations shine, you should check out some of my other quick dessert work over at easy dessert recipes!
Why This Pink Chocolate Bark Recipe is a Favorite for Valentines Day Treats
When I look through my notes on classic holiday confections, chocolate bark always stands out. It’s just proof that you don’t need complicated steps to achieve something truly gorgeous. This specific Pink Chocolate Bark embodies that perfectly for the holiday season.
It’s one of those recipes that just checks every box for simple, heartfelt gifting, which is why I keep it in my rotation when scouting for easy Valentines Day Baking Ideas.
- We are working with minimal ingredients, keeping the focus sharp on the flavor and texture.
- You don’t even need to preheat an oven! It’s a lifesaver when your kitchen is busy.
- The payoff is huge—the high visual impact of those layered colors is instant party material.
- It sets up beautifully, making it one of the best homemade chocolate gifts you can whip up quickly!
Gathering Ingredients for Your Pink Chocolate Bark
Alright, gathering our beautiful components only takes us about 25 minutes of active prep, but don’t forget we need that sweet, sweet waiting time—about 90 minutes for the bark to fully set up firm. That time is essential for getting that clean color break!
Now, let’s talk chocolate. This is where I get picky, but it’s for your own good, honey. For the white and pink layers, ditch the chips if you can. Chips have stabilizers that make them great for holding their shape in cookies, but they make melting for bark a nightmare—they can seize up on you! We want those lovely baking bars for a smooth pour. You can check out where I find some of my favorite quick snack equipment over at easy snacks and small bites to keep things moving smoothly!
For the Chocolate Layers in Your Pink Chocolate Bark
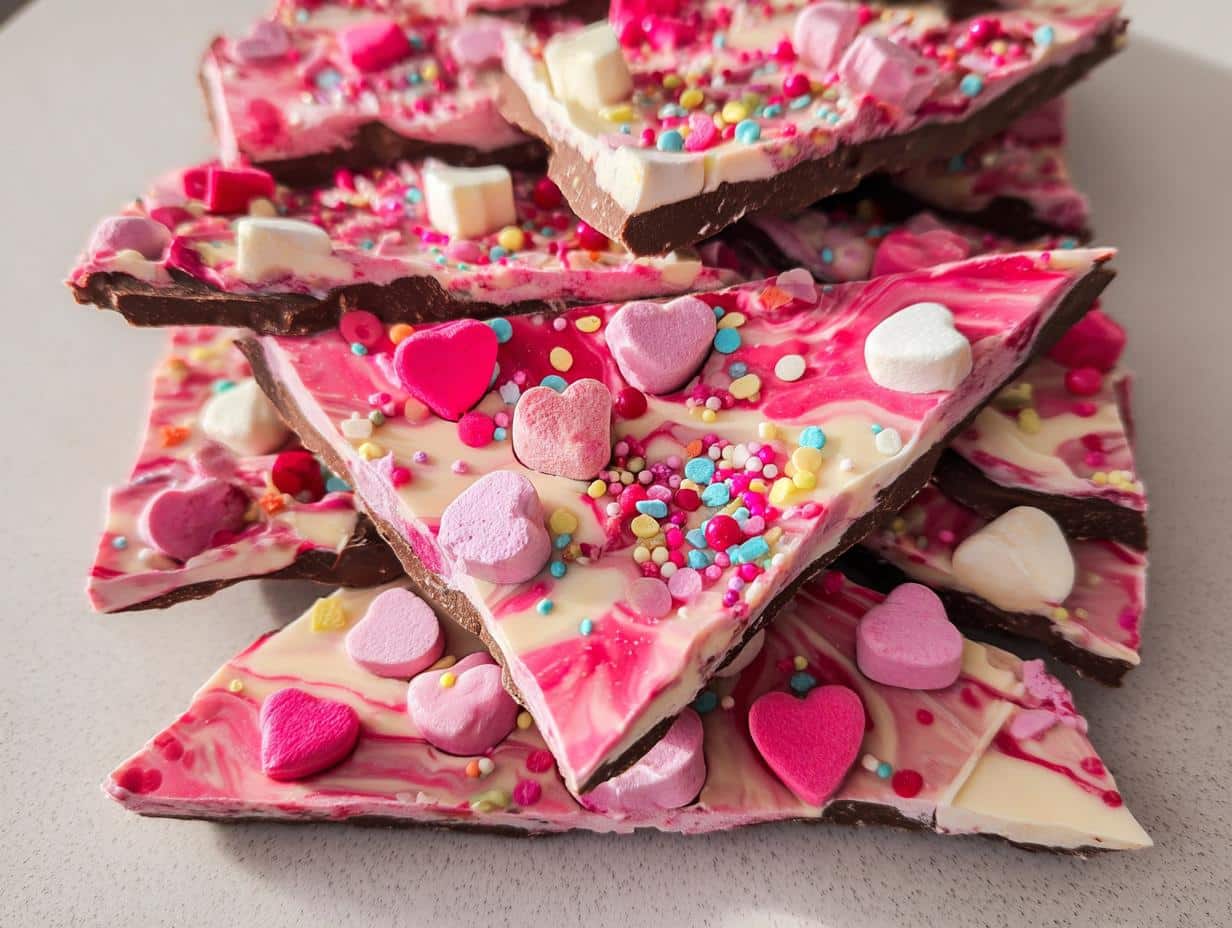
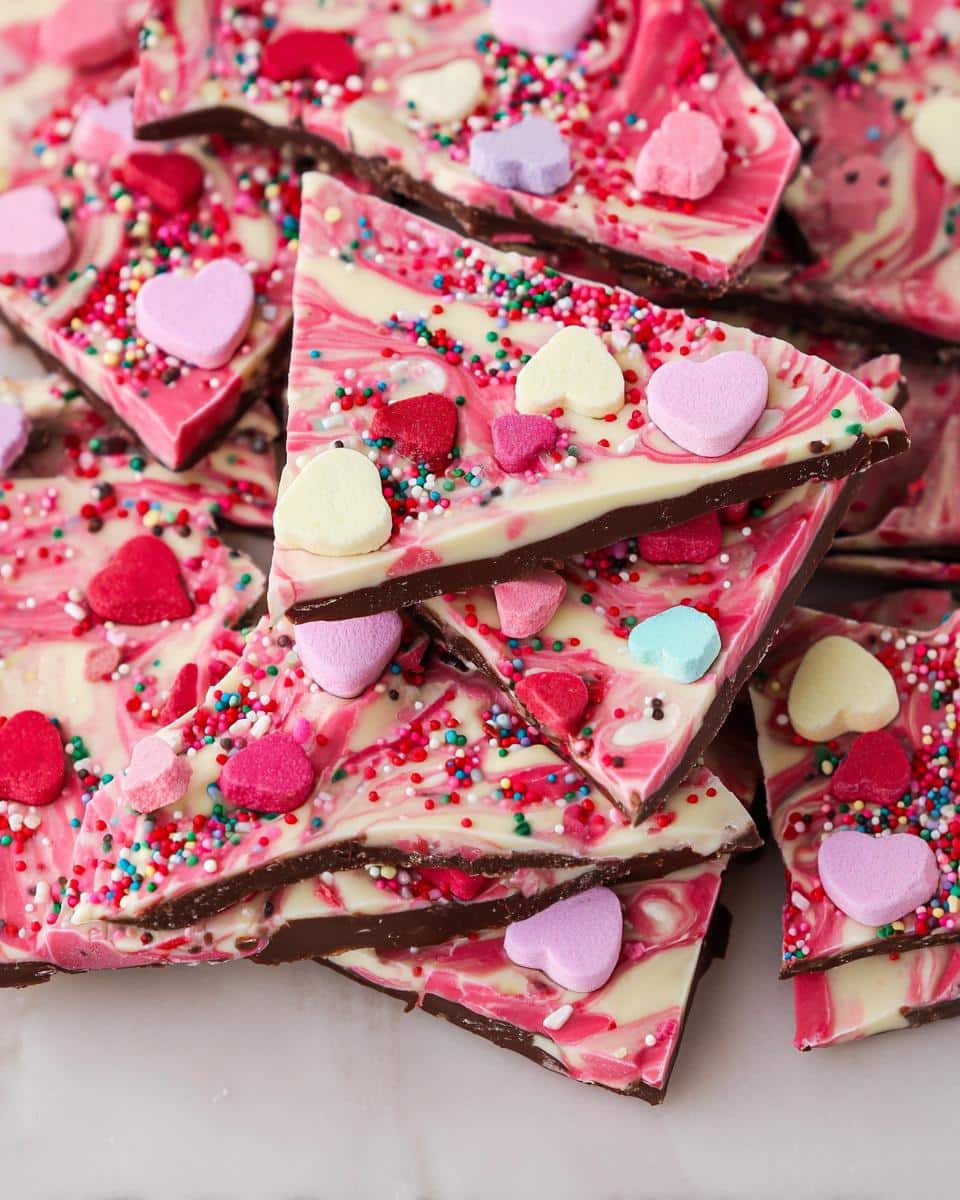
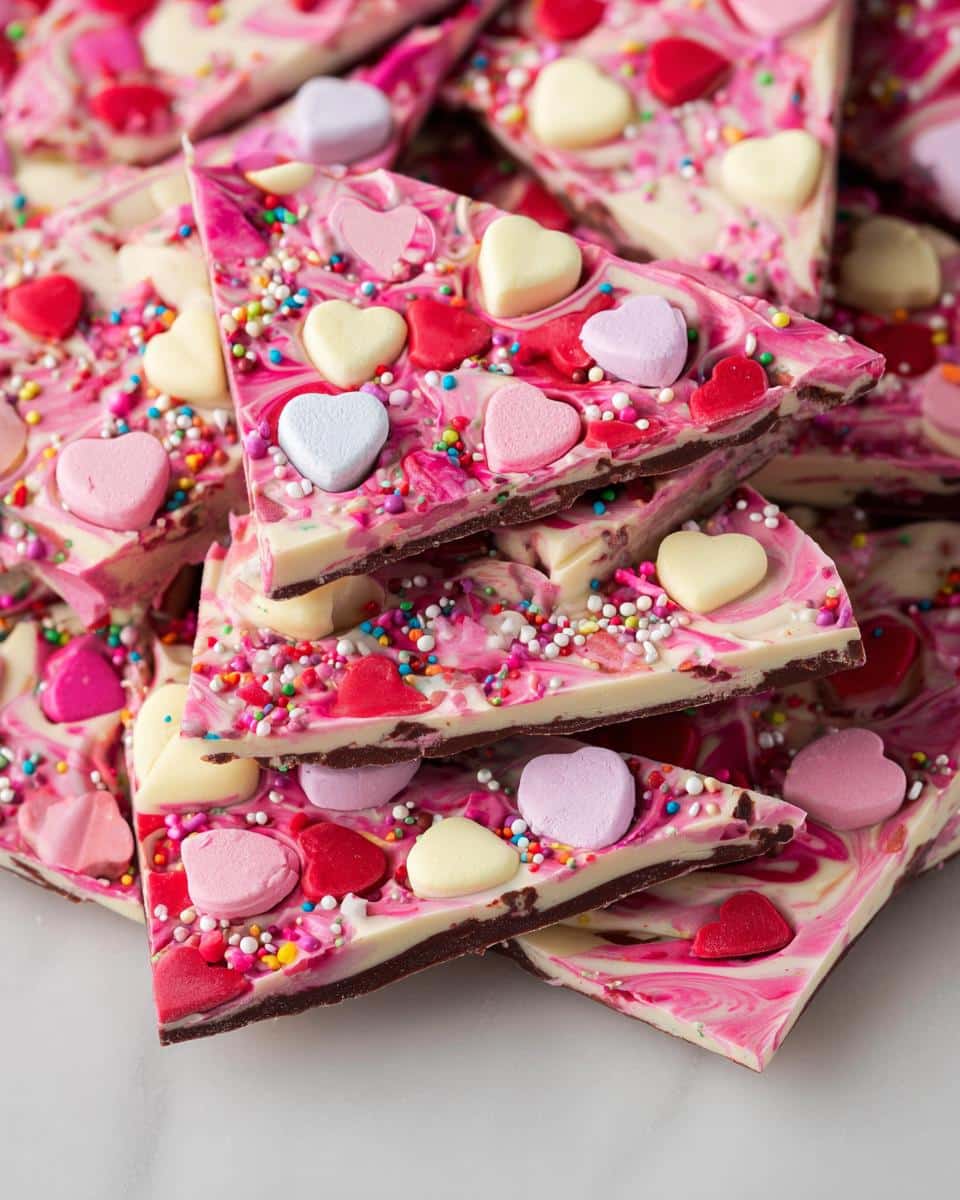
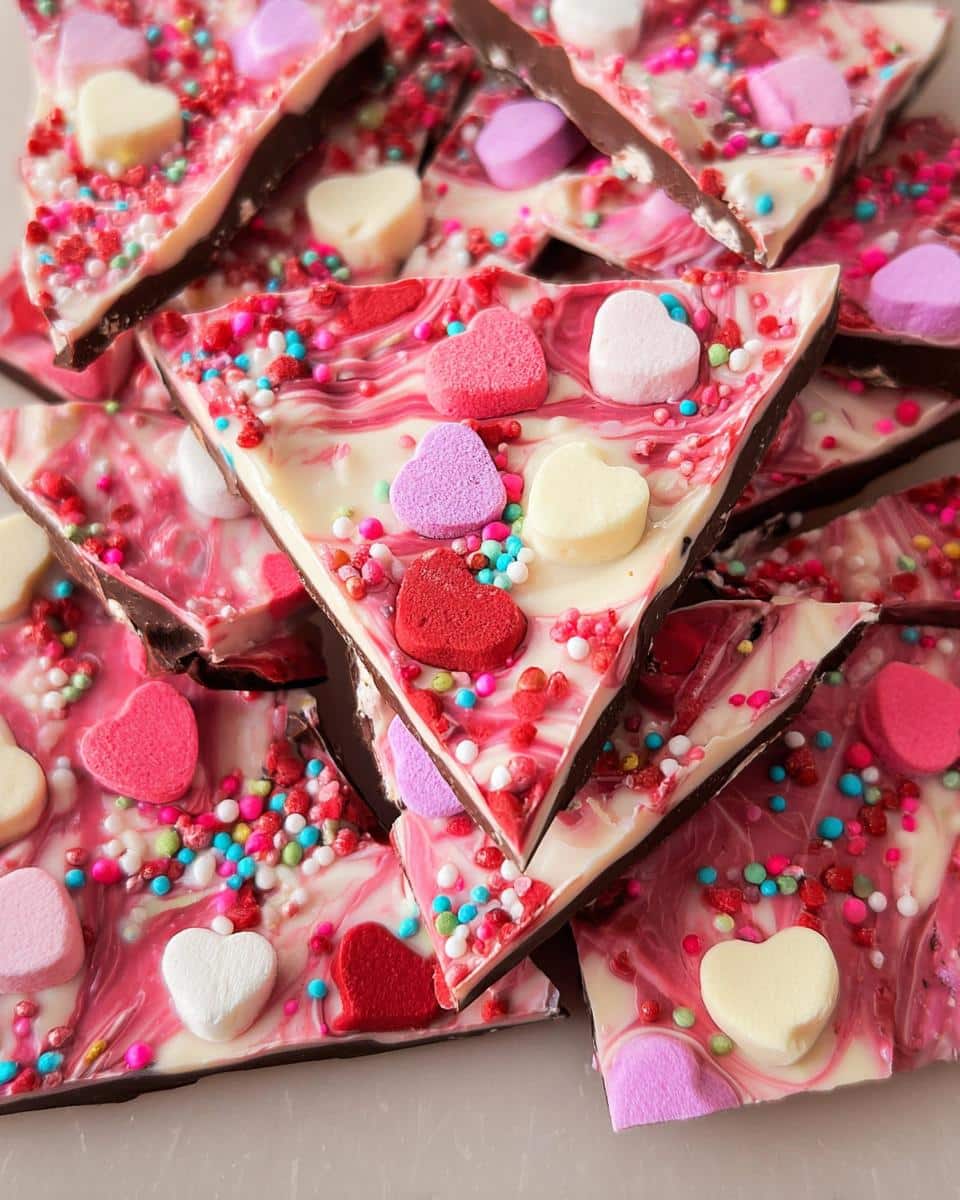
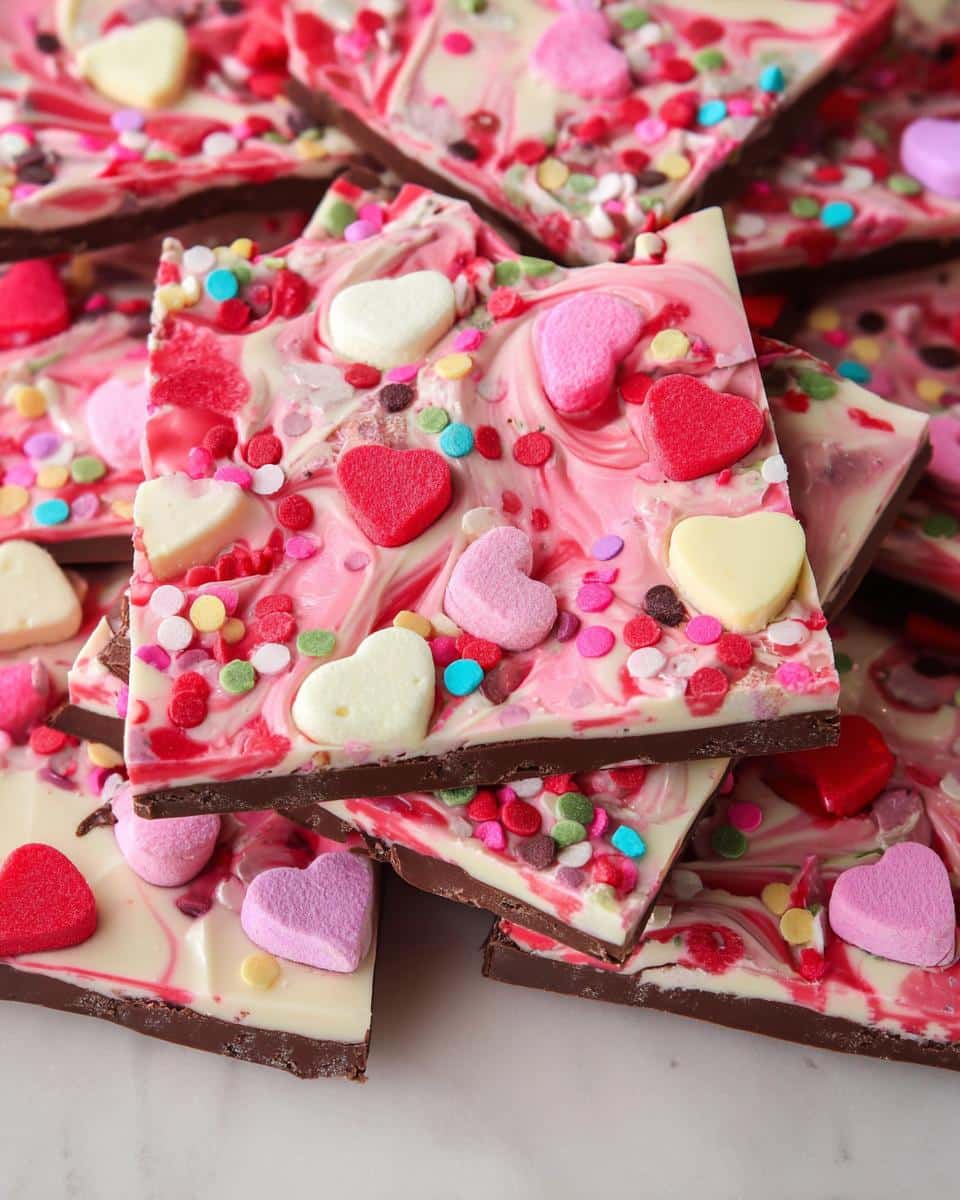
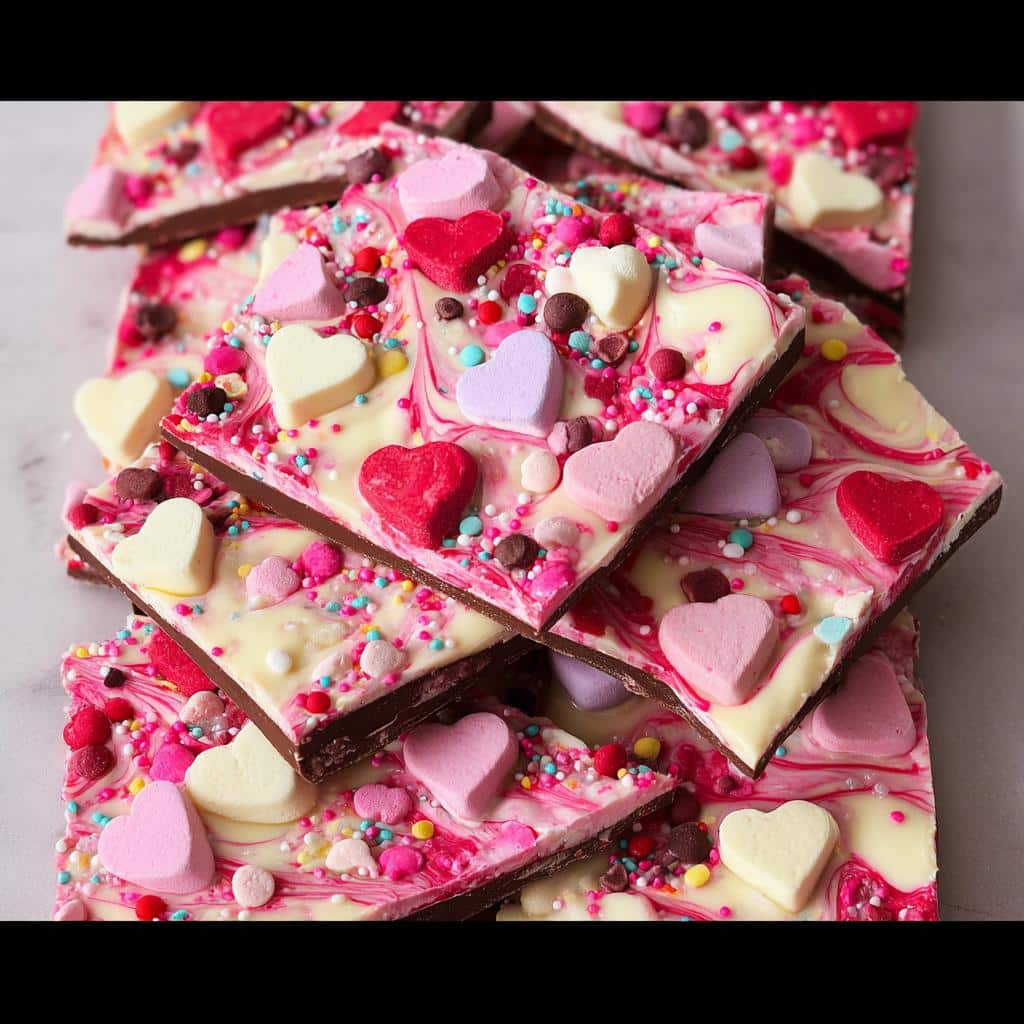
This recipe builds those three gorgeous, distinct layers we need. Remember, we’re going dark, then white, then pink, aiming for that beautiful contrast.
- Dark chocolate chips: 1.5 cups
- White chocolate baking bars: 12 oz (That’s three of those standard 4-oz bars, trust me on this measurement!)
- Pink candy melts: About 3/4 cup
Toppings to Personalize Your Pink Chocolate Bark
This is where we really lean into the fun of Valentines Day Food Ideas. Don’t stress too much about exact measurements here; just sprinkle generously!
- Valentine’s Day candy mix (I love using those little M&Ms and conversation hearts): About 1/4 cup
- Fun Valentine’s Day sprinkles: Maybe 2 tablespoons should do it!
Step-by-Step Instructions for Perfect Pink Chocolate Bark
Now for the fun part! Making this bark is much more about timing and gentle handling than it is about actual cooking, which is why it’s so satisfying. The most important thing I need you to remember right up front is this: take it slow when you melt the chocolate. If you rush the microwave, you’ll shock the cocoa butter, and poof! You’re left with grainy, seizing chocolate. We are aiming for silky smooth goodness here, especially if you want those clean ribbons of color for your Valentines Day Recipes.
If you’re making this with younger helpers, make sure they know how powerful the microwave can be. You can find some tips on letting kids help in the kitchen safely over at easy recipes for kids!
Preparing the Base Layer for Your Pink Chocolate Bark
First things first, get prepared! Line that big 12 by 18-inch cookie sheet absolutely perfectly with parchment paper. Don’t skip this, or trust me, you’ll regret it when it’s time to peel the bark off.
For the dark chocolate layer, put your measuring cups of chips in a microwave-safe bowl. Heat in short bursts—say, 30 seconds at a time. Stir it really well between every blast. Keep doing that, stirring often, until it’s totally smooth. No lumps allowed!
Pour that gorgeous melted dark chocolate right onto the paper and spread it out quickly to a thin, even layer across the entire sheet. Now, here’s the secret timing part: leave it alone! You want it to sit at room temperature. We are waiting until it’s mostly hardened—you should be able to gently touch it without your finger sinking right through—but it still needs to be slightly soft and tacky. This usually takes about 10 minutes.
Creating the Swirl Effect in Your Pink Chocolate Bark
While the dark chocolate is setting up its base, get your other two chocolates going. Break those white chocolate baking bars into smaller pieces and melt them using that same slow, stop-and-stir microwave method until they’re liquid silk. Do the same gentle melting process for the pink candy melts in their own little bowl.
Once your dark chocolate base is tacky, pour that smooth white chocolate right over the top and spread it out fast before it starts to firm up! Before the white layer sets, immediately drizzle those pink melts all over the surface. Now, grab that toothpick—just gently drag it back and forth through the pink and white. You want to create a pretty marble, not mix it into one big muddy color, okay? Keep that dark layer undisturbed underneath!
Finishing and Setting the Pink Chocolate Bark
As soon as you’ve finished your swirling—and it should look instantly beautiful—it’s time for the fun part: the toppings! Shower that beautiful surface with your Valentine’s candy mix and all those festive sprinkles. You want this done right away so the candies stick when it hardens.
Now, we wait. We need patience for this part since this is an easy no bake chocolate dessert, not a baked one! Let the whole sheet sit undisturbed at room temperature for at least an hour, maybe longer, depending on how warm your kitchen is. The goal is fully hardened and solid. When it passes the snap test, you can use a pizza cutter or a sharp knife to gently break or cut it into those lovely individual pieces. Easy peasy!
Tips for Success When Making Homemade Chocolate Bark
As a historian of food, I can tell you that while chocolate seems simple, it’s actually very temperamental. Achieving that perfect, shatteringly crisp texture in your homemade chocolate bark relies on respecting the chocolate’s nature. I’ve broken a few batches myself trying to rush things, so let me save you the trouble!
Here are the few non-negotiables I always follow to make sure my layers are vibrant and the final snap is just right:
- Slow Heat is Your Best Friend: I can’t stress this enough—if you overheat chocolate or candy melts, they seize up and turn into grainy lumps. Always use those small 15-second bursts when microwaving. Stirring thoroughly after *every* blast warms it more evenly than letting the microwave blast it all at once. It takes patience, but it’s the only way to get that smooth, glossy finish that makes these Valentines Day Dessert Ideas look professional.
- The ‘Tacky’ Stage is Key: This is crucial for layered bark like our pink version. When you pour your white chocolate over the base, it shouldn’t be fully hard. If it’s rock solid, the new layer will crack right off later. You need it tacky—firm enough that it doesn’t run everywhere when you gently spread it, but soft enough that the next layer will bond to it.
- Use Bars, Not Chips (If You Can): When melting white chocolate, those baking bars melt down into a pourable liquid much easier than chips. Chips are designed to hold their shape, remember? If you use chips for the white and pink layers, you might have to push them around too aggressively, which messes up your beautiful swirl pattern.
If you ever have questions about technique or ingredients used in my recipes, please feel free to check out the disclaimer page for more context on my testing methods over at my official statement on recipe testing.
Variations for Your Festive Dessert Ideas
You know, as a food historian, I love how a simple confection like chocolate bark takes on new life just by tinkering with the additions. While our classic pink, white, and dark layers are gorgeous—perfect for those quintessential Valentines Day Treats—you shouldn’t feel limited! This recipe is basically a blank canvas begging for your personality.
It’s so easy to pivot these ingredients to match whatever holiday or mood strikes you. If you’re looking for more ways to infuse seasonal fun into your kitchen, I’ve got a whole section dedicated to festive ideas, including some wonderful ideas from Christmas chocolate desserts that can easily inspire future bark creations!
Here are three of my favorite easy ways to spin our basic Pink Chocolate Bark into something totally new:
- Minty Kiss Bark: This swap is fantastic if you want to move away from the holiday colors. Instead of pink candy melts, use white chocolate for the top layer too! Once the white chocolate is melted, stir in about a half teaspoon of pure peppermint extract right before you pour it. Top it with crushed candy canes or dark chocolate shavings instead of conversation hearts. It’s refreshing and so clean tasting!
- Nutty Caramel Delight: If you need something richer and crunchier, trade out the M&Ms for texture. After you finish swirling the pink layer, sprinkle on some coarsely chopped, lightly toasted pecans or walnuts—get them lightly browned first for that depth of flavor. Then, drizzle thin lines of store-bought caramel sauce over everything before it sets. This takes it from a cute treat to a seriously decadent one!
- Raspberry Tartness Burst: For those who love that tart/sweet combo, this variation is my go-to. Skip the pink candy melts entirely. Once your white layer is spread, use only dark chocolate for the drizzle (melted down as usual). Before it completely sets, scatter freeze-dried raspberries over the top. The tartness of the berries cuts through the richness of the dark chocolate beautifully. It looks incredibly dramatic, too!
See? A few simple tweaks and you’ve got three completely different types of chocolate bark ready for gifting or showing off at your next gathering.
How to Store and Gift Your Pink Chocolate Bark
Once you’ve managed that beautiful swirl and your Pink Chocolate Bark is snapped into perfect pieces, the next challenge is keeping it perfect until it’s time to share it. Chocolate is surprisingly sensitive to changes in environment, so you want to get this right if you want to preserve those gorgeous colors!
Generally, this homemade bark is happiest at cool room temperature. Keep it in a truly airtight container—I mean really sealed tight—away from direct sunlight or heat. It should stay fresh like this for about a week. If your kitchen runs warm, or if you’re making these far in advance for your Valentines Dessert Ideas spread, popping it in the fridge for an hour to firm up before wrapping is just fine. Just make sure it’s covered, or it can sometimes absorb smells!
For gifting, which is what this bark is made for, keep it simple. Layer the pieces between squares of parchment paper inside a cute tin or a small cellophane bag tied up with a bright pink ribbon. That presentation speaks volumes without saying a word. Everyone loves getting something clearly made with care, and this no-fuss confection delivers that heartfelt touch every single time!
Frequently Asked Questions About Pink Chocolate Bark
I know when I first started trying to master chocolate work, I had a million questions about seizing and setting times. It’s totally normal to wonder about the details, especially when trying to make something that looks as perfect for Valentines Day Dessert Ideas as this bark does! I’ve put together some of the things I got asked most often when I first shared this recipe with friends.
If you want to know more about my culinary perspective or how I test things here at Top Chicken Eats, you can always take a peek at my About Me page!
Can I use regular pink food coloring in white chocolate for this Pink Chocolate Bark?
That’s a fantastic question for anyone trying to get that perfect custom shade! You see, the recipe uses pink candy melts, and those already have the color baked right in, which is why they melt so beautifully. If you decide to use the white chocolate baking bars instead and you want to tint them pink, you absolutely need to be careful about the colorant you choose.
Water-based food coloring is the enemy of smooth chocolate! If you add even a drop of water-based coloring to your melted white chocolate, it gets angry, moisture shocks the cocoa butter, and your smooth pool of white turns into gritty sludge—we call that seizing. Always, always use an oil-based food coloring or a specialized confectioner’s color dust. That way, you keep that glorious texture we worked so hard for!
What is the best way to ensure my layers don’t mix when making Valentines Day Treats?
This is the absolute make-or-break moment for getting that dramatic, layered look that makes this recipe so special for Valentines Day Treats. You are fighting against time and temperature here!
The secret isn’t waiting until the layer underneath is rock hard—if it’s too cold, the next layer won’t adhere and it’ll crack right off later when you try to break the bark. The magic is hitting that ‘mostly set but still slightly tacky’ window. You should be able to gently run your finger across it and leave the faintest impression without getting sticky residue on your skin. If you nail that timing, the next layer bonds perfectly, and the swirl you create stays beautifully defined!
Estimated Nutritional Information for Pink Chocolate Bark
Now, I know when we’re making something this delightful, we aren’t usually worried about counting every single calorie, but I always like to give folks a general idea of what they are enjoying! Since this recipe makes one huge sheet of bark that we then break apart, these numbers really depend on how big of a piece you decide to grab—and let’s be honest, those edge pieces look way better!
Keep in mind that because we are using various types of chocolate, plus whatever fun candies and sprinkles you decide to load on top, these figures are just educated guesses. The candy choice can really swing this one way or the other!
For an estimated serving size (about 1/12th of the finished sheet), here’s what you might be looking at:
- Calories: Roughly 240–280 kcal
- Total Fat: Around 14–17g (It’s chocolate, so there’s healthy fat in there, mostly saturated!)
- Protein: About 3g
- Total Carbohydrates: Approximately 28–35g (This does include the sugar from the melts and candy toppings)
This is a wonderful, easy no bake chocolate dessert that feels like a real indulgence but comes together so fast. Enjoy it responsibly, and remember that a little bit goes a long way when the flavors are this rich!
Share Your Galentines Aesthetic Creations
Whew! That’s our beautiful Pink Chocolate Bark ready to go. I hope you found the process as satisfying as I do. There’s just something about looking at that finished slab—all pink and playful—that makes me instantly happy, perfect for any Galentines Aesthetic party you might be planning!
Now, I absolutely live to see what you all create in your kitchens. Did you go heavy on the sprinkles? Did you try the raspberry variation I mentioned? Please, don’t be shy! Come back here and let me know how it turned out. Five stars? Tell me all about the toppings you chose in the comments below!
If you snap a photo of your gorgeous, shareable Pink Chocolate Bark, tag me on social media! I try my best to share my favorites on my feed. If you have any questions about ingredient swaps or need a little culinary historian gossip, you can always get in touch with me directly through my contact page. Happy sharing, everyone!
Pink Chocolate Bark
Ingredients
Equipment
Method
- Line a 12″x18″ cookie sheet with parchment paper and set it aside.
- Heat the dark chocolate chips in a microwave-safe bowl for 30 seconds. Stir well. Continue heating in 15-second increments, stirring after each time, until the chocolate is completely smooth and melted.
- Pour the melted dark chocolate onto the parchment paper and spread it into a thin layer.
- Set the pan aside at room temperature for about 10 minutes, or until the dark chocolate is mostly hardened but still slightly soft.
- While the dark chocolate sets, break the white chocolate baking bars into squares and place them into a microwave-safe bowl. Heat for 30 seconds, then mix well. Continue heating in 15-second increments, stirring well after each time, until the white chocolate is completely smooth and melted. Set aside.
- Put the pink candy melts into a microwave-safe bowl. Heat for 30 seconds, stir well, and continue heating in 15-second increments until smooth and melted.
- Pour the melted white chocolate over the dark chocolate layer and spread it out quickly.
- Immediately drizzle the melted pink candy melts over the white chocolate layer.
- Gently run a toothpick through the pink and white layers to create a marble swirl pattern. Try to avoid disturbing the dark chocolate layer underneath.
- Sprinkle the Valentine’s Day candy and sprinkles over the top.
- Let the chocolate bark harden and set completely at room temperature for about 30 minutes to 1 hour.
- Break or cut the bark into pieces to serve. A pizza cutter works well for making even pieces.