
There’s just something magical that happens when you take two icons of comfort food—the gooey, dreamy grilled cheese sandwich and the handheld perfection of a classic burrito—and smash them together. Trust me, as someone who’s spent years studying the history of satisfying food, that mashup is pure genius. If you’ve ever craved that deep, savory, cheesy satisfaction you get from a Taco Bell-style creation but wanted to nail the texture perfectly in your own kitchen, this is your moment.
I’m James Porter, and being a Texan, I’ve basically been raised on cheesy, hearty food! This recipe for the ultimate Grilled Cheese Burrito delivers that crispy, cheesy crust on the outside while keeping the inside packed with rich, flavorful fillings. We’re ditching the fast-food compromise; we’re going for homemade perfection where every step counts. It’s wildly indulgent, surprisingly easy, and honestly, I think it’s one of the best food ideas out there right now.
Why You Will Love This Grilled Cheese Burrito Recipe
If you’re looking for genuinely satisfying comfort food, stop searching! This recipe isn’t just filling; it’s a textural masterpiece. We’re taking familiar flavors and making them better than you remember from your last late-night run.
- The contrast is unbeatable: ridiculously crispy, buttery cheese crust outside meets a warm, gooey filling inside.
- It’s packed with flavor—that smoky chipotle mayo really takes it up a notch!
- Even though it has a few components, I promise these are some of the best food recipes for weeknights because the assembly is so fun.
Essential Components for the Perfect Grilled Cheese Burrito
Before we get to the fun part—grilling that amazing crust—we have to build the inside right. Trust me on this; it’s not just about throwing meat and cheese together. It’s about layering savory, moist, and crunchy textures so it holds up when we sear it! Think of it like building a tiny flavor fortress inside that tortilla. We’re breaking this down into the three key homemade elements that really make this Grilled Cheese Burrito taste miles better than anything you get on the fly.
Here’s what you need to gather up before assembly begins:
Ingredients for the Mexican Rice Component
We make our rice from scratch—it helps keep things moist! Don’t skip the resting period on this part, it truly helps the texture turn out perfect. This is foundational stuff here.
- 1 cup long grain white rice
- 1 tablespoon avocado oil
- 1.5 cups chicken broth low or no sodium
- 4 ounces tomato sauce
- 0.5 teaspoon onion powder
- 0.5 teaspoon garlic powder
- 0.5 teaspoon chicken bouillon
- 0.25 teaspoon salt
Ingredients for the Taco Meat Filling
A hearty meat base is non-negotiable. We’re mixing up a rich, savory blend of spices here to give this filling some real depth. This classic seasoning profile is what makes your **Grilled Cheese Burrito** filling shine.
- 1 pound ground beef
- 1 tablespoon chili powder
- 1 teaspoon ground cumin
- 0.75 teaspoon salt
- 0.5 teaspoon garlic powder
- 0.5 teaspoon onion powder
- 0.5 teaspoon dried oregano
Ingredients for the Chipotle Mayo Sauce
Oh boy, this sauce! It’s smoky, it’s creamy, and it adds that perfect kick. You absolutely need a small blender or food processor for this part to get it nice and smooth. This sauce is absolutely key to the flavor profile of the **Grilled Cheese Burrito**.
- 0.75 cup mayonnaise
- 0.25 cup sour cream
- 2 tablespoons lime juice (approx 1 small lime)
- 1 teaspoon honey
- 2 count chipotle chiles in adobo sauce
- 1 teaspoon garlic powder
- 0.5 teaspoon smoked paprika
- 0.25 teaspoon salt
Final Assembly Ingredients for the Grilled Cheese Burrito
Once your rice is fluffy and your meat is seasoned, it’s time for the wrapper and the cheese that makes this whole thing work. You’ll want sturdy tortillas—burrito size is the only way to go if you want that satisfying weight! We need that shredded cheese to melt both inside *and* out.
- 8 large tortillas (burrito size)
- 2 cups Mexican Rice (cooked)
- 1 pound taco meat
- 1 cup tortilla strips
- 0.75 cup nacho cheese sauce (warmed)
- 0.5 cup sour cream
- 0.5 cup chipotle mayo
- 1 cup Mexican cheese blend (shredded)
How To Make Grilled Cheese Burrito At Home: Step-by-Step
Now for the fun part! Making this **Grilled Cheese Burrito** at home is easier than you think, even with the separate components. While it seems like a lot of steps, these are really easy cooking recipes once you get into the flow. Remember what I always preach about texture? We want that soft, juicy interior balanced perfectly against a golden, crunchy exterior. That’s what we’ll achieve by handling each component carefully leading up to that final, glorious grill.
Preparing the Mexican Rice for Your Grilled Cheese Burrito
This rice is important because it stops the burrito from getting soggy later. Don’t rush this part—the resting time is key for fluffy, not mushy, rice!
- First things first, get that rice going. If you’re buying pre-made, fine, but making it fresh is so much better. Heat the avocado oil in a skillet over medium heat. Add the long grain white rice and toast it up until it looks nice and white.
- Now, pour in the chicken broth and the tomato sauce. Stir everything up, and toss in all those rice seasonings—onion powder, garlic powder, bouillon, and salt.
- Bring this mixture up to a simmer, then quickly reduce that heat way down low. Cover it up tight! Let it cook for a full 25 minutes.
- When the timer goes off, DO NOT lift that lid! Take the skillet off the heat and just let it sit there, covered, for another 10 minutes. This steam finish is everything. Finally, open it up, give it a good stir to fluff it, and incorporate that sauce again if it settled.
Cooking the Taco Meat Filling
This is straightforward comfort food building. We want rich flavor, not greasy filling!
- Brown that ground beef in a clean skillet over medium heat. Make sure you crumble it as it cooks down so you don’t have giant chunks.
- Once it’s totally browned and no pink is showing, you have to drain off every drop of excess grease. I usually tilt the pan and use a paper towel to mop up what’s left.
- Toss in your taco seasonings—chili powder, cumin, oregano, cumin, onion/garlic powder, and salt. Stir it around until the meat is evenly coated and smells incredible. Set this aside.
Mixing the Creamy Chipotle Mayo
If you want that smoky depth you find in restaurant-style dips, you need to blend this sauce properly. Get your small blender ready for this one—we are aiming for pure silk here. This sauce adds seriously amazing depth to the **Grilled Cheese Burrito**!
- Toss your mayonnaise, sour cream, lime juice, honey, those two chipotle chiles in adobo (don’t forget the sauce they come in!), garlic powder, smoked paprika, and salt all into your blender.
- Hit the pulse button and then blend until it is completely smooth. Seriously check the texture; you don’t want chunks of chile skin in this!
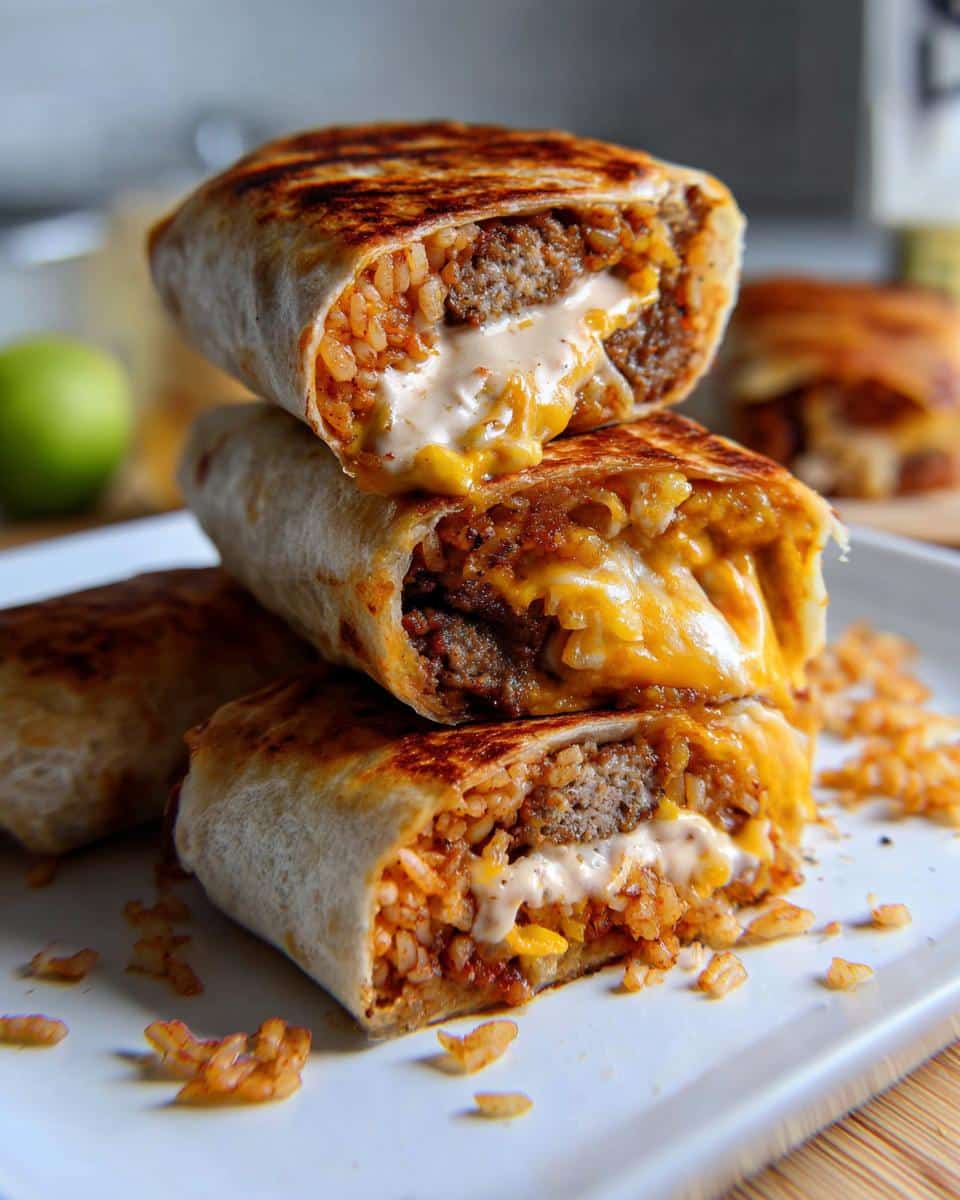
Assembling and Rolling the Burritos
Time to layer! Think about structure here. We want the wet ingredients in the middle, surrounded by rice, and the tortilla to seal everything in neatly. A tight roll means a sturdy burrito that won’t bust open when it hits the grill. This assembly is crucial for a successful **Grilled Cheese Burrito**.
- Lay out one large tortilla. Start by spooning down the Mexican rice, leaving about two inches clear around the edges.
- Layer on your taco meat next, followed by a sprinkle of those crunchy tortilla strips—they add great inner texture!
- Drizzle on the warmed nacho cheese sauce, throw a dollop of sour cream, and then your chipotle mayo.
- Top it all with a nice scattering of the shredded Mexican cheese blend.
- Fold in the sides tightly, then pull the bottom flap up over the fillings and roll it firmly forward, keeping everything tucked in. Roll it seam-side down and place it on a plate. Repeat until all eight are done!
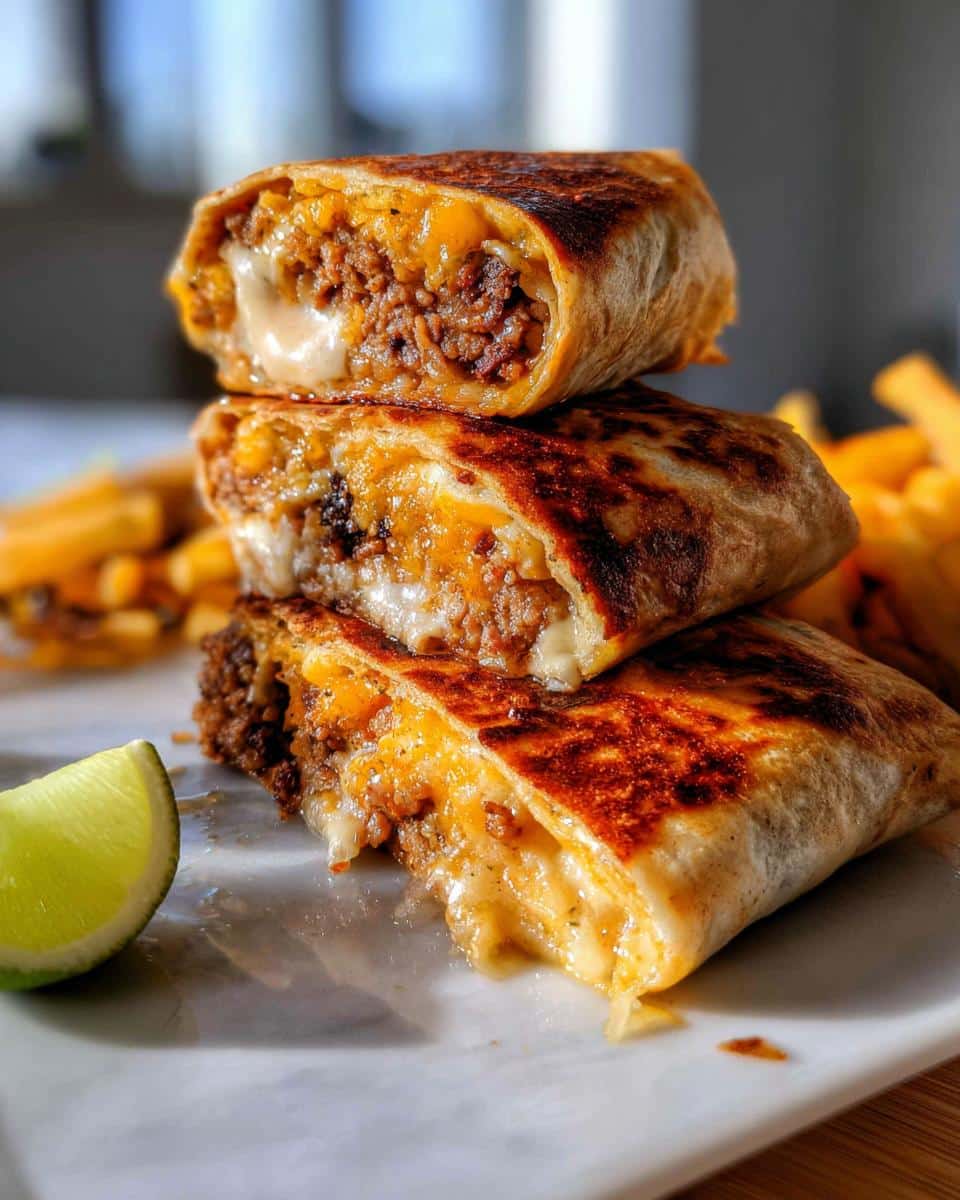
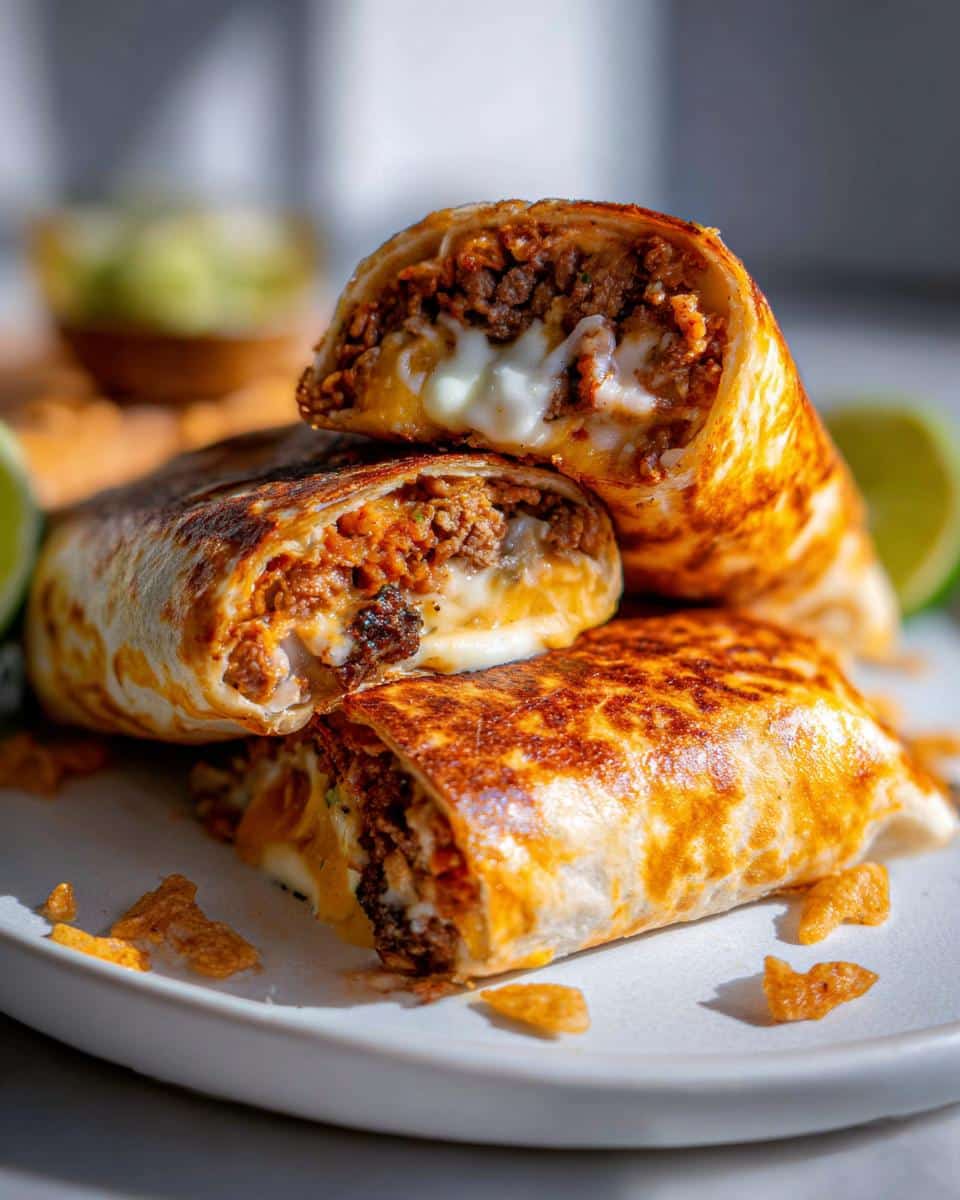
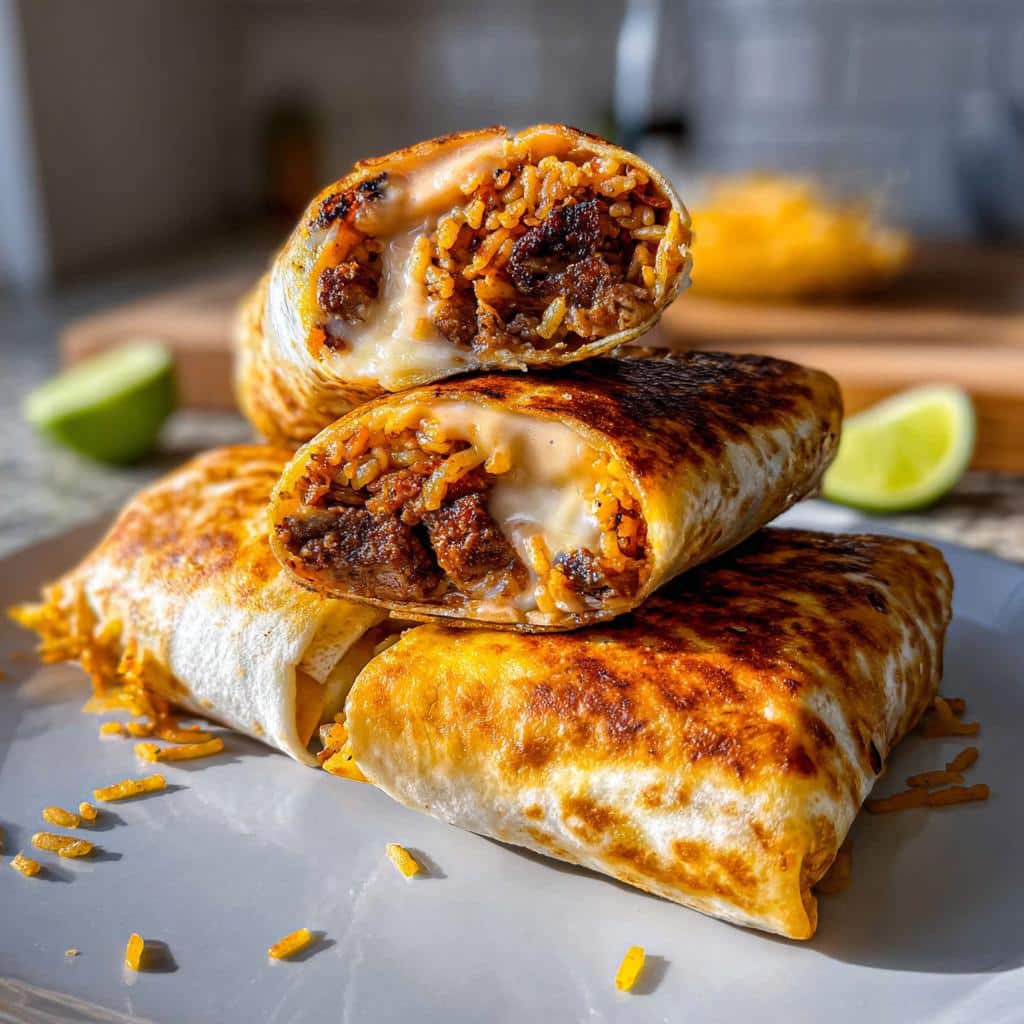
Grilling the Cheese Crust for the Ultimate Grilled Cheese Burrito
This is the grand finale, folks! This step turns a great burrito into the iconic **Grilled Cheese Burrito**. You need a good flat skillet or griddle heated over medium heat. Patience here means a golden crust, not burnt asphalt!
- Sprinkle a generous handful of shredded cheese right onto the skillet surface where you plan to cook the first burrito. Let this melt completely—it needs to create a nice little cheese puddle.
- Gently place your wrapped burrito directly seam-side down onto that melted cheese. Let it cook undisturbed for about 2 minutes until that cheese sticks and gets golden brown and toasty.
- Here’s the trick: Sprinkle another small handful of cheese *next* to the first burrito. Flip the burrito over carefully with a spatula so the cooked side lands directly onto this new layer of melting cheese.
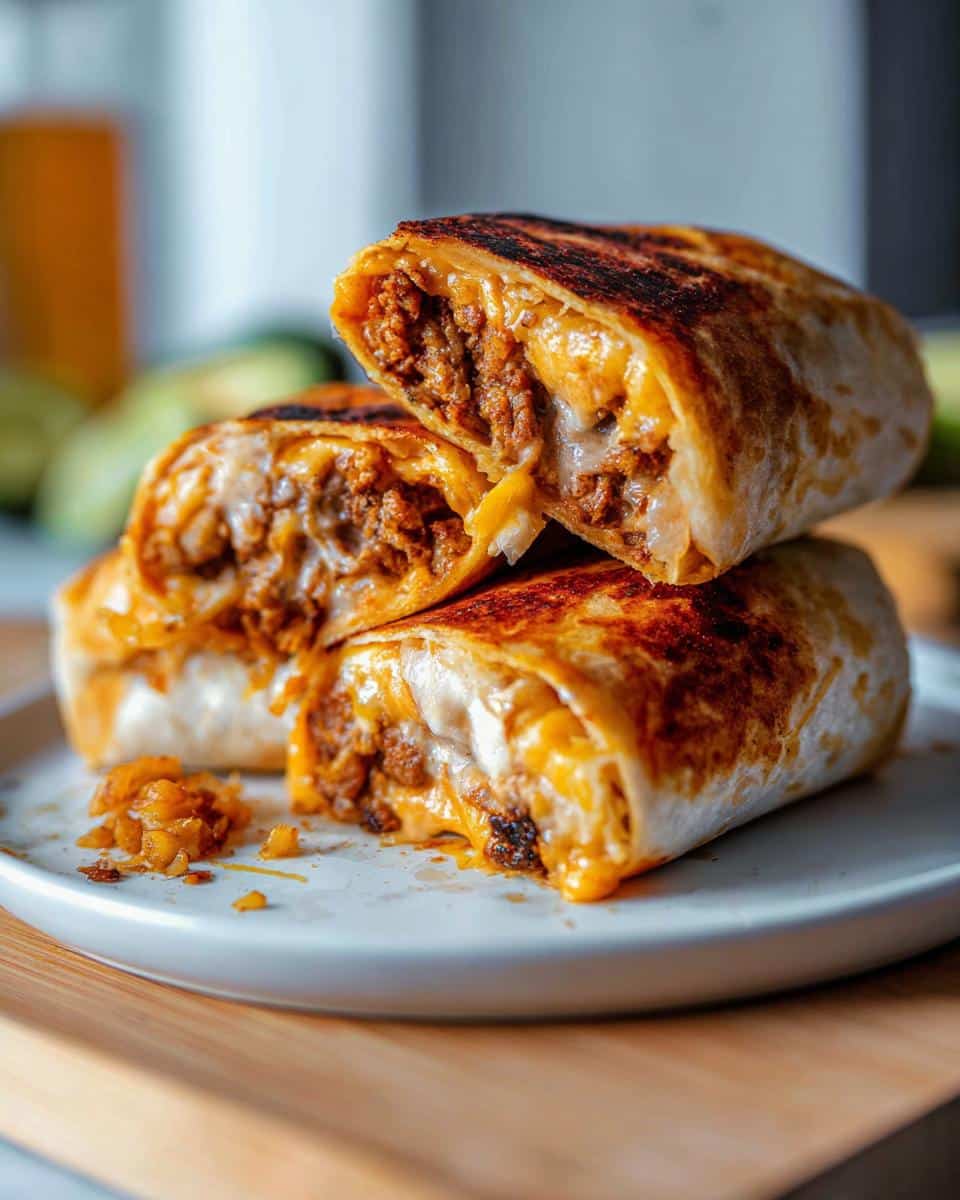
- Let that second side cook for another 2 minutes until it’s just as gorgeous. You’re basically creating twin melted cheese shells!
- Remove the **Grilled Cheese Burrito** from the skillet and set it aside while you repeat the process for the rest. They heat right through as they sit!
Tips for Success Making a Crispy Cheese Burrito
Listen, making this work isn’t about complicated steps; it’s about respecting the heat. When you’re dealing with direct cheese-to-skillet action, temperature control is everything. If your skillet is too hot, you’ll burn the cheese before the inside of your amazing fillings gets warm enough. That’s why I consider this one of the most rewarding and frankly, one of the good recipes—because mastering that heat yields such a huge payoff!
As a historian of comfort food, I can tell you the difference between a good result and an epic one often comes down to choosing the right wrapper.
Choosing the Right Tortilla is Non-Negotiable
You cannot use those tiny street taco size tortillas for this project, no matter how hard you try! If you use small ones, the filling will explode out the sides as you try to flip them. Stick to commercial burrito-sized, large flour tortillas. They have to be pliable enough to hold the filling tightly but sturdy enough to withstand grilling without tearing.
I always warm mine slightly in the microwave for about 15 seconds right before rolling. This makes them stretchier and prevents cracks when you start tucking in those corners.
Controlling the Heat for the Perfect Cheese Crust
When you sprinkle that shredded cheese onto the hot pan, you’re trying to form a single, cohesive, lacy blanket of cheese that adheres to the tortilla. This needs a medium, consistent heat. If you cook the first side too fast, the cheese burns and tastes bitter before it has a chance to bond properly.
My advice is to test the pan first. If you sprinkle a tiny pinch of cheese and it smokes immediately, pull the pan off the heat for 30 seconds to cool down. You want that cheese to melt gently until it’s bubbling and turning golden, not instantly crisping up and burning away.
The Importance of a Good Cheese Spreader
Since you’re cooking eight of these, you’ll notice that the first burrito often cooks the fastest. Don’t just rely on flipping it once! You need to press down gently with your spatula when the cheese is melting on the second side. This pressing action helps the outside cheese layer marry up with the cheese that’s already inside your burrito.
Don’t crush it flat—remember, we want contrast, not a pancake! Just a gentle, firm press to ensure maximum surface contact between the tortilla and that glorious melted cheese blanket.
Ingredient Notes and Substitutions for Your Recipe
When you’re making something this indulgent, you might worry about tweaking the ingredients, especially if you’re watching what you eat or if you’re missing something in the pantry. But don’t sweat it too much! I like to share that while tradition matters, we need easy recipe ideas that work with what we have.
That said, some parts just can’t be swapped if you want that signature crisp/gooey experience. Let’s talk about those swaps—and the parts you absolutely should keep the same.
Swapping Out the Beef
The ground beef provides that salty, classic taco profile we’re aiming for, but if you’re not doing beef this week, you have options! I’ve tested this successfully using ground turkey or even ground chicken. You just have to be a little more mindful when cooking it, as poultry tends to dry out faster.
When using leaner meats, add just a tiny splash of water or broth when you add the taco seasoning. This steams the meat slightly and keeps it from turning into chalky crumbs. Flavor-wise, they work just fine in this heavy hitter of a burrito!
Rice Alternatives for the Filling
See how our rice component is nice and fluffy? That texture helps cushion the interior. If you’re trying to cut back on carbs, you could swap that cooked Mexican Rice for cauliflower rice. It works in a pinch!
Just be careful: cauliflower rice holds far more water than grain rice. If you use it, you MUST cook it down until it’s very dry before mixing it into the assembly line. Soggy cauliflower rice equals a soggy burrito center, and we can’t have that!
The Non-Negotiable Tortilla Rule
This is the one area where I draw a firm line in the sand, okay? Do not mess with the flour tortillas here. You need that large, sturdy, burrito-size tortilla. I tried using medium fajita tortillas once because that’s all I had, and the filling burst out the sides the second I started grilling it—chaos!
The structure of the large tortilla is what allows you to tuck everything in tightly enough to survive that cheese sear. If you use smaller ones, you’ll probably end up with eight tiny, cheesy, messy taco-like things, which is fine, but it’s not the glorious **Grilled Cheese Burrito** we worked so hard to build!
Serving Suggestions for Your Grilled Cheese Burrito Dinner
Wow, you’ve done it! You’ve made this spectacular, cheesy, deeply satisfying meal. But now you’re sitting there with this golden-brown brick of glory, and you might be thinking, “What on earth do I feed my family alongside this?” Since this Grilled Cheese Burrito is incredibly rich—we’ve got meat, rice, and cheese grilled in more cheese—we need sides that offer bright contrast. We’re looking for acidity and freshness to cut right through all that incredible fat!
Honestly, this recipe is so hearty that it anchors any meal perfectly. If you were searching for **Quick Dinner Ideas**, congratulations, you found the star! But here are a few simple things I love to put on the plate next to it.
Freshness is Key: Balancing the Richness
The best pairings are those that use raw vegetables and sharp citrus flavors. They just wake up your palate after biting into that heavy cheese crust.
- Quick Cabbage Slaw: I mean really quick! Toss shredded green cabbage with a splash of apple cider vinegar, a teaspoon of sugar, and a pinch of salt. Let it sit for 15 minutes. The crunch and the vinegar cut right through the richness of the taco meat and fried cheese beautifully.
- Pico de Gallo or Fresh Salsa: Nothing beats real cilantro, onion, tomato, and lime juice. If you have a few extra minutes, making a fresh pico is way better than store-bought here. The acidity of the lime juice is non-negotiable for balance.
- Simple Sliced Avocado: Even just slicing a ripe avocado and sprinkling it with some flaky salt and a heavy squeeze of lime juice works wonders. It adds a lovely soft, healthy fat against the crispy tortilla.
Don’t Feel Guilty About Dips!
Even though we put chipotle mayo inside, you absolutely need dipping sauces because this is comfort food, and comfort food demands extra sauces! Luckily, this burrito works well with cooler, fresher dips.
Always serve extra chipotle mayo—I just make a double batch in case people want more! But you can also offer a small bowl of plain Greek yogurt or sour cream mixed with lime zest if you want something cooling straight from the fridge.
When You Need a Lighter Side Dish
Sometimes you just want soup, right? While this is a massive dish on its own, if you’re serving a crowd or just want something to sip, keep the soup light. Skip the creamy chili and go for something bright!
A simple, clear tortilla soup base or a thin black bean soup works wonders because it doesn’t compete with the heavy profile of the grilled cheese components. Think of it filling the empty spots on the plate without overwhelming your stomach!
Storage and Reheating Instructions for Leftover Grilled Cheese Burrito
Okay, so you made eight of these glorious piles of gooey, cheesy goodness, and you actually have leftovers. Good job! That means you planned ahead, because this is definitely one of those tasty recipes that tastes almost as good the next day—*if* you store and reheat it correctly. We absolutely have to keep that crispy, grilled cheese crust intact, right?
Don’t even think about making these ahead to eat cold. The best part is the sear, and steam is the mortal enemy of crispiness. That means we need to avoid the microwave if crispiness is your goal!
How to Store Your Grilled Cheese Burrito
Storing these correctly is simple, but make sure you let them cool down slightly before you wrap them up. If you wrap them hot, condensation builds up, and we’re back to soggy town, and trust me, no one wants a limp **Grilled Cheese Burrito**!
- Wait until the burritos are just warm to the touch, maybe 15 minutes after you pulled them off the skillet.
- Wrap each one individually TIGHTLY in plastic wrap. This keeps the interior fillings from drying out and locks in that smoky mayo flavor.
- Then, place the wrapped bundles into an airtight container or a heavy-duty zip-top bag.
- These beauties will keep in the refrigerator for up to 3 days. Any longer, and the tortilla really starts to degrade against the fillings.
The Only Way to Reheat: Skillet Revival
I know, I know, the microwave is faster. But if you use the microwave, you get a hot, soggy tortilla with lukewarm cheese inside. We want that crackle!
The absolute best way to bring this back to life is right back on the skillet where it was born. This low-and-slow revival process takes a little patience, but it restores about 90% of that freshly grilled crunch.
Heat up a clean, dry skillet (or griddle) over medium-low heat. You don’t need extra butter or oil here; the cheese that survived the initial fridge stay is enough to prevent sticking. Place the cold burrito seam-side down and let it sit there—this is the heating stage.
It will take about 8 minutes total to warm through completely, but flip it every 2 minutes or so. Once it starts smelling amazing and feels hot all the way through when you press it, you’re ready. That exterior cheese layer will melt and crisp up again, giving you that satisfying crunch you deserve.
Can I Freeze the Leftovers?
While I haven’t tested freezing these long-term, I wouldn’t strongly recommend it for the full **Grilled Cheese Burrito**. Freezing and thawing really messes with the texture of the rice and can make the tortilla mushy once reheated, even if you try to crisp it up later.
If you absolutely must freeze them, wrap them tightly in plastic, then foil, and store them flat so they don’t get squished. When thawing, put them straight into the fridge overnight before attempting the skillet reheat mentioned above. For best results though, stick to 3 days in the fridge!
Frequently Asked Questions About the Grilled Cheese Burrito
It’s natural to have questions when you’re merging two famous comfort dishes into something new! I get asked all the time about the best cheese or if this whole thing is too complicated for a Tuesday night. Since these are some of the most interesting food recipes out there right now, let’s clear up those final doubts!
Is the Grilled Cheese Burrito hard to make?
Not at all! I promise you, the technique is straightforward. Yes, we have three main components to prep—the rice, the meat, and the creamy sauce—which sounds like a lot, but each part is very simple, which is why this lands squarely on my list of easy food recipes. The secret is making the components ahead of time. If you have the rice and meat ready, assembly and grilling the cheese crust take less than 15 minutes!
What cheese melts best for the exterior crust?
This is crucial for that golden, crispy layer. While the inside calls for a Mexican blend to keep the flavor authentic, for the OUTSIDE crust, you need something that melts beautifully and browns evenly. I always recommend using finely shredded Monterey Jack or a good quality Colby Jack for the exterior grill surface.
These cheeses melt smoother and achieve that perfect golden-brown color without separating or burning too fast, which is exactly what you want happening on that hot skillet when you flip the burrito!
Can I make this Grilled Cheese Burrito in an air fryer?
You certainly can try, but I have to give you a little warning here. The air fryer is amazing for crisping, but it cooks all around the food. When we make the skiller version, we are applying direct, intense heat to the cheese layer, causing it to liquefy and then adhere to the tortilla, creating that unique, craggy crust.
If you use an air fryer, you need to heavily grease the basket underneath the burrito, or the cheese might just melt off into the machine! For the authentic, slightly messy, fried-cheese texture that makes the **Grilled Cheese Burrito** famous, stick to the skillet.
Nutritional Estimates for This Tasty Recipe
Look, I’m trained as a culinary historian, and while I can tell you exactly *why* this flavor combination works across the decades, when it comes to exact science like nutrition facts, I’ve got to be honest with you all—I’m a cook, not a certified nutritionist!
Because we are using 8 servings for this recipe, the per-burrito estimate is surprisingly manageable for how much food you get! But remember, since this is a homemade recipe, the numbers can swing based on what brand of ground beef you buy or how much cheese you sneak into the middle when I’m not looking (I see you!).
Please take all the figures below as a general guide, not a strict mandate. For the most accurate information, you’d need to plug the exact brands and weights you used into a dedicated nutrition calculator. This note is basically my way of saying, “These are just helpful starting points, folks!”
Here is a general estimate breakdown based on the ingredients listed for one full **Grilled Cheese Burrito**:
- Calories: Approximately 680 – 750 kcal
- Protein: Around 30 – 35g
- Fat: Roughly 38 – 45g (This is where the cheese grill adds up!)
- Carbohydrates: About 55 – 65g
This is definitely an indulgent dish. It falls squarely in the hearty dinner category based on those figures, but it’s perfect for a night when you need serious comfort food! If this is too much for your regular rotation, just remember what I always say: leftovers are great if you reheat them right in the skillet, as detailed in the storage section. For more official disclaimers about recipe calculations, you can always check out the information over at Top Chicken Eats.
Share Your Experience Making This Comfort Food Burrito Idea
Well, friend, we’ve made it to the end! We’ve folded, spiced, simmered, and grilled our way to one of the most satisfying, artery-cloggingly delicious meals I can imagine. I genuinely hope your kitchen smells as amazing as mine does right now!
Making food is a conversation, so I truly want to hear what you thought. Did you manage to get that cheese crust perfectly crispy? Did you manage to keep the whole thing tucked in? I want to know all the details!
Leave a Rating and Tell Me Your Filling Secrets
If you enjoyed this recipe and found it easy to follow, please take a second to click those stars and give it a rating! It helps other home cooks find these amazing comfort food ideas.
Also, be honest: did you stick to the plan, or did you throw in something wild? Maybe you used carnitas instead of ground beef? Or perhaps you added some pickled jalapeños because you like the heat? Serious **Cooking Ideas** are shared in the comments, so drop your best tip below!
When To Make This Again
This isn’t an everyday recipe—it’s too special for that! This is the dish you make when you need a serious flavor hug or when the game is on and you need something utterly substantial to hold onto. If you were looking for some new **Easy Meals** to bookmark for high-impact dinners, you just found one!
I encourage you to bookmark this page and pull it out next time you’re craving bold, cheesy flavor that truly hits the spot. It’s all about honoring those classic flavor pairings we love so much.
I’m James Porter, and I love exploring how our favorite dishes tell the stories of where we came from. Thanks for cooking with me today. Happy eating, and I’ll see you in the next recipe!
Grilled Cheese Burrito
Ingredients
Equipment
Method
- Prepare the rice. If using store-bought, follow package directions. If making from scratch, heat the avocado oil in a skillet over medium heat. Add the rice and cook until it appears bright white.
- Pour in the chicken broth, tomato sauce, and add the seasonings. Stir and bring this to a simmer. Reduce the heat to low, cover with a lid, and let cook for 25 minutes.
- After 25 minutes, remove from the heat, set aside, and keep the lid on for an additional 10 minutes before opening.
- Once you open the lid, stir the rice to fluff it up and stir in the tomato sauce again.
- Cook the ground beef in a medium skillet over medium heat, crumbling as it cooks. Once the beef is browned and no longer pink, drain any excess grease. Add the taco seasoning to the beef and stir to combine.
- To a small blender or food processor, add the mayonnaise, sour cream, lime juice, honey, chipotle chiles, smoked paprika, garlic powder, and salt. Blend until the sauce is smooth.
- Assemble the burritos by layering rice, taco meat, tortilla strips, nacho cheese sauce, sour cream, and chipotle mayo. Roll the burrito and place it aside seam-side down. Continue until all burritos have been assembled.
- Heat a large skillet or griddle over medium heat.
- Sprinkle a handful of the shredded Mexican cheese on the skillet and allow it to melt.
- Place the burrito seam side down onto the melted cheese and allow this to cook for about 2 minutes. Then sprinkle another handful of cheese next to the burrito on the skillet. Using a spatula, flip the burrito over so the other side is now on the new melted cheese. Continue to allow this to cook an additional 2 minutes. The cheese should be toasted and golden on both sides.
- Remove the burrito from the skillet, set aside, and continue until all burritos have been grilled.
- Serve the burritos warm with additional chipotle mayo for dipping.