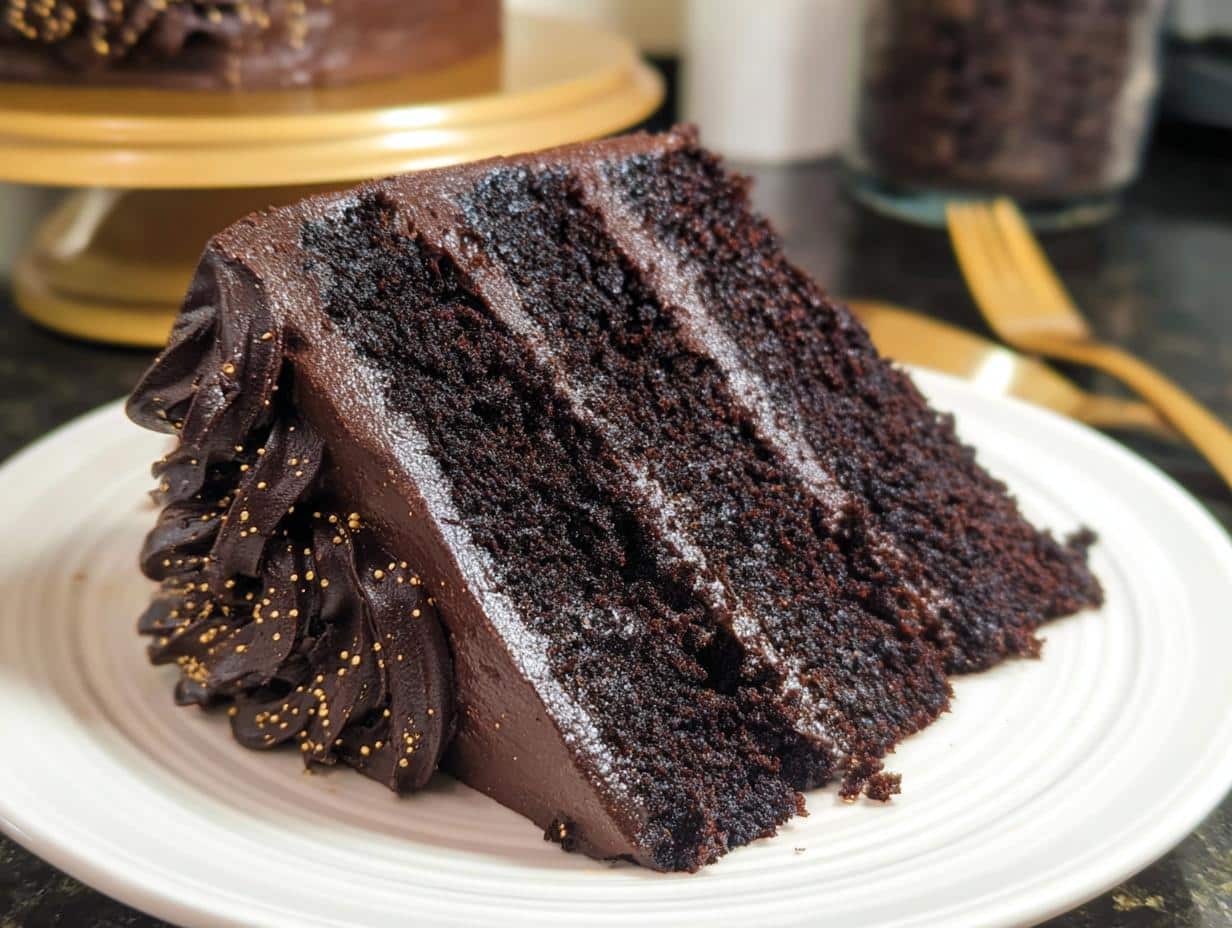
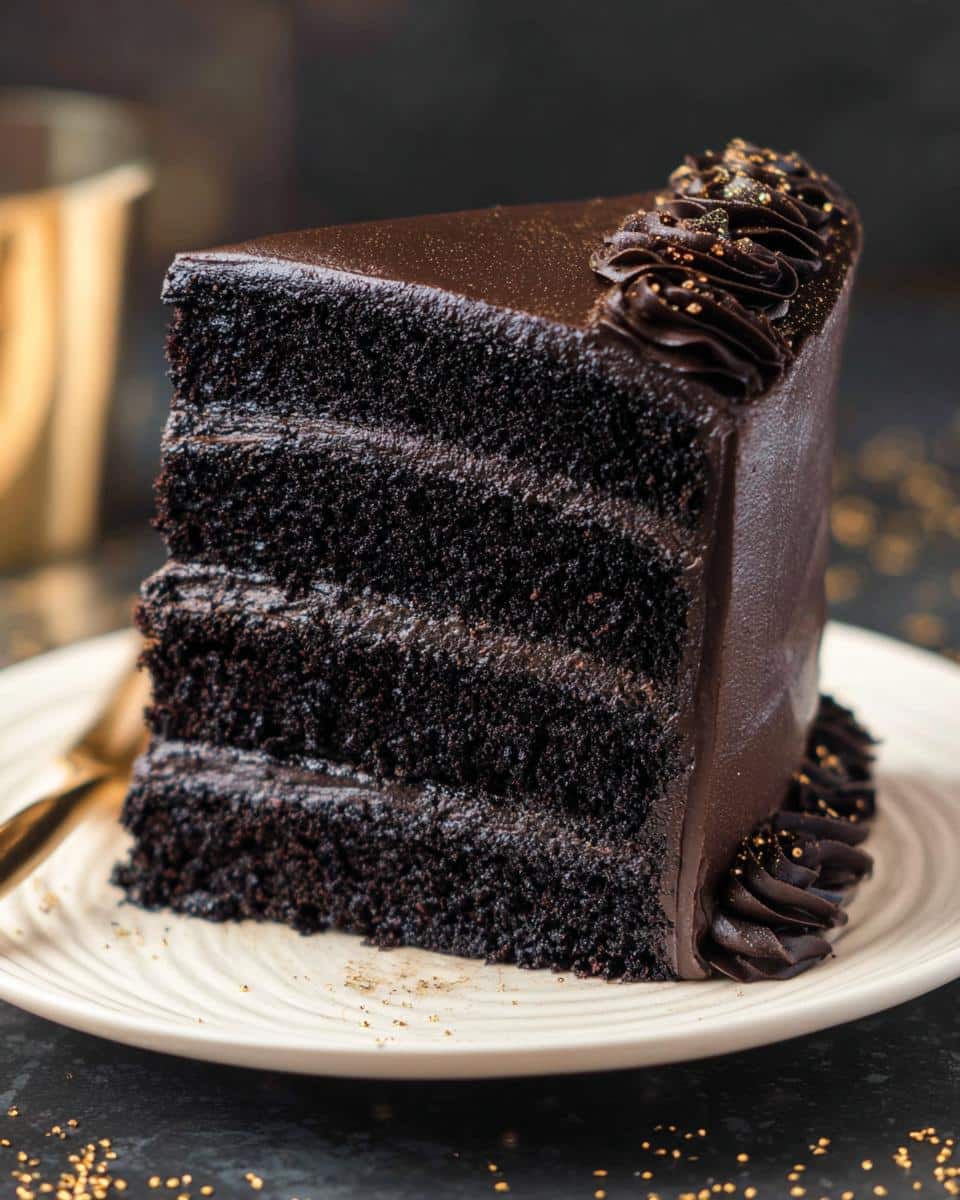
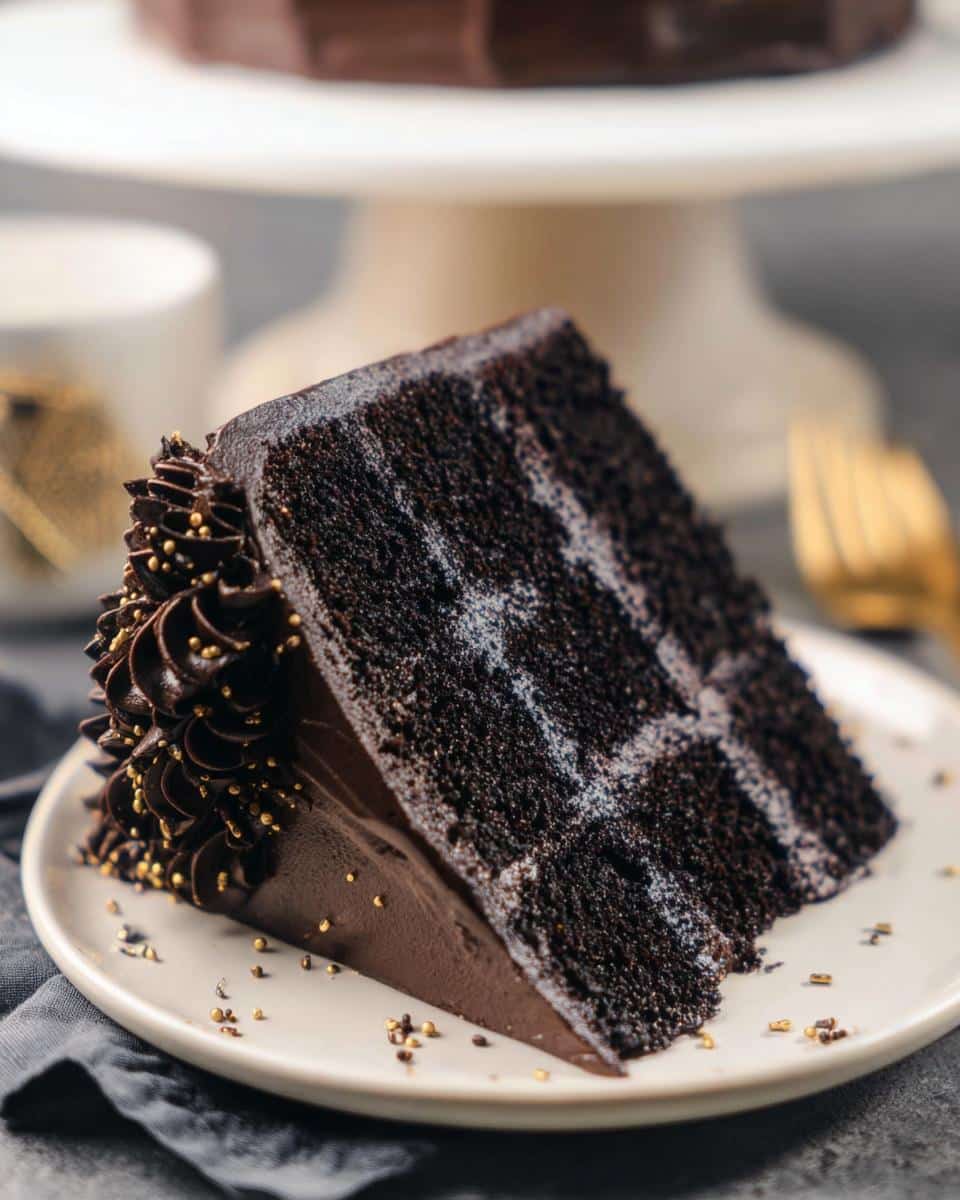
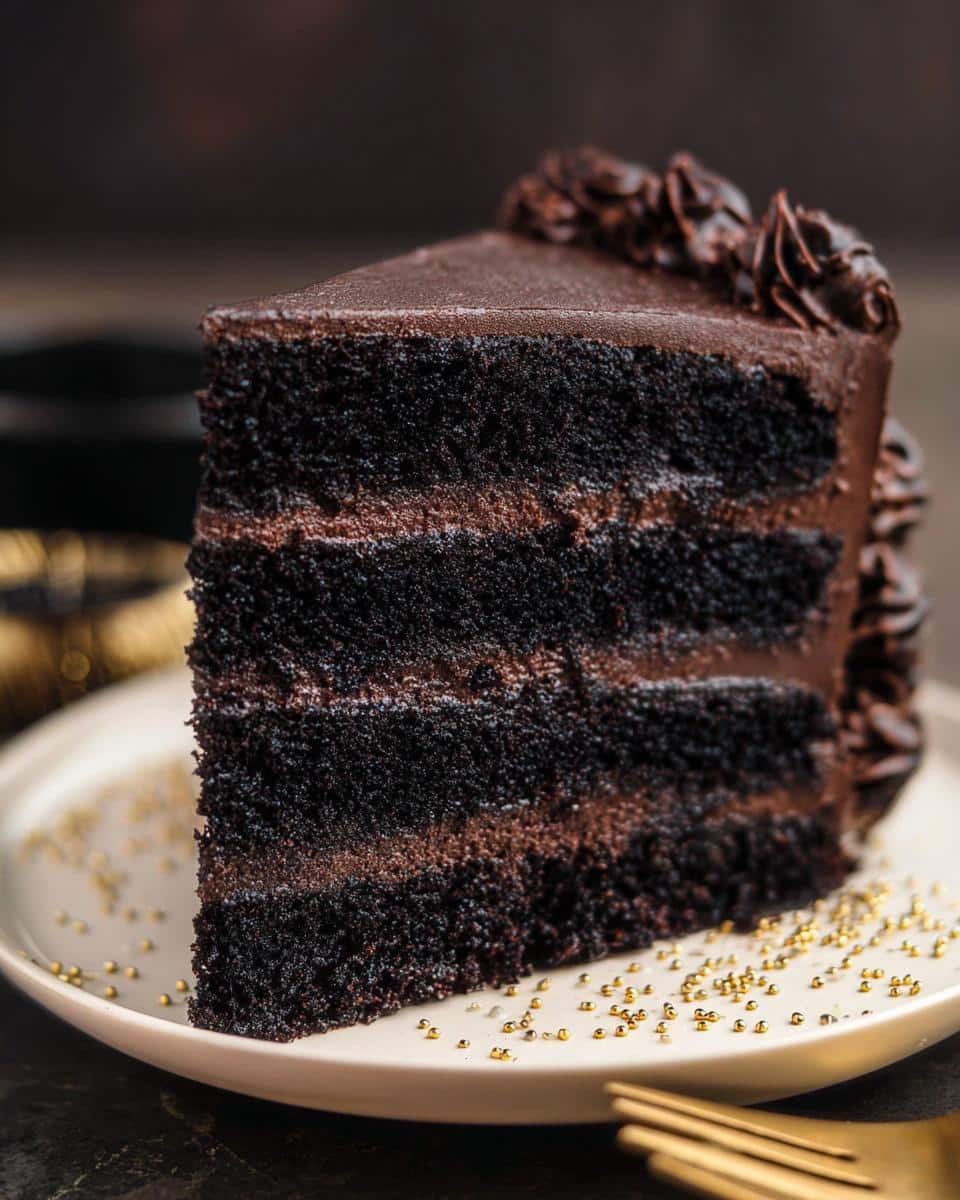
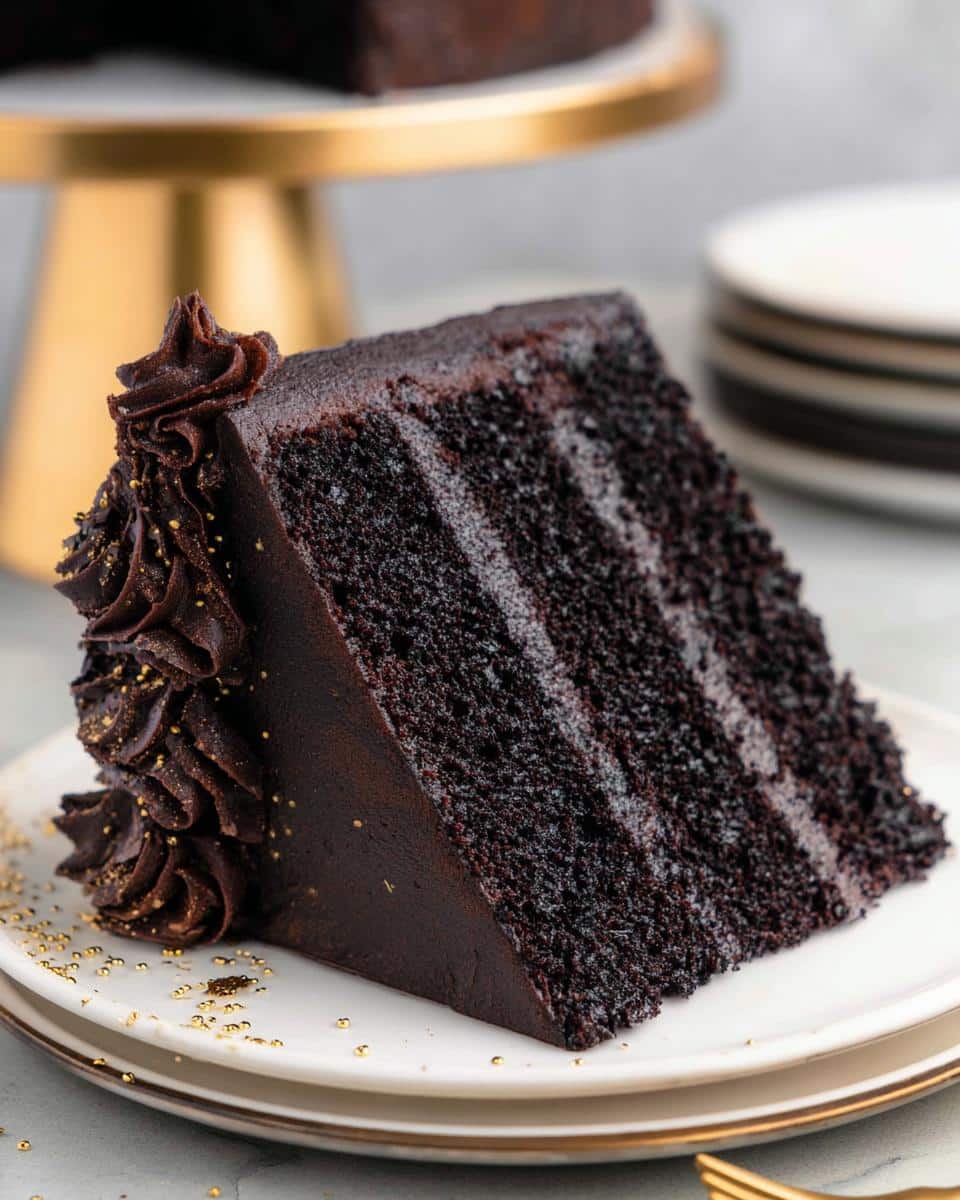
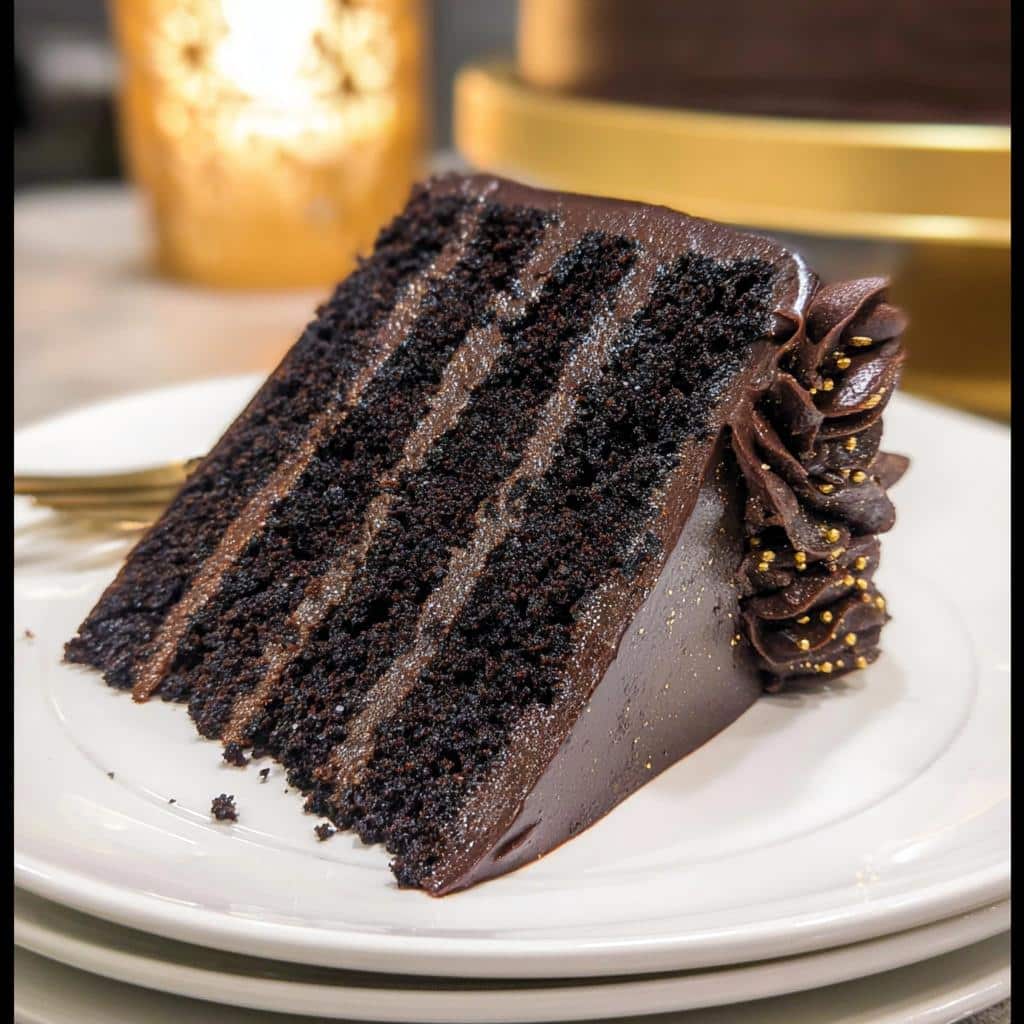
If you’re anything like me, you crave desserts that make a statement. I’m talking about that moment when a cake hits the table and everyone just stops to look at it. That’s exactly what we achieve with this recipe: an intensely colored, rich Black Velvet Cake Design that is surprisingly simple to execute, even if you feel nervous about using highly pigmented ingredients.
As a dietitian who loves letting flavor lead the way, I’m honestly obsessed with black cocoa powder. It gives you this incredible, dramatic look for your modern chocolate cake without the bitterness you might expect. Forget needing complicated piping for a showstopper; this Black Cocoa Cake Design relies on deep, uniform color for its impact. Trust me, this rich, dark chocolate cake is easier than you think, and it tastes heavenly!
Why This Black Cocoa Cake Design Delivers Visual Impact
Okay, so let’s talk about the star of the show: black cocoa powder. People often mistake it for regular Dutch-processed cocoa, but it’s totally different! Black cocoa is highly alkalized—that’s the food science secret—which strips away almost all the natural acidity you find in standard cocoa. That’s why this modern chocolate cake gets that unbelievably deep, almost purple-black hue without needing gallons of black food dye.
Using it means your cake layers look dramatic, but the flavor stays focused on pure, rich chocolate—it’s less acidic than anything else out there. This intentional use of black cocoa is what elevates this recipe. It’s for bakers who want that visual punch but refuse to compromise on a sophisticated flavor profile. It just screams *intentional baking*!
Flavor Profile: Richness Without Bitterness
Because that acidity is gone, the resulting flavor is incredibly smooth. We aren’t masking it with too much sugar here; instead, the intensity of the cocoa shines. My philosophy is always about balancing richness, and the small amount of espresso we use really deepens that natural chocolate note. You get that gorgeous aesthetic from the color, but the taste remains perfectly balanced—rich, deep, and never overly sweet. It’s chocolate perfection, honestly!
Gathering Ingredients for Your Black Cocoa Cake Design
Okay, before we get swept up in the drama of that dark color, we have to talk about getting our ducks in a row. This recipe relies on achieving that tender crumb, so precision is everything here. You must make sure your butter, eggs, and buttermilk are sitting out! Seriously, room temperature is non-negotiable for the best texture when we start mixing. We’re making two separate parts: the actual cake layers and that decadent frosting, so let’s get organized.
For the Black Velvet Cake Layers
For the layers, you’ll need your flour, sugar, salt, baking powder, and baking soda, whisked really well to combine those dry things first. The special part involves dissolving your espresso powder right into hot water—that’s called blooming the flavor! Then, we mix in the buttermilk, oil, eggs, and vanilla before bringing it all together with the dry ingredients. Remember, you absolutely need that specific black cocoa powder here; it’s the magic ingredient doing the heavy lifting for the color!
For the Black Dark Chocolate Buttercream Frosting
The frosting is pure indulgence. Make sure you start with those two full cups of unsalted butter; it has to be soft, like really soft, but not greasy. We incorporate the black cocoa powder and salt, then whip in the powdered sugar slowly. The liquid element here is important: heavy whipping cream lends a silky mouthfeel that regular milk just can’t achieve. And here’s the payoff: we finally fold in that melted dark chocolate—but be sure it’s cooled down a bit, or you’ll melt all the air right out of your butter!
Step-by-Step Instructions for the Black Cocoa Cake Design
Alright, let’s transform these ingredients into that show-stopping dramatic cake design! Timing is key here. We bake first, then make the frosting while the layers cool, and finish with assembly. Don’t worry about the thinness of the batter; that’s the secret to a tender cake!
Baking the Dark, Tender Cake Layers
First things first: get your oven preheated to 350°F (175°C) and properly prep those pans—I usually grease and line mine with parchment circles just in case. Combine all your dry ingredients, whisking them until they look uniform. In a separate bowl, dissolve that espresso into the hot water—smell that chocolate aroma starting already? Then, gently combine the wet mix into the dry mix until just combined. Don’t over-mix, please! Pour that thin batter evenly into your prepared pans—if you have a scale, use it to weigh the batter into each pan for perfectly level layers. Bake them for about 24 to 27 minutes. You know they’re ready when a toothpick comes out with just moist crumbs attached. Let them chill in the pans briefly before turning them out onto racks.
Creating the Rich Black Cake Frosting
While those layers are chilling down, we’re tackling that amazing black cake frosting. Start by beating your room-temperature butter until it’s light and fluffy—it needs air in it! On low speed, mix in the black cocoa powder and salt. Then, gradually add your powdered sugar, alternating with the heavy cream. This keeps the mixer from tossing clouds of sugar everywhere! Once it’s coming together, slowly pour in that melted, cooled dark chocolate—make absolutely sure it’s not hot! Mix until smooth. If you want that true, non-negotiable black shade for your modern chocolate cake, this is when you mix in a few drops of black gel food coloring.
Assembling Your Dramatic Black Cocoa Cake Design
This is where we get those sharp edges associated with high-end cakes! First, level your layers if they domed a bit—a serrated knife works best. Smear a tiny bit of frosting onto your cake board to anchor the first layer. Stack and fill each layer with a generous amount of frosting. Now, the crucial step: the crumb coat. Cover the entire cake—top and sides—with a super thin layer of frosting. This traps all those pesky loose crumbs. Chill that coated cake for about 30 minutes until that first layer is firm to the touch. Then pull it out and apply your final, thicker coat. Use a bench scraper held straight up and down while gently spinning the cake stand; this technique gives you those incredibly smooth, sharp sides that designers love!
Tips for Achieving the Perfect Black Cocoa Cake Design
I know working with intense color and delicate structure can feel a bit scary, but don’t you worry! The key to success with this dramatic cake is managing temperature and mixing just enough. If your layers end up a bit crumbly—which can happen with very dark cakes—it usually means one thing: the batter was too dry or you over-mixed it. Remember, that thin batter is your friend for tenderness!
Also, if your frosting seems crumbly when you try to do that final smooth coat, stick it back in the fridge for 15 minutes. Sometimes the butter gets too warm when you handle it too much. For the deepest black color, rely on the black cocoa powder first, but a tiny touch of quality black gel coloring mixed into the final coat (as I mentioned earlier) will ensure you get that signature stark contrast you see in those professional photos. Check out my disclaimer page if you ever have questions about ingredient substitutions!
Troubleshooting Common Issues
If your cake layers seem to be cracking after cooling, it often means you packed the dry ingredients too tightly into the measuring cup. Next time, spoon your flour and cocoa into the cup and level it off, or better yet, use that kitchen scale—precision is flavor insurance!
For frosting that won’t smooth, try adding half a tablespoon of heavy cream at a time. If your frosting cracks under pressure, it means the butter has seized slightly; just let it sit at room temperature for 10 minutes and give it a quick whip on low speed one more time. Quick fixes like these remind us that baking is all about being adaptable!
Creative Birthday Cakes: Decorating Ideas for Your Black Cocoa Cake Design
Now that you have this intensely gorgeous, dark canvas, the decorating part can actually be the simplest! Because the black cocoa cake design is so naturally dramatic, you don’t need a ton of fussy piping work to make it a showstopper. Think clean lines and bold contrasts for the ultimate impact. This style is perfect for those who love *Pretty Birthday Cakes* but want something ultra-modern instead of overly sweet.
I always lean into minimalism here. A super-smooth coat of that black buttercream, maybe just adorned with a few gold-leaf flakes or some striking crushed pistachios around the base, makes it look like it came straight from a fancy bakery. It’s high drama with low effort, which is exactly what I love in my Creative Birthday Cakes!
Simple Birthday Cake Designs Using Minimal Frosting
If you’re looking for *Cute Simple Cakes* that require almost no extra tools besides your bench scraper, aim for that perfectly smooth finish we talked about with the crumb coat. You don’t even *need* to pipe borders! For *Simple Birthday Cake Designs*, try keeping the sides completely bare, letting the sharp edge of the cake talk for itself. Another great tip for beginners wanting *Easy Birthday Cake Ideas* is the “single-color landscape.” Just swirl the top frosting lightly with the back of a spoon—no tips needed! This creates beautiful texture while keeping everything monochromatic and sleek. It looks intentional, elegant, and fits perfectly into the *Minimalist Bday Cake* trend.
Storage and Reheating Instructions for Your Dark Chocolate Cake Design
This cake is so rich it actually keeps really well! Since the buttercream has a lot of butter, if your kitchen is cool (under 70°F), you can keep the whole thing covered on the counter for up to two days. However, if it’s warm, wrap slices tightly in plastic wrap and keep them in the fridge. Before serving that refrigerated slice, let it sit out for about 30 minutes so that gorgeous *black cake frosting* softens up again.
Don’t throw out slices! If you want to serve a slice warm—and wow, it’s decadent that way—wrap it tightly in a damp paper towel and microwave it for just 10 to 15 seconds. It makes the chocolate flavor absolutely sing!
Serving Suggestions to Complement the Black Cocoa Cake Design
Because this cake is so intensely chocolatey, it pairs beautifully with things that give it a little bright counterpoint. Honestly, my favorite way to serve it is alongside fresh raspberries or tart cherries. Their acidity cuts right through the richness of the buttercream perfectly. If you’re making this for a grown-up gathering, a drizzle of slightly tart raspberry sauce over the slice is just divine!
And, of course, you cannot go wrong with coffee. A rich, dark roast—maybe a double espresso like the kind we put in the batter!—is the ultimate beverage partner for this deep chocolate experience. It just elevates everything. If you need to reach out with ideas or suggestions, you can always find my contact info right here!
Frequently Asked Questions About Black Cocoa Cake Design
I always get questions when I share this recipe, usually centered around getting that perfect shade or keeping the layers moist enough for a tall stack. Don’t stress about the dramatic look; you’ve got the tools now to make it happen!
Can I make this a Minimalist Bday Cake without using black food coloring?
That’s a great question, especially if you prefer very clean ingredient lists for your Minimalist Bday Cake. The honest answer is yes, but it won’t be truly *black*. The natural black cocoa powder makes the cake an incredibly deep, dark, almost charcoal brown—it’s stunning on its own! If you skip the gel coloring, you’ll have a gorgeous, refined dark chocolate cake, but it won’t have that shocking, ink-black finish that pops in photos.
What are the best Easy Cake Decorating Ideas for beginners?
If you’re aiming for *Easy Birthday Cake Ideas* but want that professional look, skip the complex piping! My favorite beginner technique for this cake is the “textured smooth.” After your final coat of frosting, use a bench scraper or the back of a spoon to create large, soft swoops across the top. That gives texture without needing a special tip. Another great hack for *Simple Birthday Cake Designs* is focusing decoration only at the bottom edge. You can press crushed Oreos or some metallic sprinkles right around the base for an instant visual frame. It looks incredibly polished but requires almost no precision on the flat sides!
Share Your Black Cocoa Cake Design Creations
I’ve handed over all my secrets for achieving that stunning, modern look with this deeply satisfying Black Cocoa Cake Design. Now it’s your turn to get in the kitchen and make some magic happen!
I truly love seeing how you take this foundation and run with it—whether you keep it perfectly minimalist or add bright, colorful accents. Please, if you try this recipe out, come back and leave a rating! Your feedback helps me know exactly what’s working or what you need more clarity on.
When you post photos of your finished dark chocolate masterpieces on social media, please tag us! Seeing your incredible results always makes my day and inspires the next round of bold baking experiments. If you have any policies questions regarding sharing or linking, check out our policy page here!
Black Velvet Cake Design
Ingredients
Equipment
Method
- Preheat the oven to 350 F/ 175 C. Line and grease three 8-inch cake pans, or four 7-inch pans.
- Combine 2 cups all-purpose flour, 2 cups sugar, 3/4 cup black cocoa powder, 2 tsp baking powder, 1 1/2 tsp baking soda, and 1 tsp salt in a large bowl. Whisk together until combined.
- Add 1 cup of hot water and 2 tsp instant espresso or coffee in a separate, medium-sized bowl. Stir until dissolved.
- Add 1 cup buttermilk, 1/2 cup oil, 2 eggs, and 2 tsp vanilla extract to the instant espresso mixture. Stir briefly to combine the ingredients.
- Pour the wet ingredients into the dry ingredients. Mix by hand until fully incorporated. The batter will be thin.
- Divide the batter evenly between the cake pans, and bake for about 24 to 27 minutes. Weigh the pans with a kitchen scale to ensure each pan has the same amount of batter for even layers.
- Remove the cake layers from the oven and let them cool in the pans for about 10 minutes. Run an offset spatula around the rim of the cake pans to loosen them, then flip them onto wire racks to finish cooling.
- Once cooled, use a serrated knife to level the top of each cake layer. If you make these ahead, wrap and freeze them at this point.
- Beat 2 cups of unsalted butter on medium speed for 30 seconds with a paddle attachment until smooth.
- Add 1 cup black cocoa powder, 1 tsp vanilla extract, and 1/2 tsp fine salt. Mix on low until the ingredients are fully incorporated.
- Slowly mix in 5 cups of powdered sugar. Halfway through, add in 2/3 cup of heavy cream to make the frosting easier to mix.
- Mix in 1 1/3 cups of melted and cooled dark chocolate on a low speed. Let the chocolate sit for about 10 minutes after melting it; it should be liquid but not hot. Mix until the ingredients are fully incorporated and the desired consistency is reached. Scrape the sides and bottom of the bowl as needed.
- If you want a darker black shade, mix in black gel food coloring. Cover with plastic wrap to prevent crusting and set aside.
- Stack and frost cake layers on a greaseproof cake board, using a small amount of frosting to secure the first cake layer to the board.
- Add an even layer of buttercream between each cake layer using a large offset spatula.
- Spread a thin coat of frosting around the cake, fully covering the layers. Smooth using a bench scraper, then chill the cake in the fridge (30 minutes) or freezer (10 minutes) until the frosting is firm.
- Add a second, thicker layer of frosting to the cake and smooth using a bench scraper. Decorate as desired and serve.