
There is just something so honest and satisfying about food you can actually tear into with your hands, isn’t there? That’s why pull-apart bread holds such a special spot in my heart; it’s the ultimate shareable comfort food, meant for gathering close. You don’t need fancy skills to make this happen! This recipe for Cheesy Garlic Pull-Apart Bread skips the big fuss but delivers on pure, indulgent flavor. Pull-apart bread reminds me of my family kitchen—it was never about perfectly plated dishes, but about who was showing up at the table. I vividly remember brushing warm bread with garlic butter, knowing everyone would dive in immediately. That’s the magic of finger foods like this—they invite connection. It’s comforting, generous, and always the first thing to disappear, trust me, it’s an invitation to slow down and just enjoy the moment together. For me, learning about home cooking really started when I began exploring my roots, which you can definitely read more about on the About Page if you’re interested in my culinary journey!
Why This Cheesy Garlic Pull-Apart Bread is Your New Favorite Party Snack
Honestly, I make this any chance I get because it’s the kind of dish that makes people instantly happy. You barely have to touch it, and bam—instant success! It’s pure crowd-pleasing magic using just a handful of simple things from the pantry and freezer. It hits all the right notes for anyone looking for satisfying Easy Snack Recipes.
- Incredibly shareable—eating is truly hands-on, which just feels more fun.
- Huge flavor payoff; that garlic butter sinks into every pocket!
- It looks way more complicated than it actually is.
- Perfect for game days, movie nights, or when unexpected guests drop by.
Quick Appetizers Ready in Under 40 Minutes
You have got to love recipes that don’t keep you chained to the oven, right? Our total time here is just 35 minutes, mostly hands-off baking time. This means you can decide you need amazing Quick Appetizers while the guests are walking up the driveway. Just thaw the dough overnight, and you’re basically set for success!
Essential Cheesy Garlic Pull-Apart Bread Ingredients
I always say, you don’t need a massive shopping list to create truly unforgettable food. This recipe proves it—it’s all about combining a few wonderfully humble components until they become something magnificent. The biggest time-saver, which I absolutely rely on for these kinds of Easy Snack Recipes, is starting with quality thawed frozen bread dough. No kneading required! This lets us focus all our energy on packing in that garlicky, cheesy goodness. This dish embodies what I believe cooking should be about: taking familiar flavors and making them shine with minimal fuss.
Lilya Lawson is the Founder and Culinary Director of Top Chicken Eats. Based in Asheville, NC, she transforms classic Southern comfort food into fresh, globally inspired recipes—helping home cooks rediscover the joy of simple, soulful meals.
Ingredient Clarity for Perfect Cheesy Garlic Pull-Apart Bread
When you gather your things, make sure you have that one pound loaf of frozen bread dough completely thawed out overnight in the fridge; that softness is key for easy rolling. For the sauce, we’re melting down salted butter, then mixing it vigorously with the grated parmesan cheese, fresh minced garlic, and that little bit of parsley for color. Then comes the main event: we use a generous cup plus two tablespoons of shredded mozzarella cheese, but remember to divide it! You’ll spread most of it on the dough first, and save a bit to sprinkle on top right before it goes into the oven for that perfect, bubbly finish.
How To Make Cheesy Garlic Pull-Apart Bread Step-by-Step
Okay, let’s get baking! This is where the magic really starts to happen, and I promise it’s honestly so satisfying to watch this simple loaf transform. Remember that equipment we talked about? You’ll need your loaf pan—go ahead and grease that up first so nothing sticks when we pull it out later. And since you’ve wisely thawed that dough overnight, it should be perfectly pliable for rolling.
Preparing the Dough and Butter Mixture for Cheesy Garlic Pull-Apart Bread
First order of business: grab your thawed bread dough and set it onto a clean surface that you’ve lightly floured. We need to gently roll this out into a nice big rectangle, aim for about 12 inches by 15 inches. Don’t get stressed if it’s not perfect; the cheese will hide any wobbly edges! While you’re doing that, grab your small bowl. This is for our garlic butter—whisk together that melted salted butter, the grated parmesan, your minced garlic, and the parsley until it looks wonderfully fragrant. This mixture is the soul of the bread, so make sure that garlic is well distributed!
Layering and Cutting for Optimal Cheesy Garlic Pull-Apart Bread
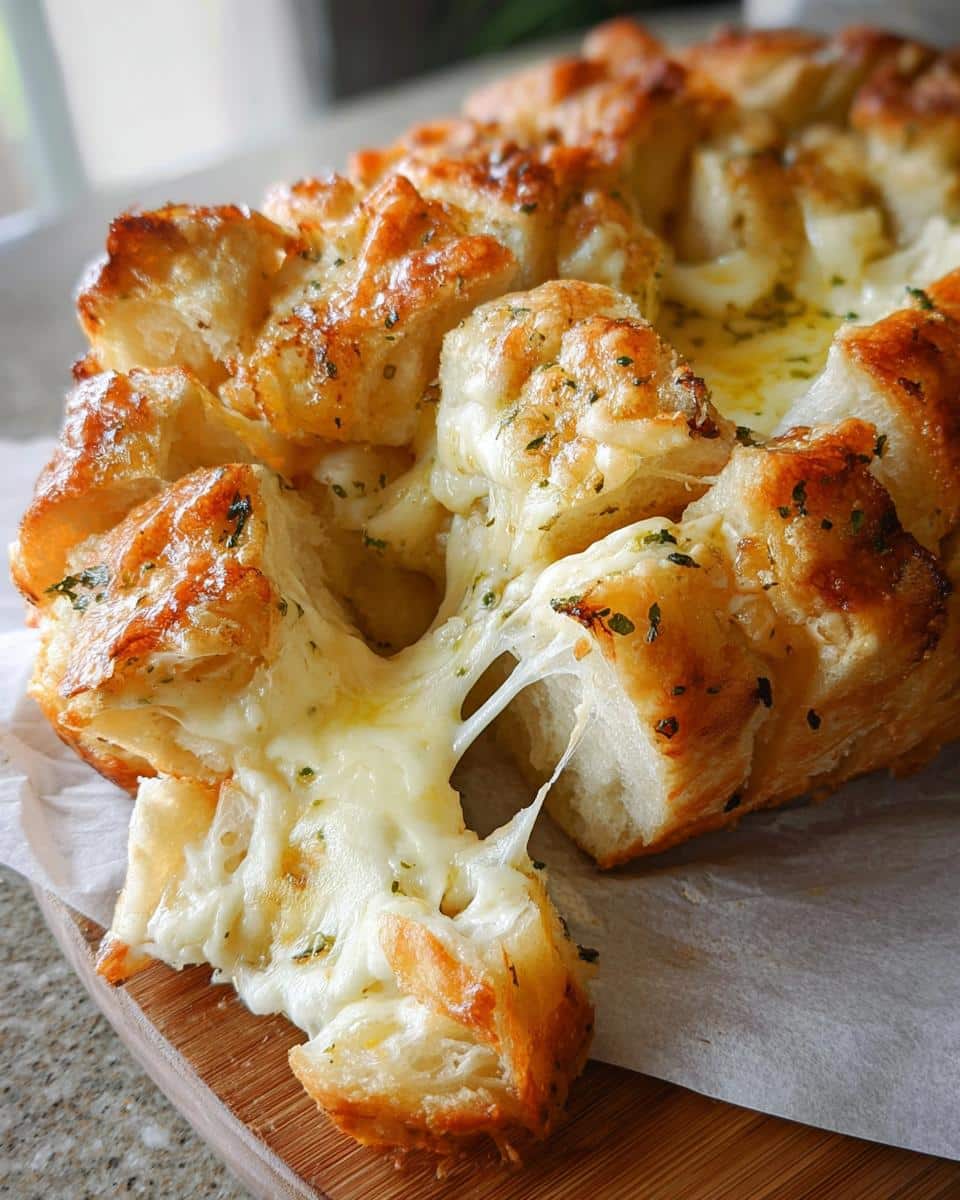
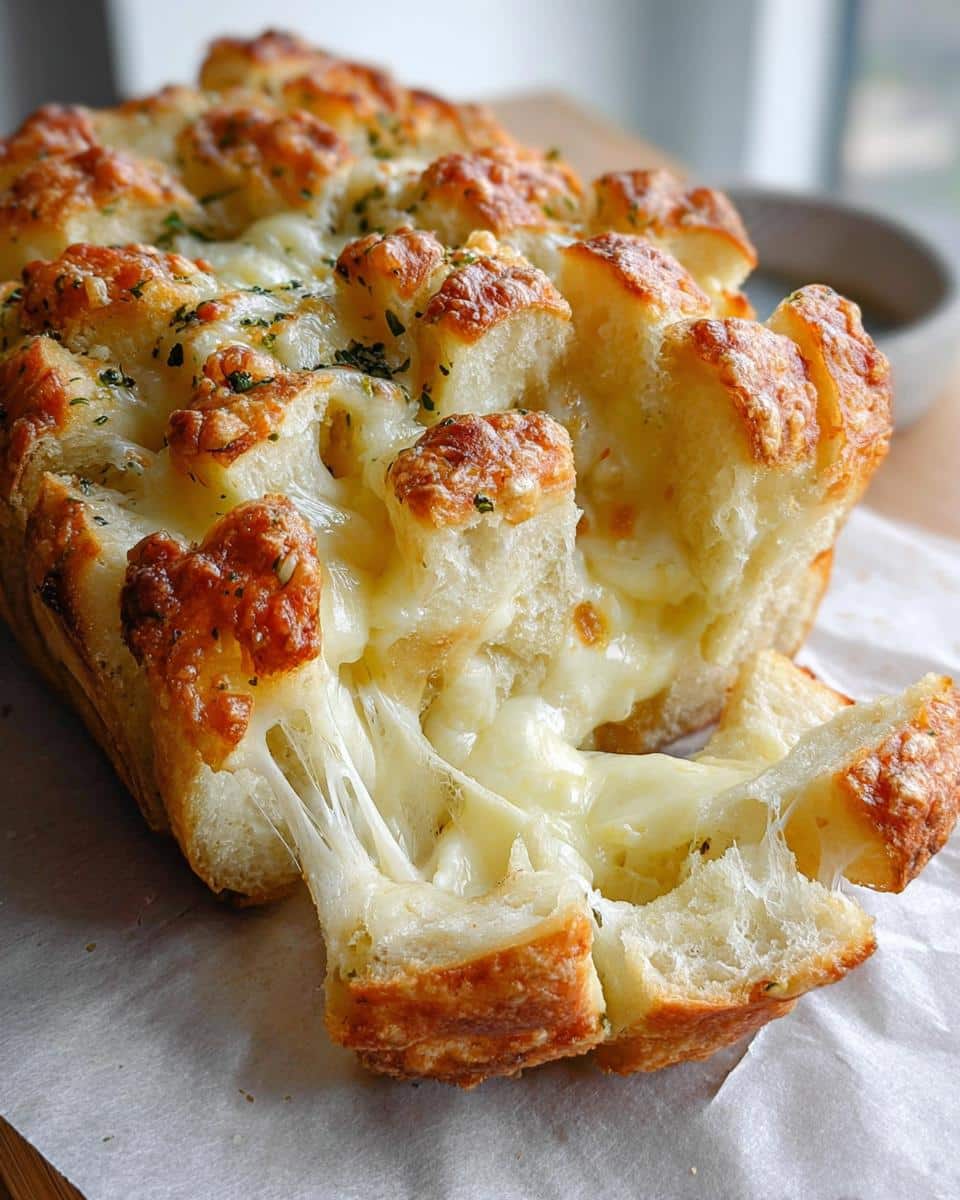
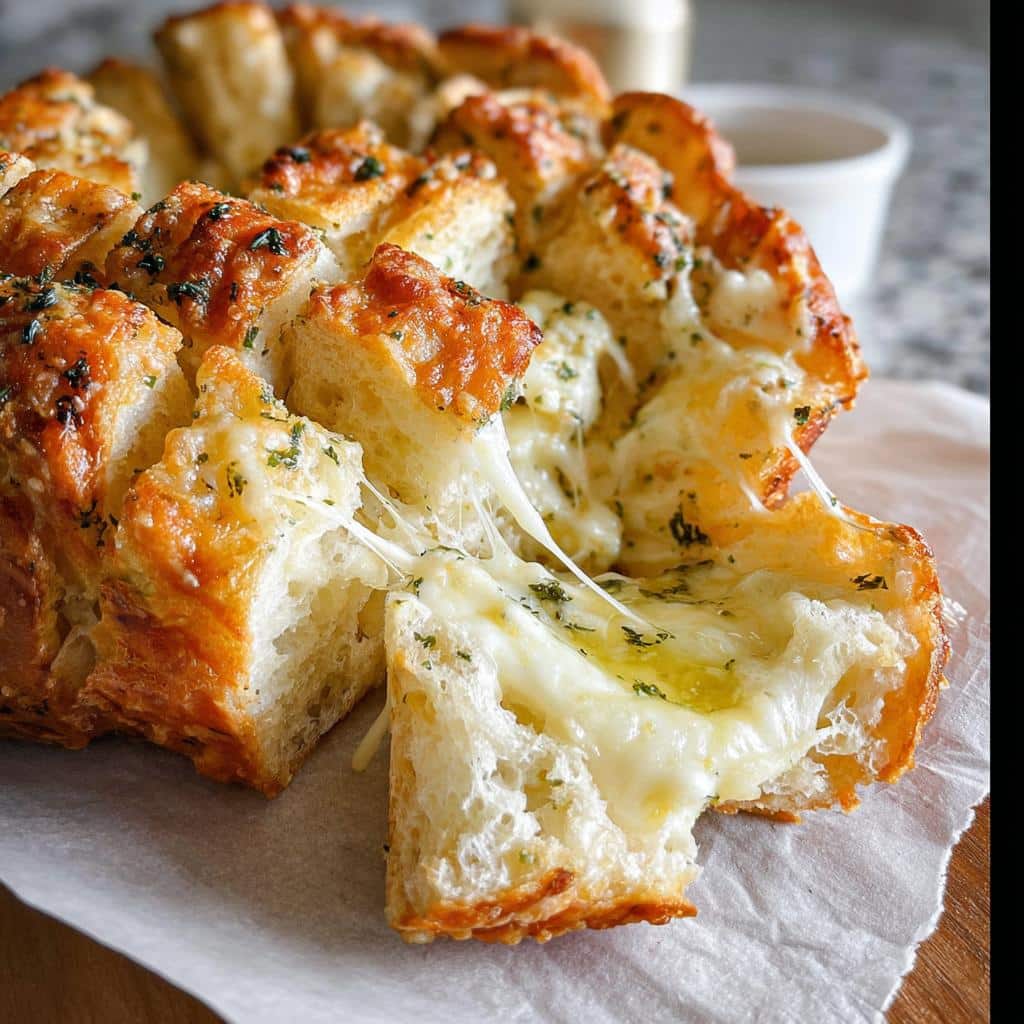
Now, take that gorgeous butter mixture and spread it evenly, right to the edges, over the surface of your dough. Once it’s coated, sprinkle on that big helping of mozzarella cheese. This is where the ‘pull-apart’ part gets serious! Using a pizza cutter—which is seriously the best tool for this job since it won’t drag the dough—we’re going to cut the whole thing into squares. Don’t reach for a knife here; the cutter gives you cleaner divisions. I cut it into 3 neat columns, which should be about 4 inches wide each. Then, turn the dough and cut it into 5 rows, making those pieces about 3 inches tall. You’ll end up with little stackable brick shapes. Layer these pieces right into your prepared loaf pan, making sure they are tucked in nicely and ready for the oven. You’ll be able to find more Easy Snack Recipes that are this fun later on!

Tips for Success When Baking Cheesy Garlic Pull-Apart Bread
Even though this recipe is super forgiving—which I love, by the way—a couple of little tricks can take this bread from great to absolutely unforgettable. When you’re dealing with layers of dough, butter, and cheese, a little patience in the oven makes all the difference between gooey perfection and a doughy center. Don’t rush the process!
First, make sure your oven temperature is spot on. Since we are relying on yeast from the thawed dough, a steady, consistent heat is crucial. If your oven runs hot, you might want to drop that temperature down by about 15 degrees Fahrenheit and let it bake for an extra 3 to 5 minutes. This ensures the center cooks through before the outside browns too much. You don’t want any undercooked pockets!
Second, don’t skimp on the cheese distribution during the assembly phase. When you are layering those cut pieces into the loaf pan, try to alternate cheese-up and cheese-down on the layers. If you just dump it all on top, the bottom layers end up a bit dry. By staggering the cheese, you guarantee that glorious melt oozes down between the squares. Think of it like creating little cheese bridges inside the bread—it’s worth the extra second of layering!
My third important tip is about that initial baking phase. I usually cover the loaf pan loosely with aluminum foil during the first 12 minutes. This traps the steam and helps the bread puff up nicely without the top setting too fast. Once you take that foil off halfway through, you can sprinkle on those extra two tablespoons of reserved mozzarella. When you finish baking uncovered, you get that beautiful golden-brown crust that looks so tempting. If you’re looking for other great baked goods that are simple yet impressive, check out some of my homemade pizza recipes—they share a similar technique for building layers!
Storage and Reheating Instructions for Leftover Cheesy Garlic Pull-Apart Bread
Now, granted, this bread never lasts long enough in our house to need saving, but if you miraculously have some left over, we need to treat it kindly so it stays soft! You want to store any leftovers in a completely airtight container at room temperature. Resist the urge to pop it right into the fridge; that just speeds up drying it out. When you’re ready to enjoy it again, skip the microwave! Microwaving bread just turns it rubbery, and we absolutely want to avoid rubbery Bite Size Appetizers.
The best way to bring this back to life is in the oven. Wrap the pieces loosely in foil—this helps trap any lingering moisture—and heat it at about 300 degrees Fahrenheit for about 8 to 10 minutes. When you pull it out, the cheese will melt right back into the bread, and it’ll taste almost exactly like it just came out of the oven the first time. It’s worth the extra five minutes!
Ingredient Spotlight: Choosing the Right Cheese for Snack Ideas
When we talk about making incredible Snack Ideas, the cheese selection is honestly half the battle won. Think about mozzarella for a moment—why do I call for it specifically? It’s all about that glorious stretch! Mozzarella has a lower fat content than some other cheeses, which means when it heats up, it melts beautifully and stays wonderfully stringy, giving you that signature pull when you tear off a piece. That visual appeal is just as important as the taste, especially for fun party food.
But I’m a firm believer that variety makes everything better, even in simple comfort foods. If you want to try shaking things up for your next batch of Bite Size Appetizers, I highly recommend swapping out maybe half of the mozzarella for Monterey Jack cheese. Monterey Jack is so creamy, and it melts down into a beautiful, buttery sauce that blends right into that garlic butter mixture. It keeps everything incredibly moist, which is exactly where we want to be.

You could also explore a young cheddar if you want a bit more tang, but if you go too sharp, you risk it getting a little oily when it melts. For this recipe, we want supreme meltability! Playing around with cheese is one of the fun parts, and I encourage you to experiment responsibly when you’re developing your own favorite version of this bread. If you ever dive into making holiday treats, you can see how I approach swapping ingredients in my spiced cookie recipes too!
Frequently Asked Questions About Cheesy Garlic Pull-Apart Bread
I always get questions after people make this bread for the first time because they realize how easy it was! Here are some of the things I hear most often about transforming basic dough into the best Easy Snack Recipes for game day. Before we dive into the questions, just a reminder to always check our site policies; you can read all about our Terms of Use whenever you need to!
Can I use fresh bread instead of frozen dough for this Finger Foods recipe?
Oh, absolutely you can! If you have a soft, pre-baked loaf lying around—maybe a nice Italian loaf or a soft French bread—that works perfectly well. The main thing you need to adjust is the cutting. Since the dough we use is raw, it expands and cooks up light and airy. If you use a pre-baked loaf, you’ll need to cut it deep into that checkerboard pattern before you even start brushing with butter, making sure you cut almost all the way through to the bottom crust without separating the base. This lets that garlicky butter mixture sink down in there and flavor every single piece. Just watch the baking time closely because a pre-baked loaf won’t take as long to heat through as raw dough.
What makes this recipe ideal for Party Snacks?
Honestly, it’s the hands-on factor! When you set this glorious, cheesy loaf on the table, people just naturally gravitate toward it. It requires zero plates, zero forks—you just grab a piece and go. That makes cleanup a dream, which every host appreciates, right? Plus, the flavor profile—garlic, butter, and tons of melted mozzarella—is universally loved. It’s a low-effort, high-reward choice when you’re serving a crowd and need foolproof Party Snacks that everyone digs into right away. It feels indulgent, but it takes maybe 15 minutes of actual work!
My bread didn’t get very brown on top, what did I miss?
That’s usually an issue with the oven spring or not reserving enough cheese for the top layer. Remember how I always stress reserving those last two tablespoons of mozzarella? Make sure you sprinkle them on right after you take the foil off halfway through baking. That exposed cheese directly under the heat is what gives you that beautiful, bubbling, golden-brown crust. If you cover it totally until the end, the steam keeps the top moist, but it won’t brown up nicely. Next time, make sure the top cheese layer is exposed for the final bake time!
Can I make the garlic butter mixture ahead of time?
Yes, you totally can! I often prepare the butter mixture—the butter, parmesan, garlic, and parsley—the night before. Just keep it covered in the fridge. The one minor thing to watch out for is that hardens up like a rock once it chills due to the butter. So, when you’re ready to assemble, you have to let that butter soften up to room temperature for at least 30 minutes. If you try to spread rock-hard garlic butter onto the dough, you’ll end up tearing holes in your beautiful rectangle. Patience while it warms up is key for easy assembly!
Estimated Nutritional Data for This Bite Size Appetizers Recipe
Now, I’m going to be honest with you; my kitchen philosophy centers around flavor and comfort, not calculating every single calorie! When we are making something as wonderful and shareable as this Cheesy Garlic Pull-Apart Bread, detailed macro counts often take a backseat to how much joy the food brings. This recipe is pure indulgence, and treating yourself is part of the whole comfort equation, if you ask me!
However, because I always want you to have all the facts for your planning—especially if you are tracking things or making certain Bite Size Appetizers for a specific crowd—I always include the estimated nutritional breakdown based on the ingredients listed above. Keep in mind this is just an estimate using standard ingredient database calculations, and your final numbers might shift slightly depending on the exact brand of frozen dough or cheese you use!
For one serving (based on the recipe making 1 loaf with the assumption of 8 generous pull-apart servings), the rough estimates look something like this:
- Calories: Approximately 350-400 kcal
- Total Fat: High, usually around 18-22g (Hello, butter and cheese!)
- Carbohydrates: Around 35-40g (Mostly from the bread dough)
- Protein: About 10-12g
This is definitely a rich appetizer, and that’s okay! It’s bread, butter, and cheese—it’s designed to be satisfying. Remember, this chart is just a guideline. The real measurement here is how many smiles you get when you pass the pan around the table!
Share Your Cheesy Garlic Pull-Apart Bread Creations
Now that you’ve baked up this beautifully gooey, cheesy, garlicky goodness, I genuinely want to see it! The reason I love sharing these recipes is because I get to see how they show up in *your* kitchens and at *your* tables. This bread is meant for gathering, and nothing makes me happier than knowing my recipe helped bring a little joy to your gathering, whether it was just you and the family or a big group of friends enjoying some perfect Finger Foods.
When you finish getting these little pockets of heaven out of the oven, please don’t forget to come back here and leave a rating! Five stars lets me know I hit that comfort food sweet spot for you. And if you have any little tweaks you tried—maybe you added bacon bits, or perhaps you used smoked mozzarella—tell us all about it in the comments below! I read every single one, and your feedback helps the whole community learn and grow together.
And oh, sharing photos is my absolute favorite thing. If you post pictures of your finished Cheesy Garlic Pull-Apart Bread on Instagram or Pinterest, tag me! I try to share as many of your amazing creations to my stories as I possibly can. It’s about keeping that warm, communal vibe going, just like in my family kitchen. So, snap a picture of that cheesy pull, tag me, and let’s celebrate simple, soulful cooking together! If you ever need to reach out with a specific question about the recipe or anything else, don’t hesitate to visit the Contact Us page!
Cheesy Garlic Pull-Apart Bread
Ingredients
Equipment
Method
- Grease a loaf pan and set it aside.
- Place the thawed bread dough on a lightly floured surface and roll it out to a 12×15 inch rectangle.
- In a small bowl, mix together the melted butter, parmesan cheese, garlic, and parsley.
- Spread the butter mixture evenly over the dough.
- Sprinkle the mozzarella cheese on top of the butter mixture.
- Use a pizza cutter to cut the dough into 3 columns (about 4 inches wide) and 5 rows (about 3 inches tall).